- Products

- Developers
- User stories
- Blog
- Pricing

How to Add Message History to your Pusher Apps

In this tutorial, I will cover how to create a solution to retrieve a message history and how to retrieve messages missed during periods of network instability.
Introduction
In this tutorial, I will cover how to create a solution to retrieve a message history and how to retrieve messages missed during periods of network instability.
Pusher makes it really easy to add real-time data and functionality to web, mobile and IoT apps. For use cases such as notifications and signalling, that data can be transient, where the data is only relevant for a short period of time. In other cases, such as activity streams or chat, data may need to be persisted and historical data is as important as the data delivered via real-time updates.
The events the Pusher libraries expose make this process easy to follow and provide a lot of flexibility when integrating with your persistence mechanism of choice.
Getting Started
For this tutorial I’m not going to create an application from scratch. Instead we’re going to start with a chat application built using React and Python for a previous tutorial. If you’d like to start from scratch you can do so by first reading the real-time chat with React and Pusher tutorial.
Assuming you’re not starting from scratch, you can get the starting code for this tutorial by running the following on your command line:
1git clone git@github.com:pusher-community/react-realtime-chat.git 2cd react-realtime-chat 3git checkout message-history 4git reset --hard be4b1f84235e7e5303a54ad6e5dd548b0f385184 5git checkout -b start
Finally, make sure you can run the application by following these steps in the README.
If you get stuck at any point you can always take a look at the source.
Message History
Being able to see a history of messages within a chat application provides context to the ongoing conversation. When you think about how you would add this functionality there are three choices that generally come to mind:
| Choice | Will it work? |
|---|---|
| 1. Generate static HTML for the existing messages on the server | No. Messages could be missed between the HTML being sent to the client and the subscription on the client taking place. |
| 2. Fetch data upon connection | No. The client hasn’t subscribed to the channel yet so any messages sent prior to the subscription could be missed. |
| 3. Fetch data upon successful subscription | Yep. This way you will get any new data via Pusher and can retrieve all historical data from your server. |
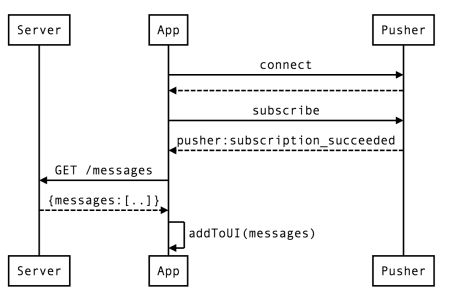
So, we’re going to fetch the historical messages from the server after we have successfully subscribed to the channel. The basic flow to achieve this is:
- The page loads
- Connect to Pusher
- Subscribe to the channel
- Bind to the
pusher:subscription_succeededevent on the channel - Bind to the
new_messageevent to be notified when any new chat messages arrive via Pusher - Upon successful subscription, retrieve the messages from the server
- Add the messages to the UI, ensuring that those messages are sorted and no duplicates exist from any messages that may have come in via Pusher during the retrieval
If you’re a visual person the following sequence diagram may help:
Retrieve Missed Messages Upon Subscription
Within the code for the React Chat application, open up static/javascripts/ui_components/MainView.jsx and update the componentDidMount function to bind to the pusher:subscription_succeeded event, passing in a reference to a retrieveHistory handler function:
1componentDidMount: function() { 2 3 this.pusher = new Pusher(PUSHER_CHAT_APP_KEY); 4 this.chatRoom = this.pusher.subscribe('messages'); 5 this.chatRoom.bind('pusher:subscription_succeeded', 6 this.retrieveHistory, this); 7 8 // existing code 9},
Next, define the retrieveHistory function. Within it we’ll make an AJAX call to retrieve the chat message history:
1retrieveHistory: function() { 2 var self = this; 3 $.get('/messages').success(function(response) { 4 // TODO: process response 5 console.log(response); 6 }); 7},
If you run the application now you’ll get a 405 (METHOD NOT ALLOWED) error logged to your JavaScript console due to the above request. This is because app.py only allows the /messages endpoint to respond to POST requests.
To resolve this we need to update the app.py to firstly save data to a database and then to respond to a GET request to the /messages endpoint by returning all existing chat messages.
If you started from the existing application you’ll already have a messages_repo.py that provides some of the database functionality we require. If you started from scratch you’ll need to download messages_repo.py and put it in the root of the application. Let’s include the class it defines into app.py and create a new instance:
1from messages_repo import MessagesRepo 2 3repo = MessagesRepo()
Now we can update the existing new_message function in app.py to save messages to the database.
1@app.route('/messages', methods=['POST']) 2def new_message(): 3 name, text = cgi.escape(request.form['name']), cgi.escape(request.form['text']) 4 5 message = repo.create(name, text) 6 7 try: 8 pusher.trigger('messages', 'new_message', message) 9 except Exception as e: 10 print("Error triggering the event via Pusher %s" % e) 11 12 return jsonify(message)
The repo.create function returns a message object with all the properties we need for the event payload we send to connected clients via Pusher.
Now that the messages are being stored we can respond to the currently unhandled GET /messages request with the existing messages. Add the following function to app.py:
1@app.route('/messages', methods=['GET']) 2def get_messages(): 3 messages = repo.get_all(); 4 return jsonify(messages)
Note: you may need to from flask import jsonify
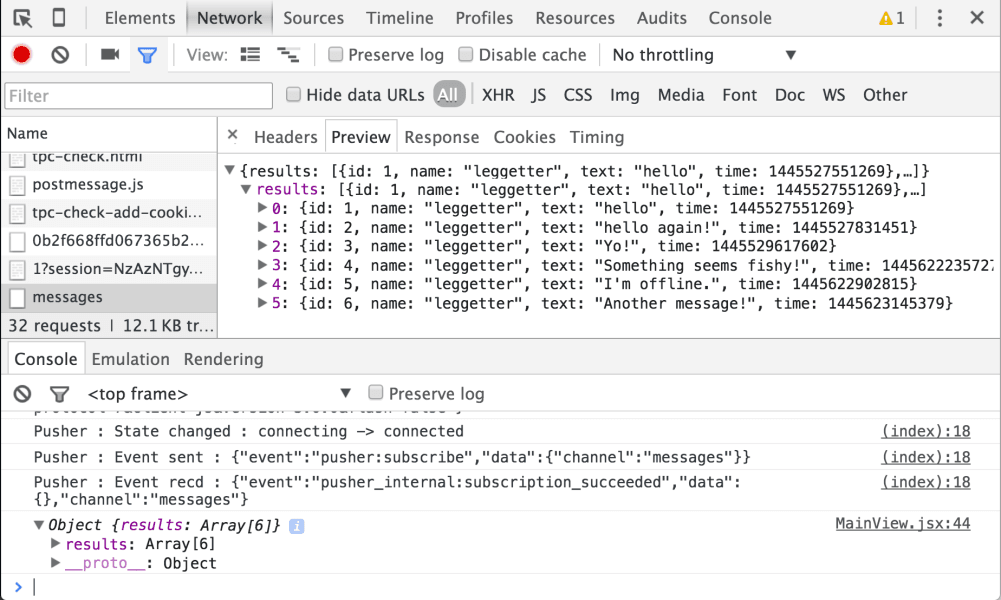
Running the web client should now result in a the expected log to the console.
Adding Historical Messages to the UI
Now that we’ve got the existing chat messages being returned to the client we need to show them in the UI.
Our application is now receiving chat messages in two places; from Pusher via an inline function bound to the new_message event and via the AJAX request to GET /messages. Let’s refactor the inline function so that it can be reused.
Firstly, extract the inline handler into a addMessage function:
1componentDidMount: function() { 2 3 this.chatRoom.bind('new_message', this.addMessage, this); 4 5 // existing code... 6}, 7 8addMessage: function(message){ 9 this.setState({messages: this.state.messages.concat(message)}) 10 11 $("#message-list").scrollTop($("#message-list")[0].scrollHeight); 12},
Then update the retrieveHistory function to make use of that function:
1retrieveHistory: function() { 2 var self = this; 3 $.get('/messages').success(function(response) { 4 response.results.forEach(self.addMessage, self); 5 }); 6},
response.results is an Array that we can loop over and make use of the new addMessage function to handle each individual historical message.
Running the front-end application will now retrieve the existing messages from the server in addition to showing real-time updates.
Handling Important Edge Cases
In addition to adding them to the UI, we need to check two things since we could receive a message from Pusher whilst the AJAX request is taking place:
- That duplicates don’t occur
- The ordering of messages in the UI is correct
We can easily avoid duplicates by checking the id property of each message and ensuring this value is unique within the collection of messages that we have:
1messageExists: function(message) { 2 var getId = function(e) { return e.id; }; 3 var ids = this.state.messages.map(getId); 4 return ids.indexOf(message.id) !== -1; 5}, 6 7addMessage: function(message) { 8 if(this.messageExists(message)) { 9 console.warn('Duplicate message detected'); 10 return; 11 } 12 13 this.setState({messages: this.state.messages.concat(message)}) 14 15 $("#message-list").scrollTop($("#message-list")[0].scrollHeight); 16},
In the code above we’ve created a messageExists helper function to make sure each message is unique. If a duplicate is detected we discard it.
To ensure the messages are in order we can use Array.sort within the addMessage function:
1addMessage: function(message) { 2 if(this.messageExists(message)) { 3 console.warn('Duplicate message detected'); 4 return; 5 } 6 7 var messages = this.state.messages.concat(message); 8 messages.sort(function(a, b) { 9 return (a.time > b.time); 10 }); 11 this.setState({messages: messages}) 12 13 $("#message-list").scrollTop($("#message-list")[0].scrollHeight); 14},
With these two changes in place we can make sure that we avoid duplicate messages and that the messages are always ordered correctly, from first to last in the UI.
Fetching Missed Messages Upon Reconnection
Sometimes a client will lose Internet connectivity. When that happens new chat messages won’t be able to be delivered to that client. So, it’s important to be able to retrieve any missed messages upon reconnection.
The Pusher JavaScript library does expose events that allow your application to monitor connectivity state. But, whilst it’s certainly valuable to use these events to provide the user with feedback about the connection state, to achieve the functionality we’re looking for we don’t actually need to use this. That’s because the Pusher library will automatically reconnect when possible and re-subscribe to the channels it was previously subscribed to. When these subscriptions succeed the pusher:subscription_succeeded event will be triggered and we’ve already got a function in place to handled that event.
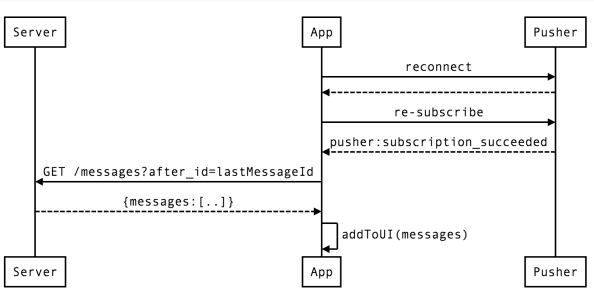
The steps for this are very similar to that of retrieving a history of messages upon page load:
- The library reconnects to Pusher
- The library re-subscribe to the channel
- When the
pusher:subscription_succeededevent is triggered, retrieve any missed messages from the server by passing the ID of the last received message - Add the messages to the UI, ensuring that those messages are sorted and no duplicates exist from any messages that may have come in via Pusher during the retrieval
The full sequence diagram looks as follows:
Right now the retrieveHistory function will fetch the entire message history. If we’ve already got a number of messages it’s more efficient to only retrieve messages that have been sent since the last one that we’ve got.
Let’s update the client to call the /messages endpoint and pass the id of the last message we’ve got:
1retrieveHistory: function() { 2 var self = this; 3 var lastMessage = this.state.messages[this.state.messages.length-1]; 4 var lastId = (lastMessage? lastMessage.id : 0); 5 $.get('/messages', {after_id: lastId}).success(function(response) { 6 response.results.forEach(self.addMessage, self); 7 }); 8},
To do this we’ll attempt to get the last message from the this.state.messages Array. If a message is found we’ll get the .id and pass that value to the /messages endpoint as a after_id query parameter e.g. /messages?after_id=5. If no messages is found we’re defaulting to sending 0, which will fetch all messages (that’s how this endpoint works, but yours might prefer the after_id parameter not to be sent at all).
Next we need to update the server to use the after_id value.
1@app.route('/messages', methods=['GET']) 2def get_messages(): 3 after_id = request.args.get('after_id', 0) 4 messages = repo.get_all(after_id); 5 return jsonify(messages)
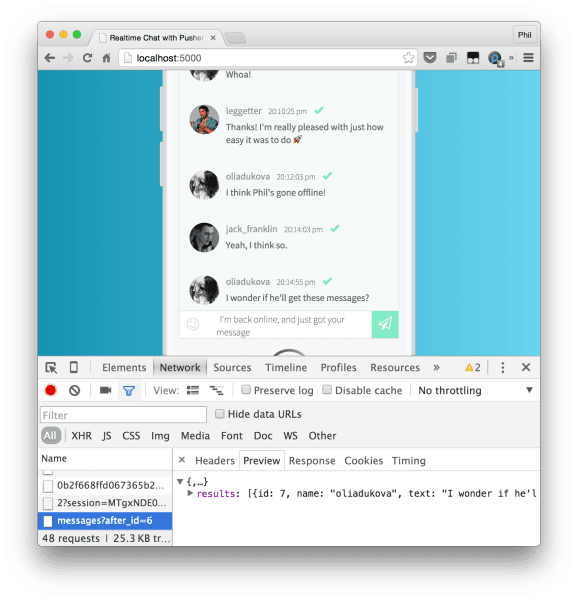
Now, if a client goes offline for any period of time it will fetch any missed messages when it reconnects again.
Conclusion
In around 50 lines of client and server code we’ve added message history to an existing real-time chat application.
By following the techniques in this tutorial I hope you can see just how easy it is to use the events that the Pusher JavaScript library (and other Pusher WebSocket libraries) expose to add historical data to an application, and also fetch any missed messages during periods of network instability.


© 2024 Pusher Ltd. All rights reserved.
Pusher Limited is a company registered in England and Wales (No. 07489873) whose registered office is at MessageBird UK Limited, 3 More London Riverside, 4th Floor, London, United Kingdom, SE1 2AQ.