- Products

- Developers
- User stories
- Blog
- Pricing

What’s new in Laravel 5.5?
Discover the new features and tools that have been included in Laravel 5.5 and how you can take advantage of them in your application.
Introduction
Laravel 5.5 has been released and at the time of writing this article, the current Laravel version stands at 5.5.0. This release is the next LTS release since version 5.1 which reaches its LTS end this year.
? LTS means Long Term Support. This version of Laravel will get bug fixes for two years and will get an additional year of security updates.
In this article, we are going to look at some of the new features and tools that have been included in Laravel 5.5 and how you can take advantage of them in your application. We are going to be looking at them in no particular order. Let’s get started.
Laravel 5.5 now requires PHP 7.0+
This is the biggest change to Laravel since its inception. Laravel 5.5 now requires PHP 7.0 or newer to run. PHP 7.0 was written to be faster and to use less memory to accomplish the same task that earlier versions of PHP would have taken to handle.
This is a welcome change and, though many people may not like it, it is a positive change as PHP 7.0 brings too many goodies and it’s a good time to adopt it in major frameworks.
Error Handling with
Laravel 5.5 comes pre-installed with the Whoops package for error reporting. If you were an early user of Laravel, you will recognize Whoops from back in the day. It was previously used in the early days of Laravel before it was removed and now it is back.
“Whoops is an error handler framework for PHP. Out-of-the-box, it provides a pretty error interface that helps you debug your web projects, but at heart, it’s a simple yet powerful stacked error handling system.”
When there is an error on your page, Whoops provides a clean view where you can see the error and a stack trace to the error. It makes spotting errors way easier. An example is shown below:
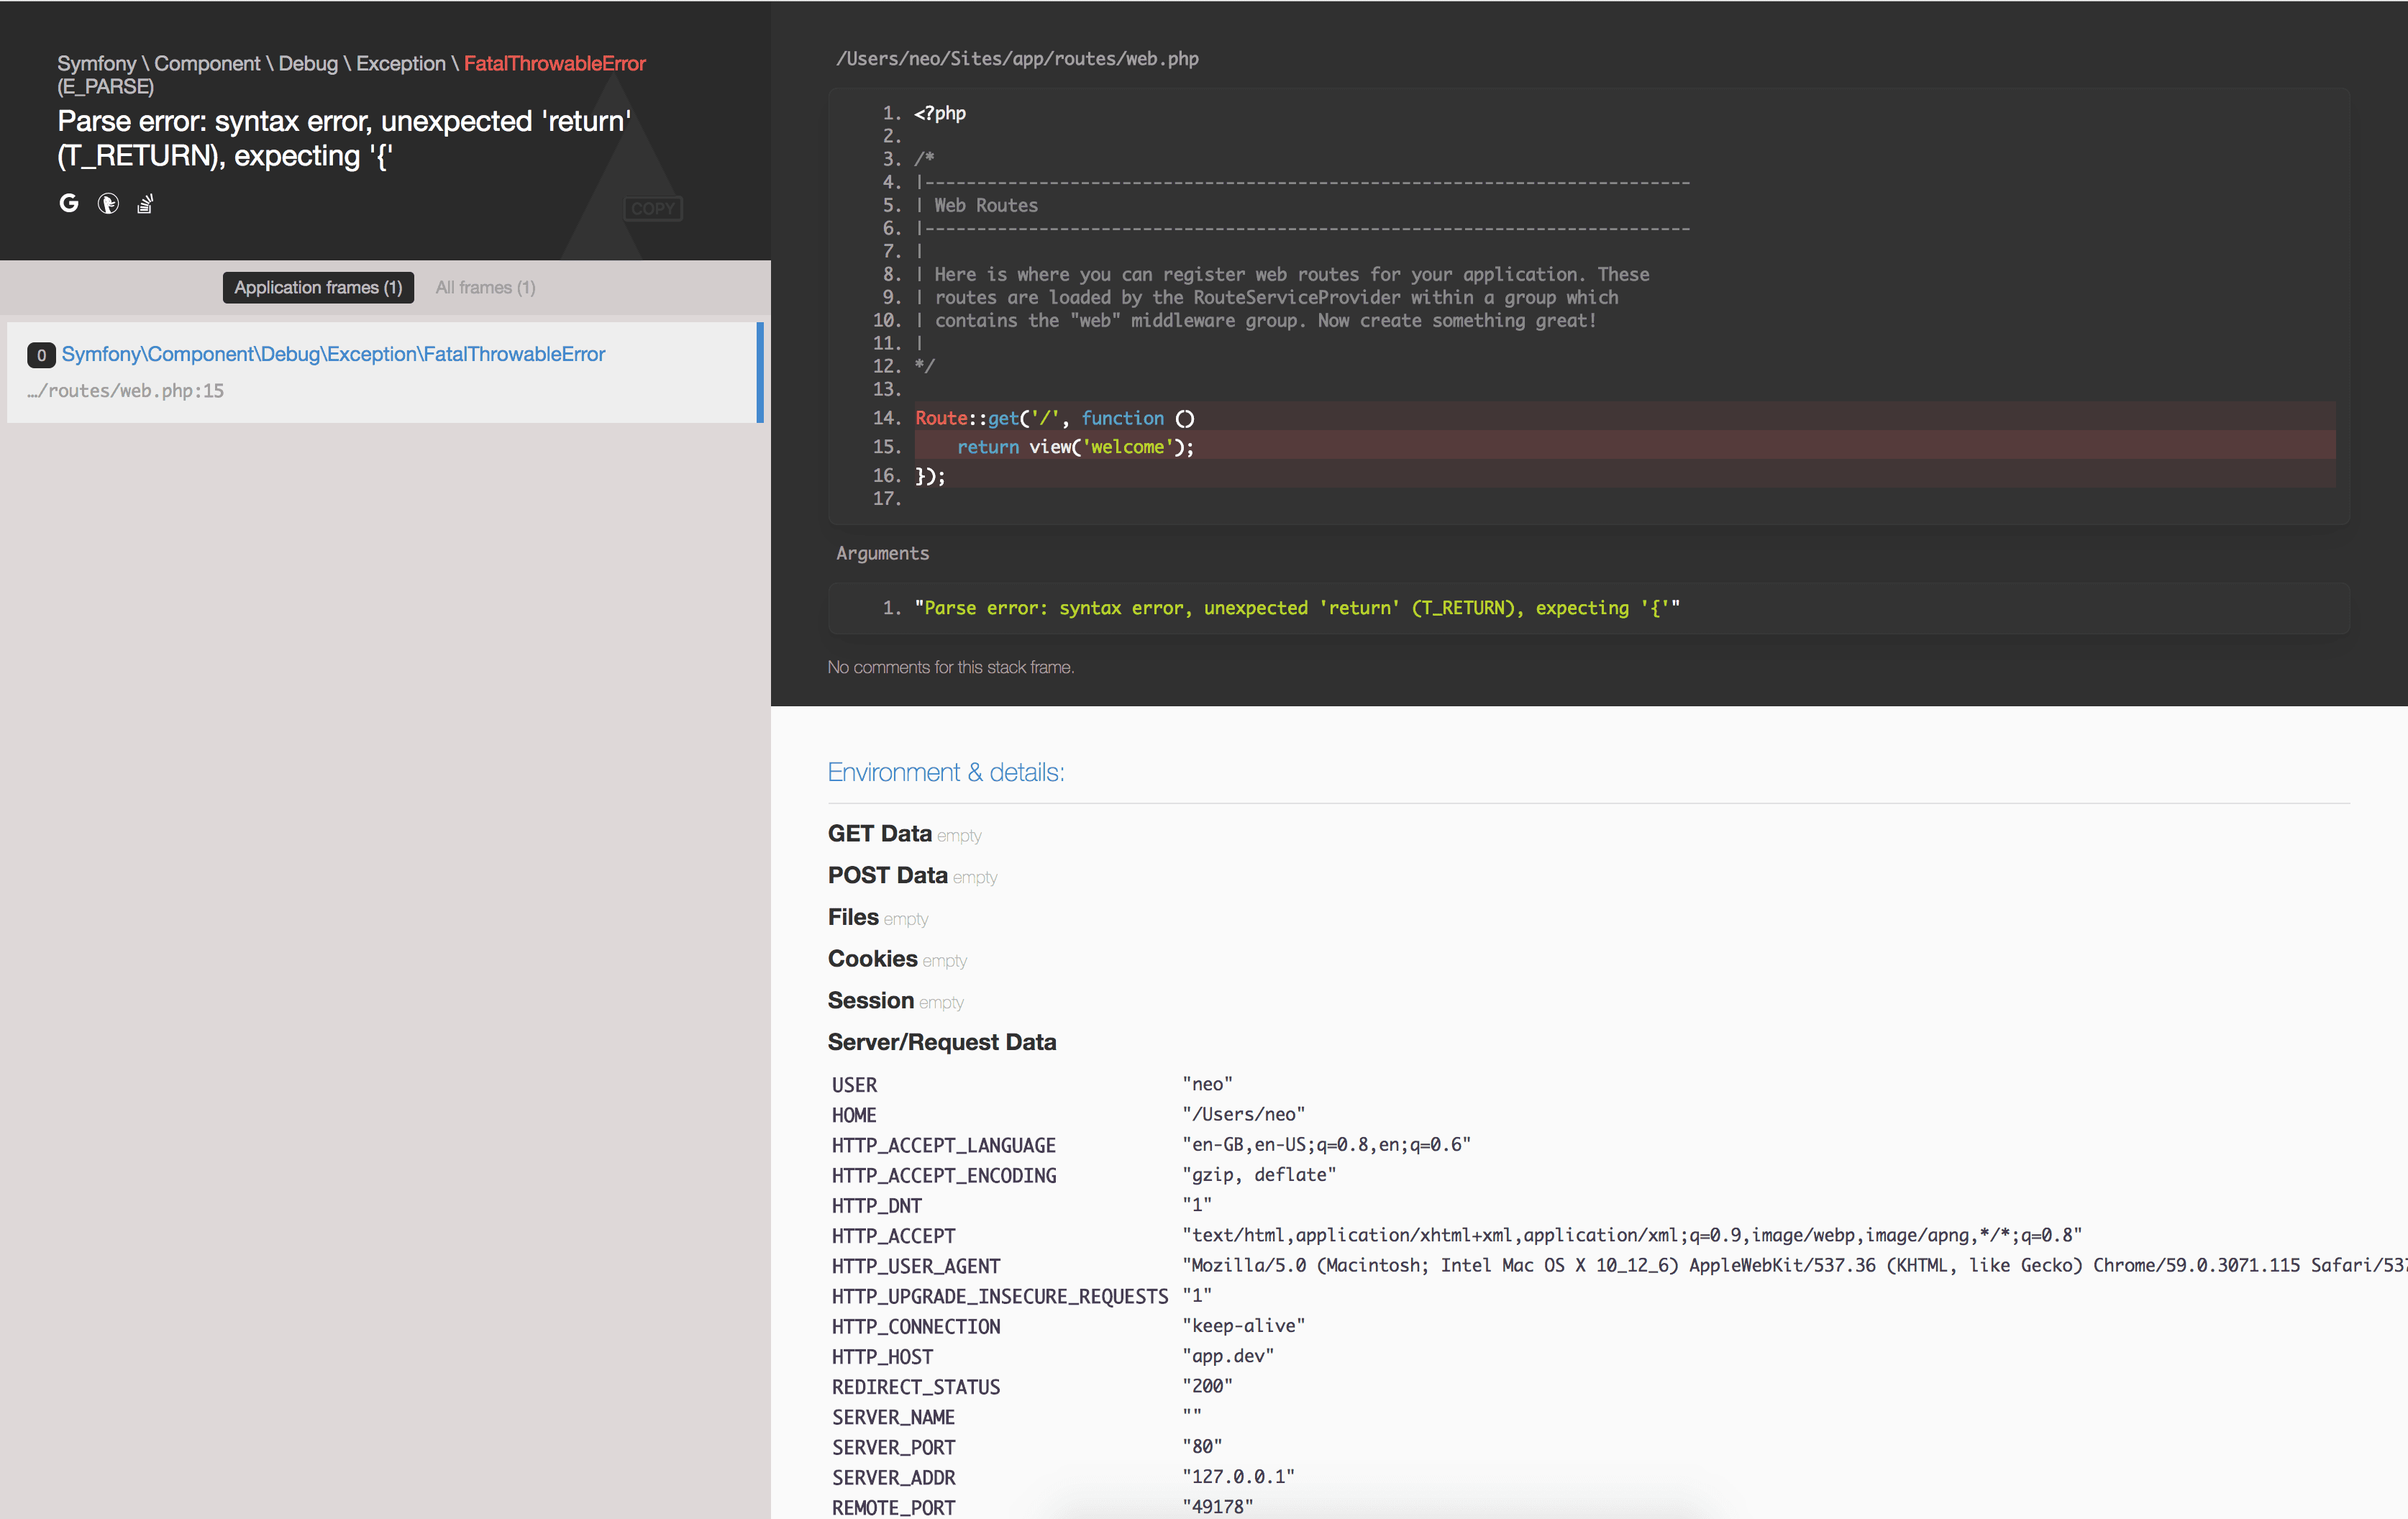
With the new Whoops, you can:
- Click the icons below the error message to quickly search for the error using Google, DuckDuckGo or StackOverflow.
- Quickly see all the set environment variables.
- See a stack trace of the error for more complicated errors.
- Jump to the file using the “open” link at the top of the stack error.
For the last item on the list, you will need to make some changes to support this feature.
Open the ./app/Exceptions/Handler.php file and in there add the code below:
1<?php 2 3 // ... 4 use Illuminate\Support\Arr; 5 use Whoops\Handler\PrettyPageHandler; 6 use Illuminate\Filesystem\Filesystem; 7 // ... 8 9 class Handler extends ExceptionHandler { 10 11 //... 12 13 protected function whoopsHandler() 14 { 15 return tap(new PrettyPageHandler, function ($handler) { 16 $files = new Filesystem; 17 $handler->setEditor('sublime'); 18 $handler->handleUnconditionally(true); 19 $handler->setApplicationPaths( 20 array_flip(Arr::except( 21 array_flip($files->directories(base_path())), [base_path('vendor')] 22 )) 23 ); 24 }); 25 } 26 27 // ... 28 }
In the code above, we have overridden the whoopsHandler method from the parent class and we are adding just one line: $handler->setEditor('sublime'). This is the line that makes the difference!
You should go here to see a list of supported editors and also information on how you can add your own editor. If you are a Mac user using Sublime Text, you will need to download the Sublime URL protocol for it to work.
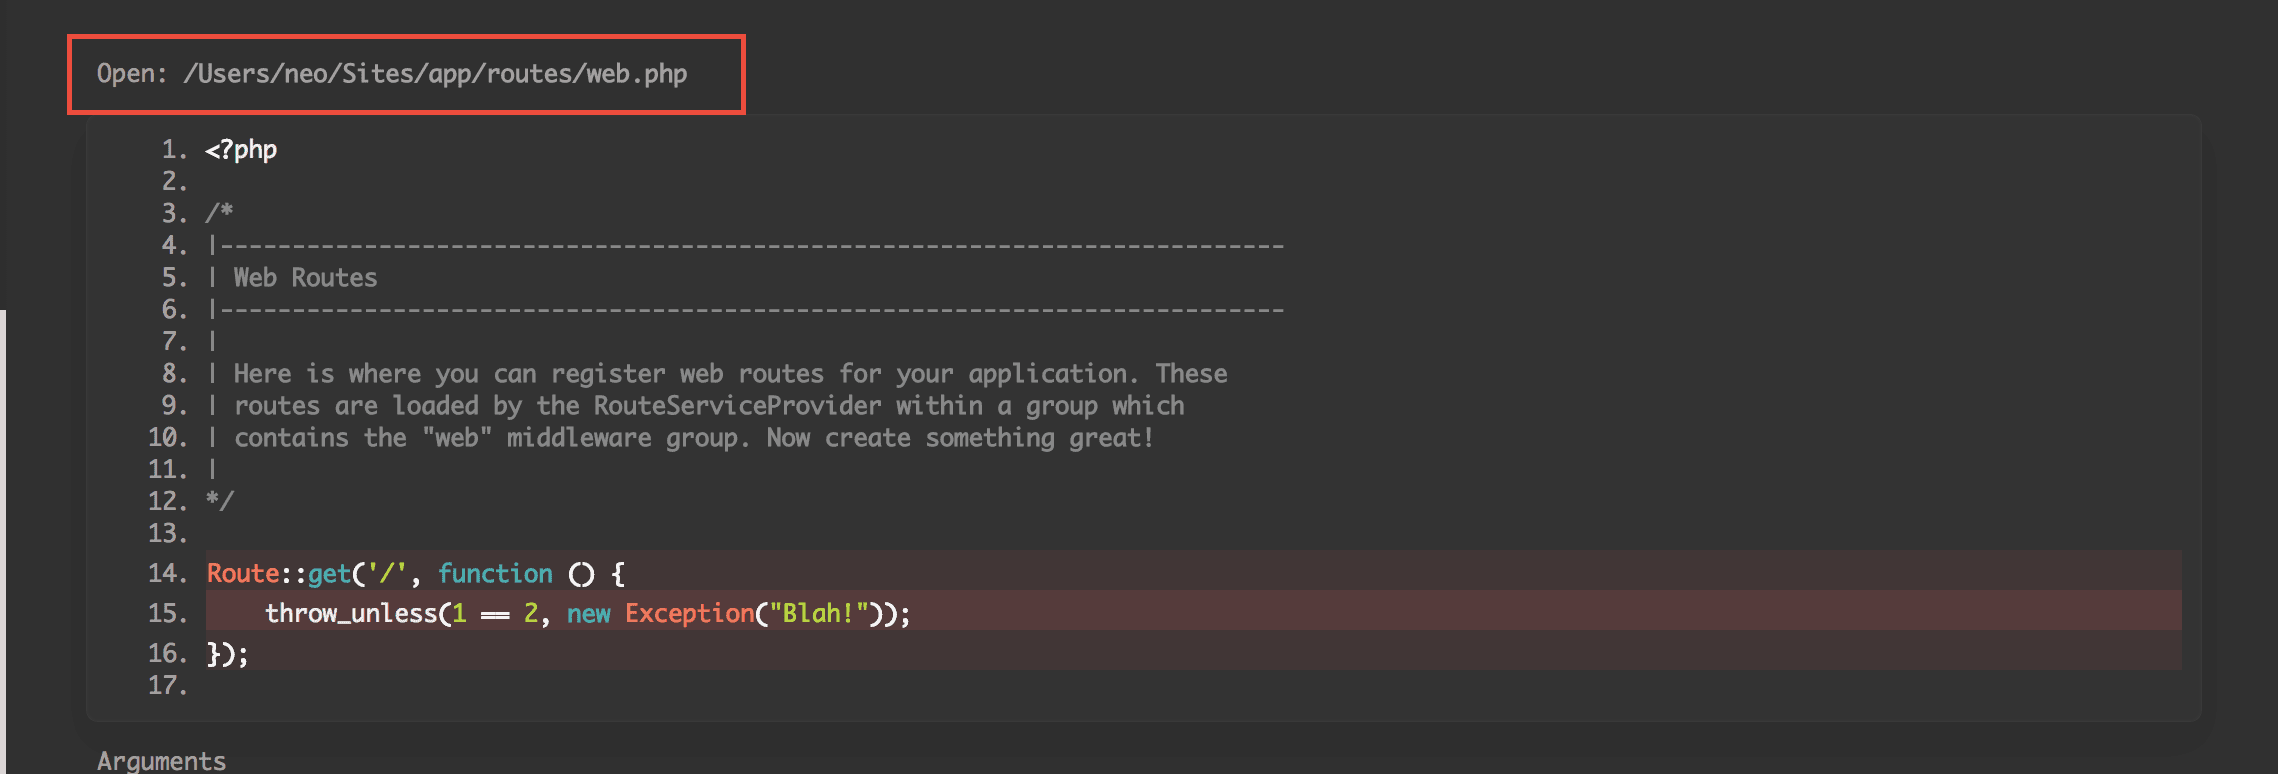
You can now click on the highlighted “Open” part to open the offending file in Sublime Text (or your choice editor). It even jumps to the specific line!
Testing your emails are easier in Laravel 5.5
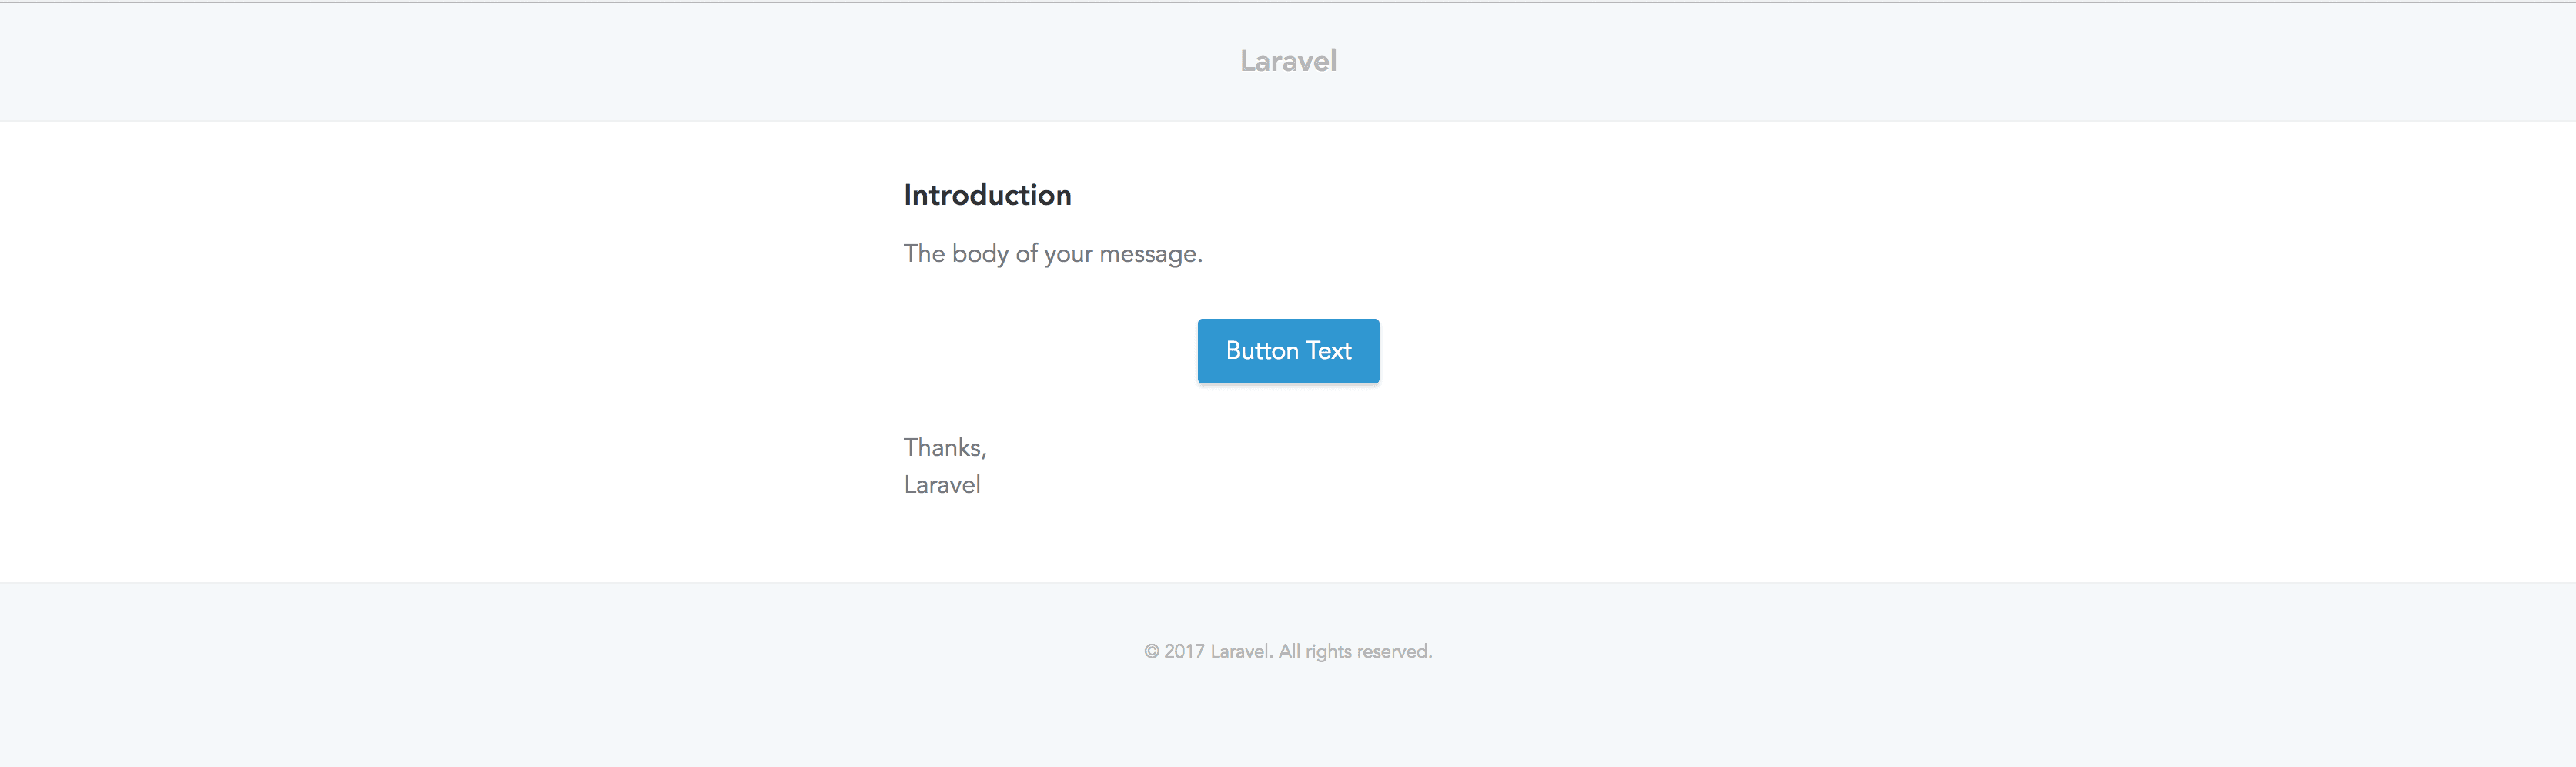
Prior to Laravel 5.5, testing emails were a little tricky. Most times, you would have to use Mailtrap to actually send the email just so you can see how it looks. However, with Laravel 5.5, you can now preview the email directly from your browser which simplifies the testing process by a lot! A quick way to do this is shown below.
Run the command to create a new email view:
1$ php artisan make:mail Welcome --markdown=emails.welcome
This command will create some new files. The first file will be the ./app/Mail/Welcome.php class and the second file will be the ./resources/views/emails/welcome.blade.php. The latter being where you customize the look and feel of the email.
To quickly see how the email looks, you can simply create a new route like below:
1Route::get('/email', function () { 2 return new App\Mail\Welcome; 3 });
Then visit that route. You will see the email displayed in HTML, and you can design it to your heart’s desire.
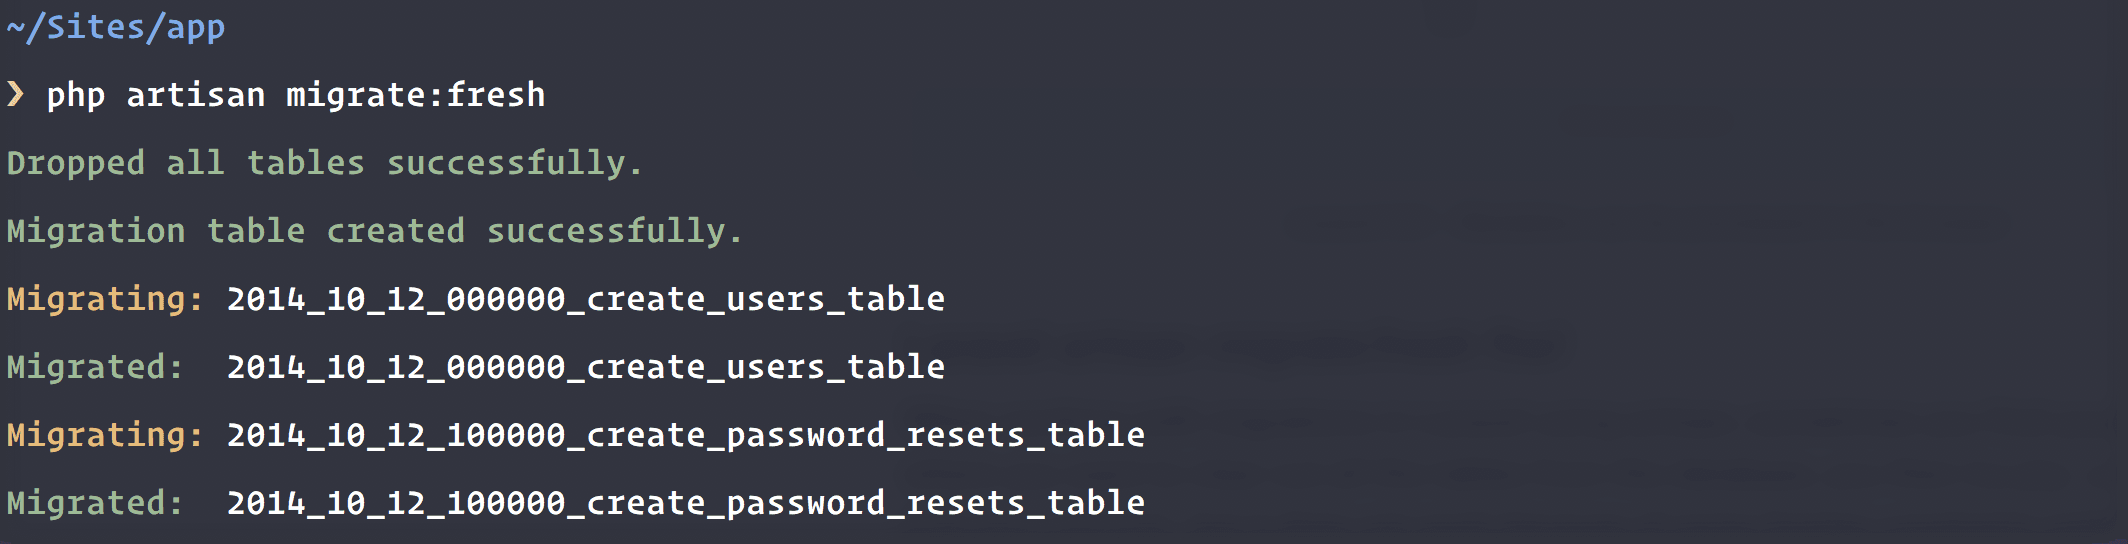
Laravel artisan migrate:fresh FTW!
When working with migrations in Laravel using artisan, sometimes you find yourself in a situation where you want to clear out all the tables from the database, so you try php artisan migrate:refresh but it does not work because of some foreign constraint violation. You then have to manually log in to your MySQL client and delete all the tables.
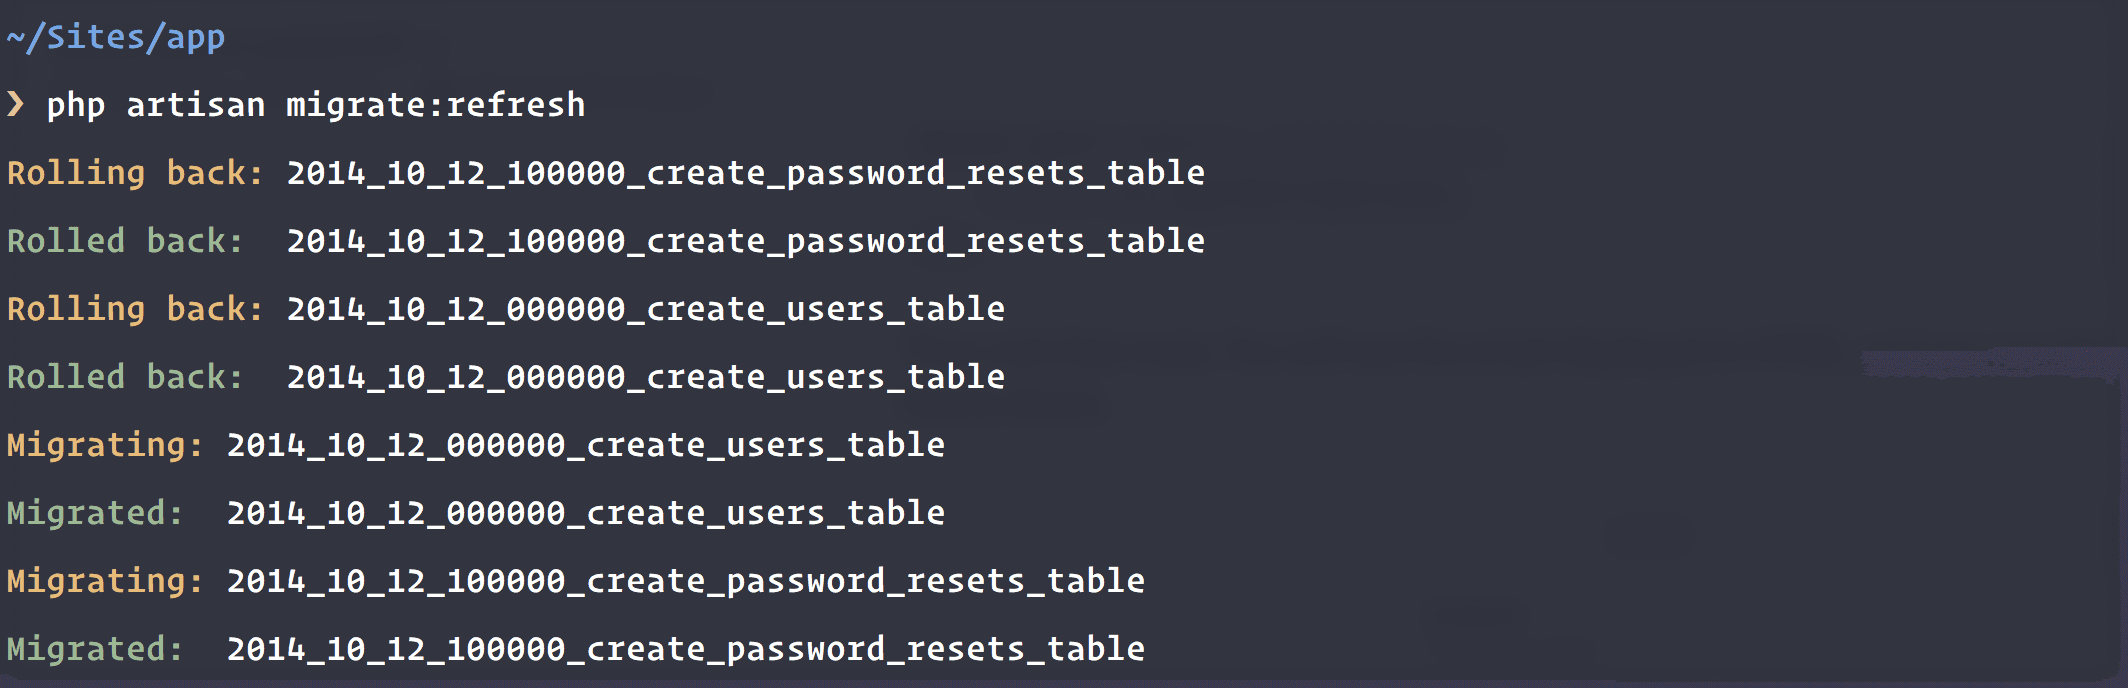
Well, that’s why we now have the migrate:fresh command. Unlike migrate:refresh it does not roll back the migration before running migration again, It simply drops all the tables and runs the migrations from scratch. This saves you a trip to your MySQL client and can prove useful on certain occasions.
Automatic package discovery
Laravel 5.5 now comes with Automatic Package Discovery! If you have had to install some Laravel package in the past, you will recall you always had to add the Service Provider of that package to the provider’s array in the ./config/app.php file. Then, for some packages, you might also need to register the Facade to the same file.
In Laravel 5.5, you do not need to do any of that. With automatic package discovery, we’ll just require a package and start using it off the bat.
⚠️ The package provider has to configure their package for auto-discovery for this feature to work. Most packages will probably (if they have not already) start adding this to their packages.
If you are a package developer, you can take a look at the composer.json file of the Laravel Debugbar package that already has this feature enabled; or you can just add the code below to the composer.json file of your package:
1"extra": { 2 "laravel": { 3 "providers": [ 4 "Foo\\Bar\\ServiceProvider" 5 ], 6 "aliases": { 7 "Bar": "Foo\\Bar\\Facade" 8 } 9 } 10 }
One of the big wins of the Automatic Package Discovery feature is that the application does not break after packages are uninstalled. With package auto-discovery, when a package is removed via Composer everything related to the package is also removed.
Win!
Laravel 5.5 has new front-end presets
Laravel 5.4 and 5.3 came bundled with Bootstrap and Vue. These frameworks were included to make it easy to scaffold your front-end without stress. In Laravel 5.5, you now have some new presets. For instance, you can now use React instead of Vue. You could also decide to use no frameworks if you wish.
Laravel 5.5 comes with a new artisan command that will make working with the new presets easy and clean.
To remove all the front-end presets in the application, all you need to do is run the command below:
1$ php artisan preset none
This will remove the front-end presets that were added to the application; Bootstrap, Vue or React.
You can also specify the preset you will like to use by running any of the commands below:
1$ php artisan preset react 2 $ php artisan preset vue 3 $ php artisan preset bootstrap
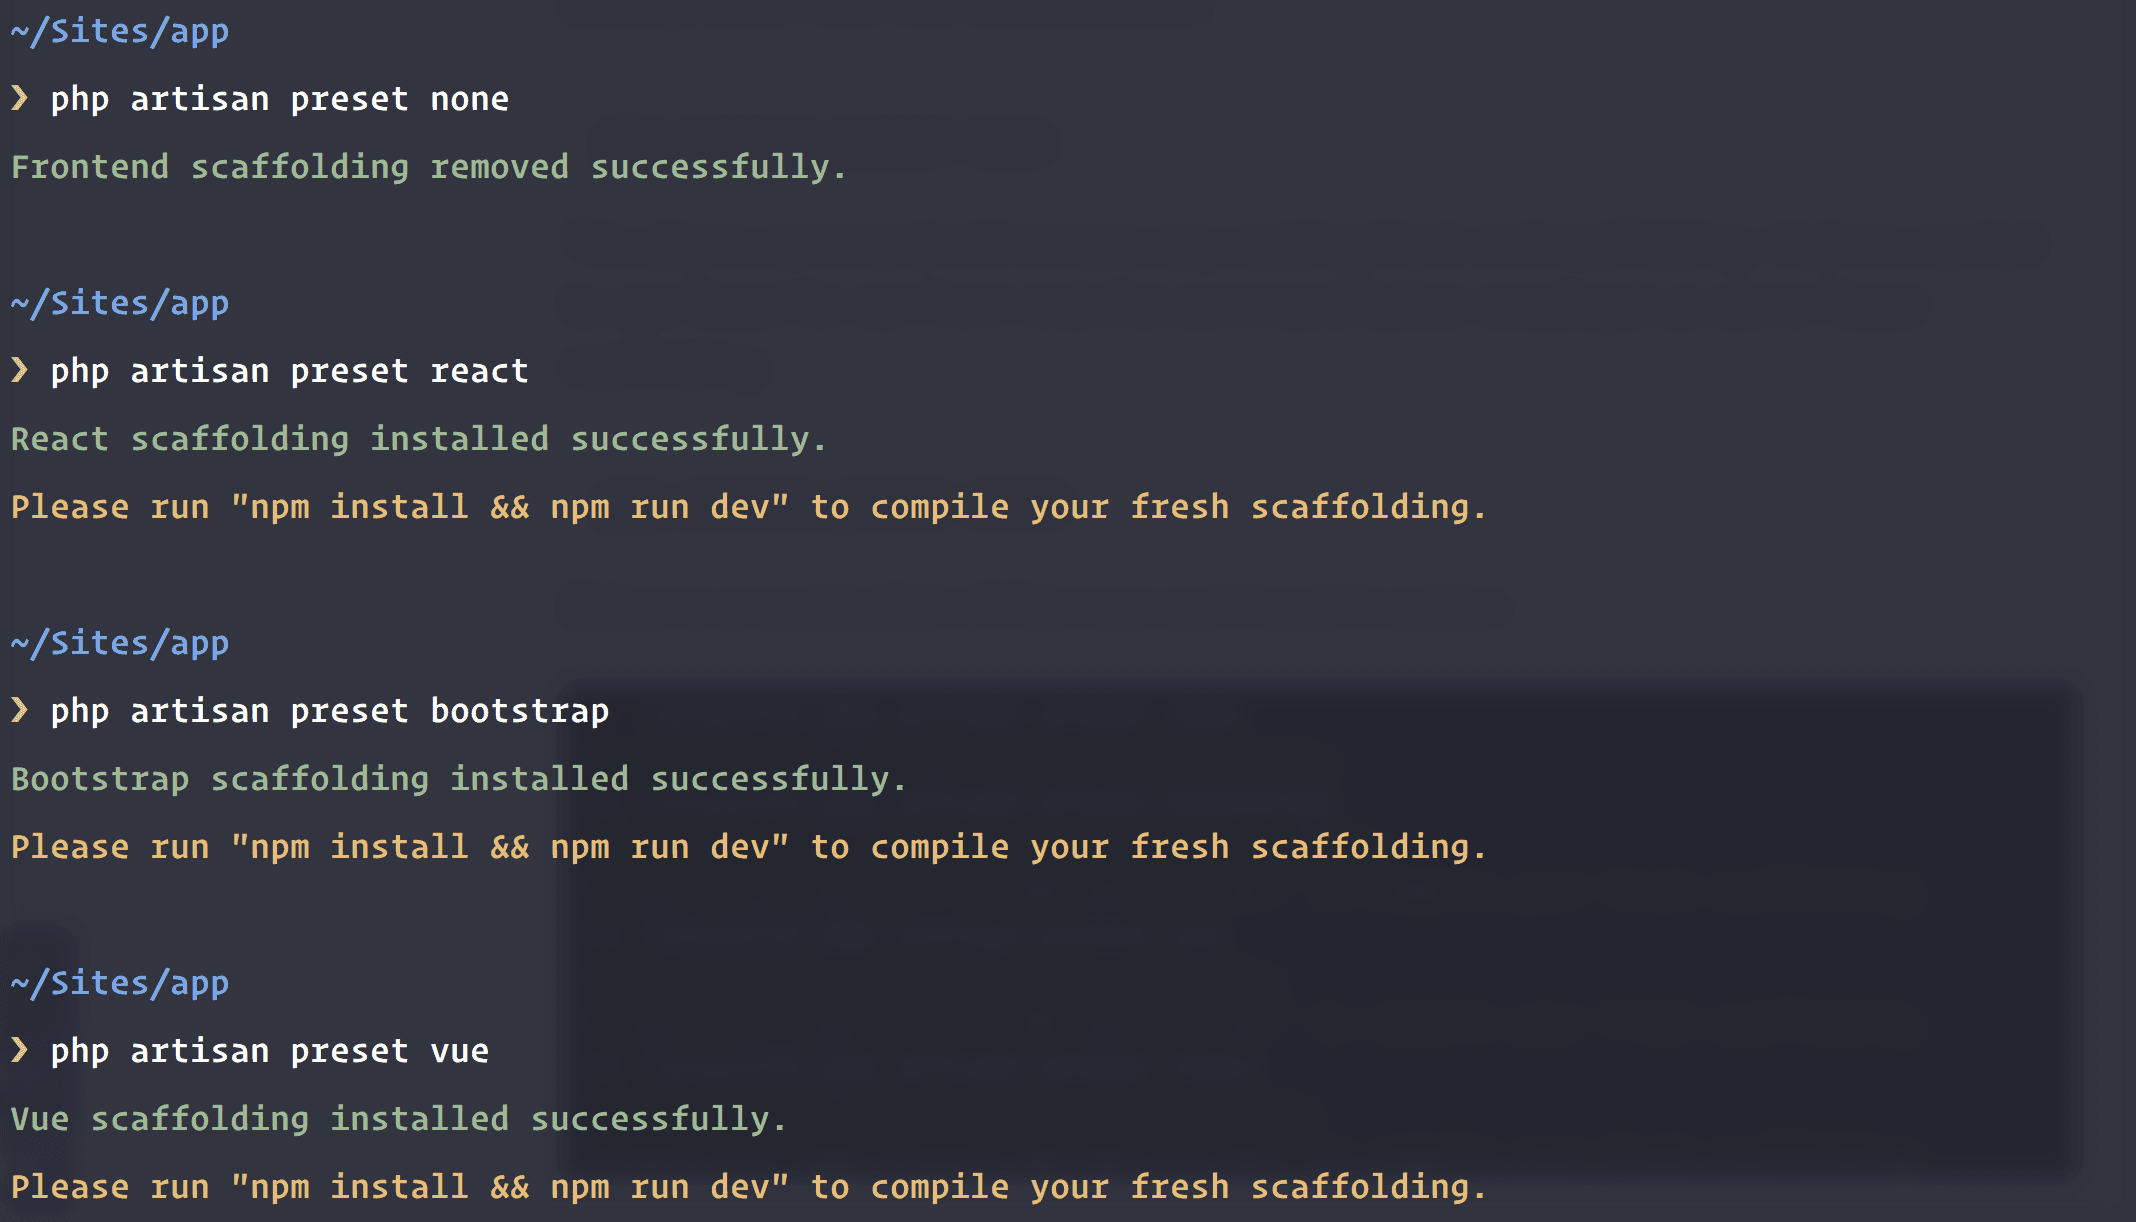
Depending on your needs, these commands may come in handy.
Custom Validation Rules
With Laravel 5.5, custom validations are now cleaner. In the previous versions of Laravel, to create a custom validation you’d probably have used Validator::extend and then add this to the App service provider class. You might have also needed to separately define your custom error messages in another file.
But here’s how custom validators are created in Laravel 5.5. We now have a new artisan command to define custom validations. Run the command below to create a new custom validation rule:
1$ php artisan make:rule FooBarRule
This will create a new FooBarRule class in the ./app/Rules directory. If you inspect that class you will note that it extends a Rule contract. This contract forces it to implement the passes and message methods. This is where you’ll define the validators logic and error message respectively.
1<?php 2 3 namespace App\Rules; 4 5 use Illuminate\Contracts\Validation\Rule; 6 7 class FooBarRule implements Rule 8 { 9 public function passes($attribute, $value) 10 { 11 return $value !== 'foobar'; 12 } 13 14 public function message() 15 { 16 return 'Sorry but foo needs to be bar'; 17 } 18 }
That’s all! Then using your custom rule will look something like this:
1use App\Rules\FooBarRule; 2 3 request()->validate([ 4 'field' => ['required', 'min:5', new FooBarRule] 5 ]);
You can read more on custom validation rules here.
Model factory generators
In Laravel 5.5 you can now easily use a new artisan command to create custom factory generators.
1$ php artisan make:factory PostFactory
Running the code above will create a new PostFactory inside the ./database/factories directory.
1<?php 2 3 use Faker\Generator as Faker; 4 5 $factory->define(Model::class, function (Faker $faker) { 6 return [ 7 // 8 ]; 9 });
You can now use the PostFactory to create seed data for your database table.
1$ php artisan make:model Post -fmc
The command above will not only create a model, it will also create a model factory, a post controller, and posts migration in one fell swoop! That’s a pro-tip right there.
Laravel Collections can take a dump() now …and dd() too
In Laravel 5.5, it is now easy to visually see what is going on inside our Collections. In previous versions of Laravel, you might have needed to pass the Collection through the dd helper function and for each time you would have needed to use the dd for every step of the way.
In Laravel 5.5, you can now chain a dd and dump method on the collection. This will generally make debugging even easier as it can be inside a chained collection statement. See the example below:
1collect(['neo', 'lynda', 'ibiyemi', 'olayinka', 'michelle']) 2 ->dump() 3 ->shuffle() 4 ->dump() 5 ->shuffle() 6 ->dd();
When we run that, we can see the output generated below:
1Collection {#171 ▼ 2 #items: array:5 [▼ 3 0 => "neo" 4 1 => "lynda" 5 2 => "ibiyemi" 6 3 => "olayinka" 7 4 => "michelle" 8 ] 9 } 10 Collection {#166 ▼ 11 #items: array:5 [▼ 12 0 => "olayinka" 13 1 => "neo" 14 2 => "michelle" 15 3 => "ibiyemi" 16 4 => "lynda" 17 ] 18 } 19 array:5 [▼ 20 0 => "lynda" 21 1 => "olayinka" 22 2 => "michelle" 23 3 => "ibiyemi" 24 4 => "neo" 25 ]
Pretty useful I’d say.
Custom Blade::if() Directives
This is one of my favorite new feature in Laravel 5.5. If you think about your general Blade templates, there are times when you have to do multiple “if” checks. This can make your entire view look ugly sometimes.
Blade::if allows you create custom blade directives that will clean up your views and make them much more readable. Here is an example of it in use:
1// ------------------------------------------------ 2 // Pre Laravel 5.5 3 // ------------------------------------------------ 4 5 @if ($user->isSubscribed() && $user->activeSubscriber() && $user->isNotBanned()) 6 <p>You are a valid subscriber!</p> 7 @else 8 <p>You are not a valid subscriber!</p> 9 @endif 10 11 12 // ------------------------------------------------ 13 // Laravel 5.5 14 // ------------------------------------------------ 15 16 @subscriber($user) 17 <p>You are a valid subscriber!</p> 18 @else 19 <p>You are not a valid subscriber!</p> 20 @endsubscriber
To make the above work in Laravel 5.5 though you would need to register the custom directive. To do this you need to add the code below to the AppServiceProvider‘s boot method:
1Blade::if('subscriber', function ($user) { 2 return $user->isSubscribed() && $user->activeSubscriber() && $user->isNotBanned(); 3 });
This little addition will make our blade templates even easier to read and without the clutter of chained if statements!
Other Miscellaneous Changes
There are a lot of changes made in Laravel 5.5 and we cannot hope to cover them all in this article. However, here are some other ones that can be looked at and explored.
New Routing Methods
In Laravel 5.5 you now have new routing methods:
1Route::view('/welcome', 'welcome'); 2 Route::redirect('home', 'dashboard');
The Route::view is just a short way of doing this:
1Route::get('/welcome', function () { 2 return view('welcome'); 3 });
The Route::redirect is a short way of doing the same but with return redirect('/url') instead.
The RefreshDatabase trait
The RefreshDatabase trait will make sure that, while running tests, migrations are run before and after each test. It will also make sure that the database is restored to its initial state after each test is run
Both capabilities were previously accessible via the DatabaseMigrations and DatabaseTransactions traits. However, you can just use the RefreshDatabase traits now. Small but useful change.
Exception Helper Functions
Laravel 5.5 comes with two new exception helper functions: throw_if and throw_unless. Here is an example of how they can be used:
1// Pre Laravel 5.5 2 if ($username === null) { 3 throw new UsernameEmptyException("Username cannot be empty"); 4 } 5 6 // Laravel 5.5 7 throw_if($username === null, new UsernameEmptyException("Username cannot be empty")); 8 9 // Or... 10 throw_if($username === null, UsernameEmptyException::class, "Username cannot be empty"); 11 12 // Pre Laravel 5.5 13 if ($username !== 'admin') { 14 throw new UsernameInvalidException("Username invalid"); 15 } 16 17 // Laravel 5.5 18 throw_unless($username === 'admin', new UsernameInvalidException("Username invalid")); 19 20 // Or ... 21 throw_unless($username === 'admin', UsernameInvalidException::class, "Username invalid");
Simple and useful in certain cases.
Conclusion
There are many gems in Laravel 5.5 and we have covered the major ones. While we cannot cover all the changes, we have certainly covered the major changes. If you know of one that was not covered in this article, please leave a comment below highlighting the change you have noticed.
If you have additional feedback or comments please leave them below in the comments section.


© 2024 Pusher Ltd. All rights reserved.
Pusher Limited is a company registered in England and Wales (No. 07489873) whose registered office is at MessageBird UK Limited, 3 More London Riverside, 4th Floor, London, United Kingdom, SE1 2AQ.