- Products

- Developers
- User stories
- Blog
- Pricing

Build a modern web application with Laravel and Vue Part 5: Creating a simple Trello clone using Laravel and Vue

In this final part, we are going to combine all the concepts from the previous parts into building a Trello clone using Laravel and Vue.
Introduction
In previous chapters of this series, we considered a couple of concepts useful for developing modern web applications with Laravel and Vue.
In this final part, we are going to combine all the concepts from the previous parts into building a Trello clone using Laravel and Vue.
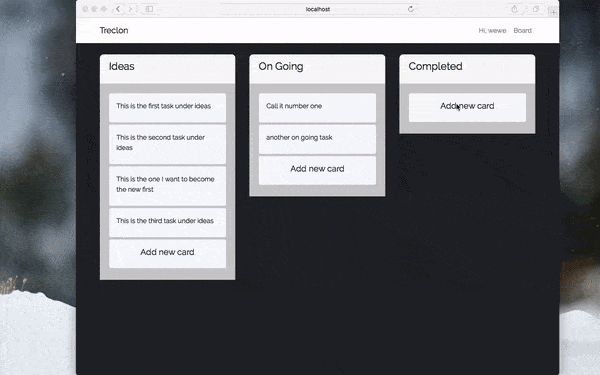
Here is a screen recording of what the application will look like when complete:
Prerequisites
To follow along in this part of the series you must:
- Have read part all previous parts of the series.
- Have all the requirements from previous parts of the series.
When you have all the requirements, we can continue.
Setting up for development
We have already discussed setting up your environment in previous parts of this series so in case you need help please read the previous parts. If you have also been following up with the other parts, you should have already set up a Laravel project.
If you have not set up a project, then you should go back to the previous parts and read them as they give a detailed guide on how to set all set up for this part of the series.
You can still read them!
Creating API routes
In one of the earlier chapters, we spoke about creating RESTful APIs so the techniques mentioned there will be applied here. Let’s create the endpoints for the API of our Trello clone.
In our routes/api.php file, make sure the file contains the following code:
1<?php 2 3 Route::post('login', 'UserController@login'); 4 Route::post('register', 'UserController@register'); 5 6 Route::group(['middleware' => 'auth:api'], function() { 7 Route::get('/category/{category}/tasks', 'CategoryController@tasks'); 8 Route::resource('/category', 'CategoryController'); 9 Route::resource('/task', 'TaskController'); 10 });
? As a good practice, when creating routes, always put more specific routes ahead of less specific ones. For instance, in the code above the
/category/{category}/tasksroute is above the less specific/categoryroute.
In the code above, we defined our API routes. Putting the definitions in the routes/api.php file will tell Laravel that the routes are API routes. Laravel will prefix the routes with a /api in the URL to differentiate these routes from web routes.
Also in the Route group above, we added a middleware auth:api, this makes sure that any calls to the routes in that group must be authenticated.
A thing to note is, using the resource method on the Route class helps us create some additional routes under the hood. Here is a summary of all the routes available when we added the code above to the file:
Routes for the category resource
| Method | URI | Function |
|---|---|---|
| GET | /api/category | To list all the available categories |
| POST | /api/category | To create a new category resource |
| DELETE | /api/category/{category_id} | To delete a particular category resource |
| GET | /api/category/{category_id} | To fetch a particular category resource |
| GET | /api/category/{category}/tasks | To fetch all tasks for particular category |
| PUT | /api/category/{category_id} | To update a particular category resource |
Routes for the task resource
| Method | URI | Function |
|---|---|---|
| GET | /api/task | To list all the available tasks |
| POST | /api/task | To create a new task resource |
| DELETE | /api/task/{task_id} | To delete a particular task |
| GET | /api/task/{task_id} | To fetch a particular task resource |
| PUT | /api/task/{task_id} | To update a particular task resource |
Routes for the user resource
| Method | URI | Function |
|---|---|---|
| POST | /api/register | Create a new user |
| POST | /api/login | Log an existing user in |
? To see the full route list, run the following command:
$ php artisan route:list.
Now that we have a clear understanding of our routes, let’s see how the controllers will work.
Creating the controller logic
We are going to take a deeper look at the implementation of our different controllers now.
User controller
Since we already created and fully implemented this in the second part of the series, we can skip that and move on to the next controller.
Category controller
Next, open the CategoryController and replace the contents with the following code:
1<?php 2 3 namespace App\Http\Controllers; 4 5 use App\Category; 6 use Illuminate\Http\Request; 7 8 class CategoryController extends Controller 9 { 10 public function index() 11 { 12 return response()->json(Category::all()->toArray()); 13 } 14 15 public function store(Request $request) 16 { 17 $category = Category::create($request->only('name')); 18 19 return response()->json([ 20 'status' => (bool) $category, 21 'message'=> $category ? 'Category Created' : 'Error Creating Category' 22 ]); 23 } 24 25 public function show(Category $category) 26 { 27 return response()->json($category); 28 } 29 30 public function tasks(Category $category) 31 { 32 return response()->json($category->tasks()->orderBy('order')->get()); 33 } 34 35 public function update(Request $request, Category $category) 36 { 37 $status = $category->update($request->only('name')); 38 39 return response()->json([ 40 'status' => $status, 41 'message' => $status ? 'Category Updated!' : 'Error Updating Category' 42 ]); 43 } 44 45 public function destroy(Category $category) 46 { 47 $status = $category->delete(); 48 49 return response()->json([ 50 'status' => $status, 51 'message' => $status ? 'Category Deleted' : 'Error Deleting Category' 52 ]); 53 } 54 55 }
The functions in the controller above handle the basic CRUD operations for the resource. The tasks methods return tasks associated with a category.
Task controller
Next, open the TaskController. In this controller, we will manage tasks. A task is given an order value and is linked to a category. Replace the contents with the following code:
1<?php 2 3 namespace App\Http\Controllers; 4 5 use App\Task; 6 use Illuminate\Http\Request; 7 8 class TaskController extends Controller 9 { 10 public function index() 11 { 12 return response()->json(Task::all()->toArray()); 13 } 14 15 public function store(Request $request) 16 { 17 $task = Task::create([ 18 'name' => $request->name, 19 'category_id' => $request->category_id, 20 'user_id' => $request->user_id, 21 'order' => $request->order 22 ]); 23 24 return response()->json([ 25 'status' => (bool) $task, 26 'data' => $task, 27 'message' => $task ? 'Task Created!' : 'Error Creating Task' 28 ]); 29 } 30 31 public function show(Task $task) 32 { 33 return response()->json($task); 34 } 35 36 public function update(Request $request, Task $task) 37 { 38 $status = $task->update( 39 $request->only(['name', 'category_id', 'user_id', 'order']) 40 ); 41 42 return response()->json([ 43 'status' => $status, 44 'message' => $status ? 'Task Updated!' : 'Error Updating Task' 45 ]); 46 } 47 48 public function destroy(Task $task) 49 { 50 $status = $task->delete(); 51 52 return response()->json([ 53 'status' => $status, 54 'message' => $status ? 'Task Deleted!' : 'Error Deleting Task' 55 ]); 56 } 57 58 }
That’s all for the controllers. Since we have already created the models in a previous chapter, let’s move on to creating the frontend.
Building the frontend
Since we are done building the backend, let’s make the frontend using VueJS. To work with Vue, we will need the Vue and Vue router packages we installed in a previous chapter. We will also need the [vuedraggable](https://github.com/SortableJS/Vue.Draggable) package. To install it, run the command below:
1$ npm install vuedraggable --save
Creating the Vue router routes
Since we are building a Single Page App, we are going to set up our vue-router to handle switching between the different pages of our application. Open the resources/assets/js/app.js file and replace the contents with the following code:
1import Vue from 'vue' 2 import VueRouter from 'vue-router' 3 4 Vue.use(VueRouter) 5 6 import App from './views/App' 7 import Dashboard from './views/Board' 8 import Login from './views/Login' 9 import Register from './views/Register' 10 import Home from './views/Welcome' 11 12 const router = new VueRouter({ 13 mode: 'history', 14 routes: [ 15 { 16 path: '/', 17 name: 'home', 18 component: Home 19 }, 20 { 21 path: '/login', 22 name: 'login', 23 component: Login, 24 }, 25 { 26 path: '/register', 27 name: 'register', 28 component: Register, 29 }, 30 { 31 path: '/board', 32 name: 'board', 33 component: Dashboard, 34 }, 35 ], 36 }); 37 38 const app = new Vue({ 39 el: '#app', 40 components: { App }, 41 router, 42 });
Next, open the routes/web.php file and replace the contents with the code below:
1<?php 2 3 Route::get('/{any}', 'SinglePageController@index')->where('any', '.*');
This will route incoming traffic to the index method of our SinglePageController which we created in the previous chapter.
Dealing with authentication
Since our API is secure we’d need access tokens to make calls to it. Tokens are generated and issued when we successfully log in or register. We are going to use localStorage to hold the token generated by our application so we can very easily get it when we need to make API calls.
⚠️ Although this is out of the scope of the article it may be worth knowing that contents in local storage are readable from the browser so you might want to make sure your tokens are short-lived and refreshed often.
Let’s set up register component. Create the file resources/assets/js/views/Register.vue and add the following for the template:
1<template> 2 <div class="container"> 3 <div class="row justify-content-center"> 4 <div class="col-md-8"> 5 <div class="card card-default"> 6 <div class="card-header">Register</div> 7 8 <div class="card-body"> 9 <form method="POST" action="/register"> 10 <div class="form-group row"> 11 <label for="name" class="col-md-4 col-form-label text-md-right">Name</label> 12 13 <div class="col-md-6"> 14 <input id="name" type="text" class="form-control" v-model="name" required autofocus> 15 </div> 16 </div> 17 18 <div class="form-group row"> 19 <label for="email" class="col-md-4 col-form-label text-md-right">E-Mail Address</label> 20 21 <div class="col-md-6"> 22 <input id="email" type="email" class="form-control" v-model="email" required> 23 </div> 24 </div> 25 26 <div class="form-group row"> 27 <label for="password" class="col-md-4 col-form-label text-md-right">Password</label> 28 29 <div class="col-md-6"> 30 <input id="password" type="password" class="form-control" v-model="password" required> 31 </div> 32 </div> 33 34 <div class="form-group row"> 35 <label for="password-confirm" class="col-md-4 col-form-label text-md-right">Confirm Password</label> 36 37 <div class="col-md-6"> 38 <input id="password-confirm" type="password" class="form-control" v-model="password_confirmation" required> 39 </div> 40 </div> 41 42 <div class="form-group row mb-0"> 43 <div class="col-md-6 offset-md-4"> 44 <button type="submit" class="btn btn-primary" @click="handleSubmit"> 45 Register 46 </button> 47 </div> 48 </div> 49 </form> 50 </div> 51 </div> 52 </div> 53 </div> 54 </div> 55 </template>
Then for the script, add the following in the same file below the closing template tag:
1<script> 2 export default { 3 data(){ 4 return { 5 name : "", 6 email : "", 7 password : "", 8 password_confirmation : "" 9 } 10 }, 11 methods : { 12 handleSubmit(e) { 13 e.preventDefault() 14 15 if (this.password === this.password_confirmation && this.password.length > 0) 16 { 17 axios.post('api/register', { 18 name: this.name, 19 email: this.email, 20 password: this.password, 21 c_password : this.password_confirmation 22 }) 23 .then(response => { 24 localStorage.setItem('user',response.data.success.name) 25 localStorage.setItem('jwt',response.data.success.token) 26 27 if (localStorage.getItem('jwt') != null){ 28 this.$router.go('/board') 29 } 30 }) 31 .catch(error => { 32 console.error(error); 33 }); 34 } else { 35 this.password = "" 36 this.passwordConfirm = "" 37 38 return alert('Passwords do not match') 39 } 40 } 41 }, 42 beforeRouteEnter (to, from, next) { 43 if (localStorage.getItem('jwt')) { 44 return next('board'); 45 } 46 47 next(); 48 } 49 } 50 </script>
In the code above, we have a handleSubmit method that is called when a user submits the registration form. It sends all the form data to the API, takes the response and saves the jwt to localStorage.
We also have a beforeRouterEnter method which is called by the vue-router before loading a component. In this callback, we check if the user is already logged in and redirect to the application’s board if the user is.
The login component is setup in a similar manner. Create the file resources/assets/js/views/Login.vue and add the following for the template:
1<template> 2 <div class="container"> 3 <div class="row justify-content-center"> 4 <div class="col-md-8"> 5 <div class="card card-default"> 6 <div class="card-header">Login</div> 7 8 <div class="card-body"> 9 <form method="POST" action="/login"> 10 <div class="form-group row"> 11 <label for="email" class="col-sm-4 col-form-label text-md-right">E-Mail Address</label> 12 13 <div class="col-md-6"> 14 <input id="email" type="email" class="form-control" v-model="email" required autofocus> 15 </div> 16 </div> 17 18 <div class="form-group row"> 19 <label for="password" class="col-md-4 col-form-label text-md-right">Password</label> 20 21 <div class="col-md-6"> 22 <input id="password" type="password" class="form-control" v-model="password" required> 23 </div> 24 </div> 25 26 <div class="form-group row mb-0"> 27 <div class="col-md-8 offset-md-4"> 28 <button type="submit" class="btn btn-primary" @click="handleSubmit"> 29 Login 30 </button> 31 </div> 32 </div> 33 </form> 34 </div> 35 </div> 36 </div> 37 </div> 38 </div> 39 </template>
And for the script, add the following code to the file below the closing template tag:
1<script> 2 export default { 3 data(){ 4 return { 5 email : "", 6 password : "" 7 } 8 }, 9 methods : { 10 handleSubmit(e){ 11 e.preventDefault() 12 13 if (this.password.length > 0) { 14 axios.post('api/login', { 15 email: this.email, 16 password: this.password 17 }) 18 .then(response => { 19 localStorage.setItem('user',response.data.success.name) 20 localStorage.setItem('jwt',response.data.success.token) 21 22 if (localStorage.getItem('jwt') != null){ 23 this.$router.go('/board') 24 } 25 }) 26 .catch(function (error) { 27 console.error(error); 28 }); 29 } 30 } 31 }, 32 beforeRouteEnter (to, from, next) { 33 if (localStorage.getItem('jwt')) { 34 return next('board'); 35 } 36 37 next(); 38 } 39 } 40 </script>
That’s all for the Login component.
We need to make a little modification to our application wrapper component. Open the file resources/assets/js/views/App.vue file and update the file with the following code in the template section:
1[...] 2 3 <!-- Right Side Of Navbar --> 4 <ul class="navbar-nav ml-auto"> 5 <!-- Authentication Links --> 6 <router-link :to="{ name: 'login' }" class="nav-link" v-if="!isLoggedIn">Login</router-link> 7 <router-link :to="{ name: 'register' }" class="nav-link" v-if="!isLoggedIn">Register</router-link> 8 <li class="nav-link" v-if="isLoggedIn"> Hi, {{name}}</li> 9 <router-link :to="{ name: 'board' }" class="nav-link" v-if="isLoggedIn">Board</router-link> 10 </ul> 11 12 [...]
Also, replace the contents of the script tag in the same file with the following:
1export default { 2 data(){ 3 return { 4 isLoggedIn : null, 5 name : null 6 } 7 }, 8 mounted(){ 9 this.isLoggedIn = localStorage.getItem('jwt') 10 this.name = localStorage.getItem('user') 11 } 12 }
In the code above, we do a check to see if the user is logged in or not and then use this knowledge to can hide or show route links.
Making secure API calls
Next, let’s create the main application board and consume the meat of the API from there. Create a resources/assets/js/views/Board.vue file add the following code to the file:
1<template> 2 <div class="container"> 3 <div class="row justify-content-center"> 4 <draggable element="div" class="col-md-12" v-model="categories" :options="dragOptions"> 5 <transition-group class="row"> 6 <div class="col-md-4" v-for="element,index in categories" :key="element.id"> 7 <div class="card"> 8 <div class="card-header"> 9 <h4 class="card-title">{{element.name}}</h4> 10 </div> 11 <div class="card-body card-body-dark"> 12 <draggable :options="dragOptions" element="div" @end="changeOrder" v-model="element.tasks"> 13 <transition-group :id="element.id"> 14 <div v-for="task,index in element.tasks" :key="task.category_id+','+task.order" class="transit-1" :id="task.id"> 15 <div class="small-card"> 16 <textarea v-if="task === editingTask" class="text-input" @keyup.enter="endEditing(task)" @blur="endEditing(task)" v-model="task.name"></textarea> 17 <label for="checkbox" v-if="task !== editingTask" @dblclick="editTask(task)">{{ task.name }}</label> 18 </div> 19 </div> 20 </transition-group> 21 </draggable> 22 <div class="small-card"> 23 <h5 class="text-center" @click="addNew(index)">Add new card</h5> 24 </div> 25 </div> 26 </div> 27 </div> 28 </transition-group> 29 </draggable> 30 </div> 31 </div> 32 </template>
In the template above we have implemented the [vue-draggable](https://github.com/SortableJS/Vue.Draggable) component, we installed earlier. This gives us a draggable div that we can use to mimic how Trello cards can be moved from one board to another. In the draggable tag we passed some options which we will define in the script section of the component soon.
To ensure we can drag across multiple lists using vue draggable, we had to bind our categories attribute to the parent draggable component. The most important part is binding the element.tasks to the child draggable component as a prop using v-model. If we fail to bind this, we would not be able to move items across the various categories we have.
We also define a method to be called when the dragging of an item is done (@end), when we click to edit an item or when we click the Add New Card.
For our style add the following after the closing template tag:
1<style scoped> 2 .card { 3 border:0; 4 border-radius: 0.5rem; 5 } 6 .transit-1 { 7 transition: all 1s; 8 } 9 .small-card { 10 padding: 1rem; 11 background: #f5f8fa; 12 margin-bottom: 5px; 13 border-radius: .25rem; 14 } 15 .card-body-dark{ 16 background-color: #ccc; 17 } 18 textarea { 19 overflow: visible; 20 outline: 1px dashed black; 21 border: 0; 22 padding: 6px 0 2px 8px; 23 width: 100%; 24 height: 100%; 25 resize: none; 26 } 27 </style>
Right after the code above, add the following code:
1<script> 2 import draggable from 'vuedraggable' 3 export default { 4 components: { 5 draggable 6 }, 7 data(){ 8 return { 9 categories : [], 10 editingTask : null 11 } 12 }, 13 methods : { 14 addNew(id) { 15 }, 16 loadTasks() { 17 }, 18 changeOrder(data){ 19 }, 20 endEditing(task) { 21 }, 22 editTask(task){ 23 this.editingTask = task 24 } 25 }, 26 mounted(){ 27 }, 28 computed: { 29 dragOptions () { 30 return { 31 animation: 1, 32 group: 'description', 33 ghostClass: 'ghost' 34 }; 35 }, 36 }, 37 beforeRouteEnter (to, from, next) { 38 if ( ! localStorage.getItem('jwt')) { 39 return next('login') 40 } 41 42 next() 43 } 44 } 45 </script>
Loading our categories
Let’s load our categories as we mount the Board component. Update the mounted method of the same file to have the following:
1mounted() { 2 let token = localStorage.getItem('jwt') 3 4 axios.defaults.headers.common['Content-Type'] = 'application/json' 5 axios.defaults.headers.common['Authorization'] = 'Bearer ' + token 6 7 axios.get('api/category').then(response => { 8 response.data.forEach((data) => { 9 this.categories.push({ 10 id : data.id, 11 name : data.name, 12 tasks : [] 13 }) 14 }) 15 this.loadTasks() 16 }) 17 },
In the code above, we set up axios. This is very important because vue will call the mounted method first before the page loads, so it is a convenient way to actually load data we need to use on our page.
? We set up some default
axiosheaders so we no longer need to pass the headers for each call we make.
Loading our tasks
Now we can add the logic to load the tasks from a category. In the methods object of the Board component, update the loadTasks method to the following code:
1[...] 2 3 loadTasks() { 4 this.categories.map(category => { 5 axios.get(`api/category/${category.id}/tasks`).then(response => { 6 category.tasks = response.data 7 }) 8 }) 9 }, 10 11 [...]
Adding new tasks
Let’s add the logic to add new tasks. In the methods object of the Board component, update the addNew method to the following:
1[...] 2 3 addNew(id) { 4 let user_id = 1 5 let name = "New task" 6 let category_id = this.categories[id].id 7 let order = this.categories[id].tasks.length 8 9 axios.post('api/task', {user_id, name, order, category_id}).then(response => { 10 this.categories[id].tasks.push(response.data.data) 11 }) 12 }, 13 14 [...]
When the addNew method is called the id of the category is passed in, which helps us determine where the new task should be added. We create the task for that category and pass in a dummy text as a placeholder so the user can see it come up.
Editing tasks
We will now add the logic to edit tasks. In the methods object of the Board component, update the endEditing method to the following:
1[...] 2 3 endEditing(task) { 4 this.editingTask = null 5 6 axios.patch(`api/task/${task.id}`, {name: task.name}).then(response => { 7 // You can do anything you wan't here. 8 }) 9 }, 10 11 [...]
When a task is edited, we pass it to the endEditing method which sends it over to the API.
Reordering tasks
Now we can get the logic to reorder tasks. In the methods object of the Board component, update the changeOrder method to the following:
1[...] 2 3 changeOrder(data) { 4 let toTask = data.to 5 let fromTask = data.from 6 let task_id = data.item.id 7 let category_id = fromTask.id == toTask.id ? null : toTask.id 8 let order = data.newIndex == data.oldIndex ? false : data.newIndex 9 10 if (order !== false) { 11 axios.patch(`api/task/${task_id}`, {order, category_id}).then(response => { 12 // Do anything you want here 13 }); 14 } 15 }, 16 17 [...]
Draggable returns an object when you drop an element you dragged. The returned object contains information of where the element was moved from and where it was dropped. We use this object to determine which category a task was moved from.
? If you go over the draggable component again, you’d notice we bound
:idwhen we were rendering categories. This is the sameidreferenced above.
Build the application
The next thing we need to do is build the assets. Run the command below to build the application:
1$ npm run prod
? Using
prodwill optimize the build. Recommended especially when you want to build for production. The other value available here isdevwhich is used during the development process
When the build is complete, we can now run the application:
1$ php artisan serve
Conclusion
In this series, we have seen how to build a simple Trello clone and in the process explained some key concepts you need to know when building modern web applications using Laravel and Vue.
Here’s a link to the source code.


© 2024 Pusher Ltd. All rights reserved.
Pusher Limited is a company registered in England and Wales (No. 07489873) whose registered office is at MessageBird UK Limited, 3 More London Riverside, 4th Floor, London, United Kingdom, SE1 2AQ.