- Products

- Developers
- User stories
- Blog
- Pricing

Using prediction models with CoreML
In this tutorial, you will create a classification model from a data set using scikit-learn, convert that model to CoreML, and use it in an iOS app.
Introduction
Apple released CoreML, a new framework for integrating machine learning models into any iOS app so predictions can happen on the device, without using any external service. Machine learning allows computers to learn without being explicitly programmed. It’s a hot and complex topic that you see in action almost everywhere, from movie recommendations to personal assistants.
You can use trained models from frameworks like Caffe, Keras, and scikit-learn, among others, and using coremltools, a Python library provided by Apple, you can convert those models to the CoreML format.
In this tutorial, we’re going to review the process of creating a prediction model with scikit-learn, converting it to Core ML format, and integrating it into an app. It is aimed at beginners, so it will explain some concepts and guide you to install a Python environment for creating the model. A little knowledge of machine learning and Python will help you, but it’s not absolutely required.
However, this tutorial won’t explain how to choose an algorithm to create a prediction model, how to preprocess the data, train the model, test it, and tune the process, all essential parts of a machine learning project.
Having said that, this is how the final app will look:
The sliders change different values that represent six elements of a wine’s chemical composition, and they are used to predict from which cultivar (1, 2, or 3) a wine comes from.
You will need Xcode 9. You can find the Python script on this gist and the complete Xcode project on this GitHub repository.
Let’s start by talking about the data set we’re going to use for the project.
Understanding the wine data set
A good place to get data sets for machine learning is the UC Irvine Machine Learning Repository.
The wine data set we are going to use comes from this repository, and it’s the result of using chemical analysis determine the origin of wines.
In addition to the cultivar the wine belongs, each row contains 13 attributes:
- Alcohol
- Malic acid
- Ash
- Alkalinity of ash
- Magnesium
- Total phenols
- Flavonoids
- Nonflavonoids phenols
- Proanthocyanins
- Color intensity
- Hue
- OD280/OD315 of diluted wines
- Proline
All of these attributes have continuous values. For example, here are the first three rows of the data set:
11,14.23,1.71,2.43,15.6,127,2.8,3.06,.28,2.29,5.64,1.04,3.92,1065 2 1,13.2,1.78,2.14,11.2,100,2.65,2.76,.26,1.28,4.38,1.05,3.4,1050 3 1,13.16,2.36,2.67,18.6,101,2.8,3.24,.3,2.81,5.68,1.03,3.17,1185
The value we are going to predict is known as the target. In this case, it is the cultivar, the origin of the wine, which can have three values: 1, 2, or 3. Each row represents an observation or a sample, and each column is known as a feature.
This is a good beginner’s dataset because it has no missing values and since the target is a discrete value (1, 2, or 3), it represents a classic classification problem, where we have to identify the category an observation belongs to, unlike a regression problem, where we have to predict a continuous value (for example, predicting the price of a house based on certain factors).
Now let’s set up our Python environment to start working with this data set.
Setting up the Python environment
We’ll be using coremltools to convert a trained model with scikit-learn to the format Core ML uses (.mlmodel). This is a Python package so we should have an environment with Python 2.7.
MacOS Sierra includes that version of Python out of the box, however, if you are going to use Python for data science projects, it’s often a good idea to use Anaconda which will ensure that we are using the correct version of Python and have all of the necessary dependencies installed.
Anaconda is a Python distribution that includes Python, R and Scala packages for data science, and in addition to pip, it comes with conda, its own package, and environment manager.
For this tutorial we’re going to use Anaconda, however, you can also use Miniconda, a distribution that only includes conda and Python so you can install the packages you need individually. Also, you can use your own Python installation if you want.
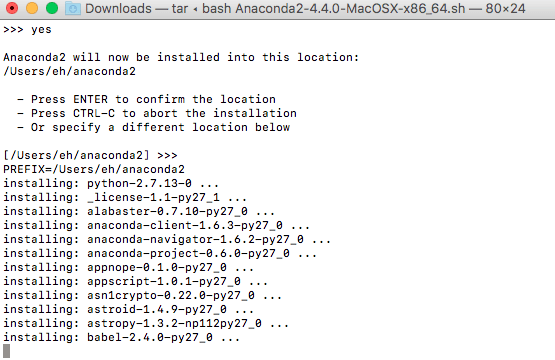
For macOS, you have the option to install Anaconda with a graphical and command line installer. Either way, choose the Python 2.7 version. For example, here’s a screenshot of the command line installer:
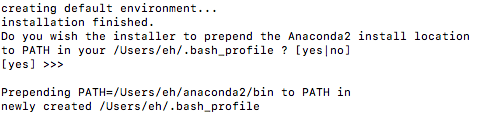
If you choose to prepend the Anaconda2 install location to the PATH to give it higher preference:
You can reload .bash_profile without having to open a new terminal with the command:
1source ~/.bash_profile
Make sure your environment is up-to-date:
1conda update conda 2 conda update anaconda
Verify your installation, you should see something similar to this:
1$ conda -V 2 conda 4.3.22 3 $ python -V 4 Python 2.7.13 :: Anaconda 4.4.0 (x86_64)
Now that Anaconda is installed, let’s build the script for the model.
Building the model with scikit-learn, Pandas, and coremltools
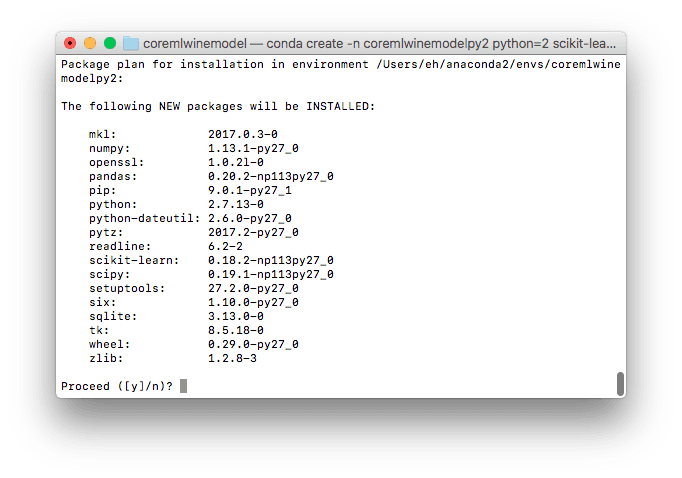
Let’s start by creating a new Python 2 environment for our project with the latest versions of the dependencies it will need:
1conda create -n coremlwinemodelpy2 python=2 scikit-learn pandas
The environment will be created and the packages will be installed:
Once the environment is created, activate it with:
1source activate coremlwinemodelpy2
You can get a list of all the environments you have created with the command:
1conda env list
Here’s a sample output:
1# conda environments: 2 # 3 coremlwinemodelpy2 * /Users/eh/anaconda2/envs/coremlwinemodelpy2 4 root /Users/eh/anaconda2
The one with the asterisk is the currently active environment.
Now let’s install coremltools. At the time of this writing, it is not in the conda package repository, so we have to use pip to install it:
1pip install coremltools
You can find the updated Anaconda package list here.
Now create a file, let’s say wine_model.py, and start by importing Pandas, which we’ll use to load the model:
1import pandas as pd
Also, import the model we’re going to use to make predictions, random forest, from scikit-learn:
1from sklearn.ensemble import RandomForestClassifier
Random forest is a regression and classification algorithm that belongs to a class of machine learning algorithms called ‘ensemble methods’. This name comes from the fact that it works by generating multiple models that make predictions independently, which are then combined into a single (and better) prediction. Random forest generates decision trees (hence its name).
Not all scikit-learn models are supported by coremltools. You can check the list here.
Some imports for cross-validation, which we’re going to use for evaluating the model:
1from sklearn.model_selection import cross_val_score 2 from sklearn.model_selection import cross_val_predict 3 from sklearn import metrics
And of course, coremltools:
1import coremltools
Now we are ready to load the data set. Scikit-learn comes with some sample data sets, and the one we’re going to use happens to be one of them:
1from sklearn.datasets import load_wine 2 3 data = load_wine()
However, this might not be your case, so let’s use Pandas to manually load the data set.
Pandas can read data from CVS, SQL, JSON and other formats. You can see the complete list of I/O formats supported here. In this case, we’ll use the read_csv() function:
1# Data set URL 2 dataset_url = 'http://archive.ics.uci.edu/ml/machine-learning-databases/wine/wine.data' 3 4 # Names of the columns 5 names = ['cultivar', 'alcohol', 'malic_acid', 'ash', 'alkalinity_ash', 'magnesium', 'total_phenols', 'flavonoids', 'nonflavonoid_phenols', 'proanthocyanins', 'color intensity', 'hue', 'od280_od315', 'proline'] 6 7 # Read the CSV file 8 data = pd.read_csv(dataset_url, names=names, header=None)
Pandas assume the first row should be used as the column names, but the file doesn’t have a header, so what we do here is specify the column names and explicitly tell it that there’s no header.
Now let’s separate our target (y) from our input features (X):
1X = data[['alcohol','malic_acid', 'ash', 'alkalinity_ash', 'magnesium', 'total_phenols']] 2 y = data['cultivar'].astype(str)
Note: In the data set, the cultivar is a numeric value, however, when trying to use the CoreML format in Xcode, the generated class interprets it as an Int64 type and it was throwing an error when unwrapping the dictionary with the classification probability. As this app is being built with beta versions, this is probably a bug that will get fixed in future versions so you don’t have to convert the cultivar to a string.
Since the data set has no missing values (and we’re not going to do any preprocessing for this example), we can create the model now with the default values:
1# Create the model 2 model = RandomForestClassifier()
One important thing is to know how well the model is performing. One technique that can help us with this task is cross-validation.
For example, using a method called k-fold cross-validation, the data set is randomly partitioned into k equal sized smaller sets. Of all these, one set is used as the validation data for testing the model, and the remaining k − 1 sets are used as training data. Then, the process is then repeated k times (the folds), with each of the k sets used exactly once as the validation data. The results from the folds can be averaged to produce a single result.
You can know more cross-validation on the scikit-learn documentation and in this article.
This way, we can compute the model accuracy using cross-validation (with five folds, just as an example) and then printing the score’s mean:
1# Evaluate the model with cross validation 2 scores = cross_val_score(model, X, y, cv=5) 3 print('Scores: {}').format(scores) 4 print('Accuracy: {0:0.2f} (+/- {1:0.2f})').format(scores.mean(), scores.std() * 2)
Using the actual predictions, we can also compute the score with the methods cross_val_predict and metrics.accuracy_score:
1predicted = cross_val_predict(model, X, y, cv=5) 2 print('Predicted: {}').format(predicted) 3 accuracy_score = metrics.accuracy_score(y, predicted) 4 print('Accuracy: {0:0.2f}').format(accuracy_score)
Next, we fit the model with the data:
1# Fit the data 2 model.fit(X, y)
And finally, let’s convert the model to the Core ML format, specifying the input feature names we’re going to use in our Swift code, and save it:
1# Convert model to Core ML 2 coreml_model = coremltools.converters.sklearn.convert(model, input_features=['alcohol','malicAcid', 'ash', 'alkalinityAsh', 'magnesium', 'totalPhenols']) 3 4 # Save Core ML Model 5 coreml_model.save('wine.mlmodel') 6 7 print('Core ML Model saved')
Optionally, we can also specify the name of the output attribute that will hold the predicted cultivar with the output_feature_names parameter.
The output of the model (and its identifier) depends on its type:
- If the model is a transformer, it is the name of the array feature output by the final sequence of the transformer (defaults to
output). - If it is a classifier, it should be a 2-tuple of names giving the top class prediction and the array of scores for each class (defaults to
classLabelandclassProbability). - If it is a regressor, it should give the name of the prediction value (defaults to
prediction).
You can also specify metadata like the author and the license of the model. If you want to know more about coremltools’ API, you can find the documentation here. In particular, here’s the page for the scikit converter.
Run this program with:
1python wine_model.py
The output should be something similar to this:
1Scores: [ 0.83783784 0.91666667 0.88888889 0.88571429 0.88235294] 2 Accuracy: 0.88 (+/- 0.05) 3 Predicted: ['1' '1' '1' '1' '1' '1' '1' '1' '1' '1' '1' '3' '1' '1' '1' '1' '1' '1' 4 '1' '1' '1' '1' '1' '1' '1' '1' '1' '1' '1' '1' '1' '1' '1' '1' '1' '1' 5 '1' '1' '1' '1' '1' '1' '1' '1' '1' '1' '1' '1' '1' '1' '1' '1' '1' '1' 6 '1' '1' '1' '1' '1' '2' '2' '2' '3' '2' '2' '2' '2' '2' '1' '2' '2' '2' 7 '2' '1' '2' '2' '2' '2' '2' '2' '2' '2' '2' '3' '2' '2' '2' '2' '2' '2' 8 '2' '2' '2' '2' '2' '2' '2' '2' '2' '2' '2' '2' '2' '2' '2' '3' '2' '2' 9 '2' '2' '2' '2' '2' '2' '2' '2' '2' '2' '2' '2' '2' '2' '3' '1' '2' '2' 10 '2' '2' '2' '2' '3' '3' '3' '3' '2' '2' '3' '3' '3' '3' '3' '3' '3' '3' 11 '2' '3' '3' '3' '3' '3' '3' '3' '2' '3' '2' '3' '3' '2' '1' '1' '2' '3' 12 '3' '3' '3' '3' '3' '2' '3' '3' '3' '2' '3' '3' '3' '3' '3' '3'] 13 Accuracy: 0.89 14 Core ML Model saved
You’ll get slightly different results because the data will be grouped in different ways, but we can see that one method estimated a 0.88 accuracy and the other, 0.89 (also, notice in the output the predicted values).
For the purposes of this tutorial, we’ll leave it at that, however, in a real situation, you’ll have to try different model parameters or algorithms to see which gives you the best result.
In addition, the file wine.mlmodel should be generated in the same directory of the script.
Now that we have our model, let’s create the app.
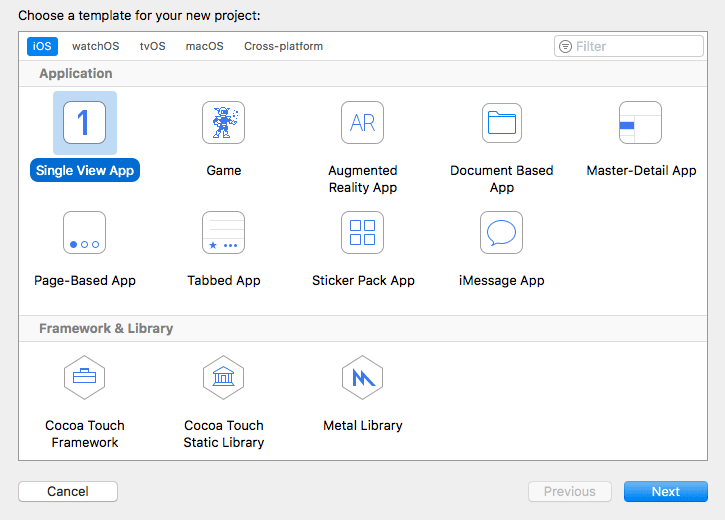
Building the app
Open Xcode a create a new Single View App:
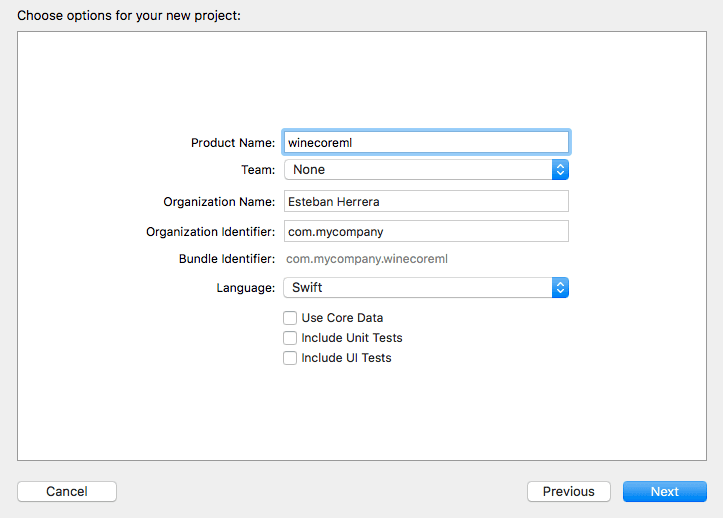
Enter the project information, choosing Swift as the language:
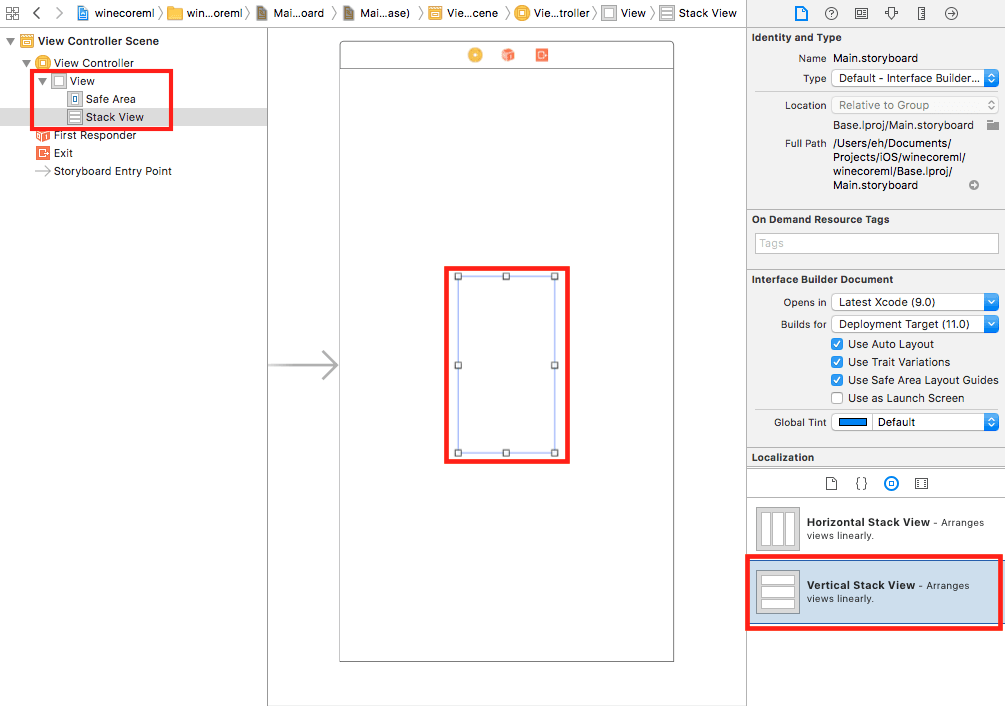
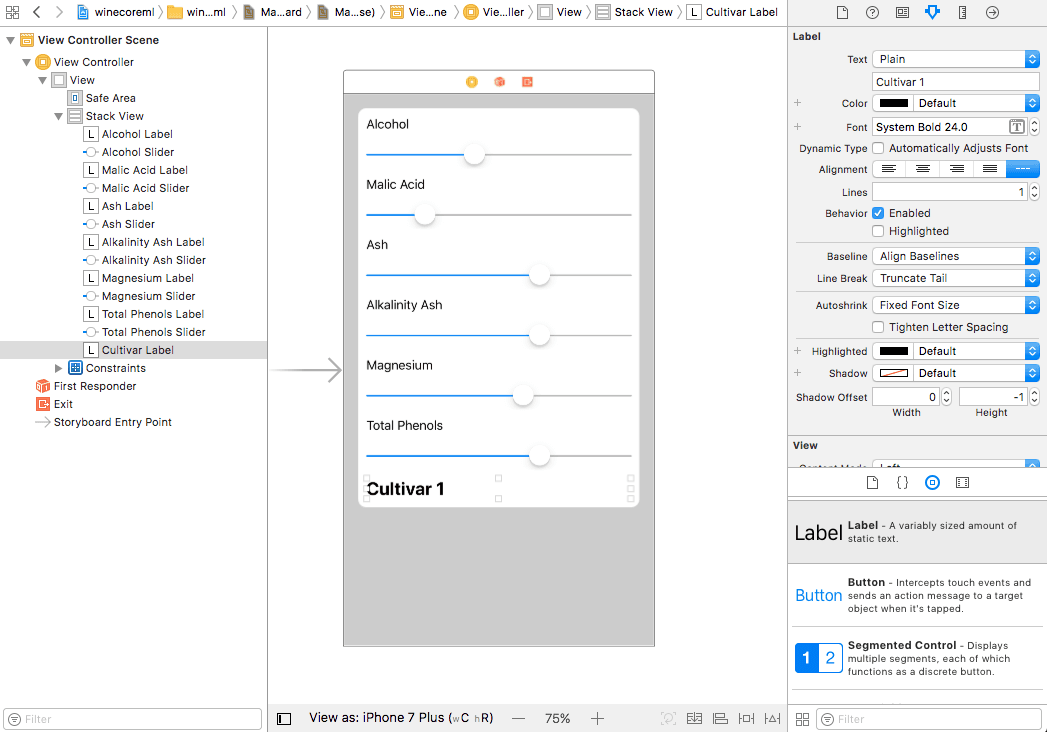
Let’s start by creating the user interface. Open Main.storyboard and drag a Vertical Stack View to the main view:
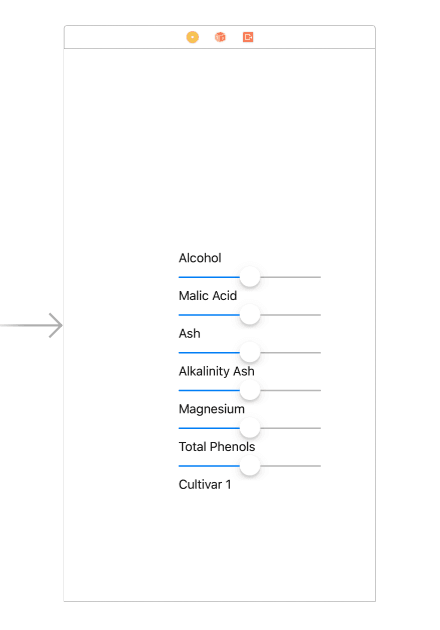
Our model has six inputs, and they all are continuous values, so drag into the stack view six sliders with corresponding labels for each input and an additional label for the predicted cultivar. This is how the view should look like at this point:
Next, give the sliders the following (sort of random) values and ranges:
- Alcohol slider: 14 (value), 10 (min), 20 (max)
- Malic acid: 1 (value), 0 (min), 5 (max)
- Ash: 2.5 (value), 1.5 (min), 3 (max)
- Alkalinity ash: 20 (value), 10 (min), 25 (max)
- Magnesium: 100 (value), 70 (min), 120 (max)
- Total phenols: 3 (value), 1 (min), 4 (max)
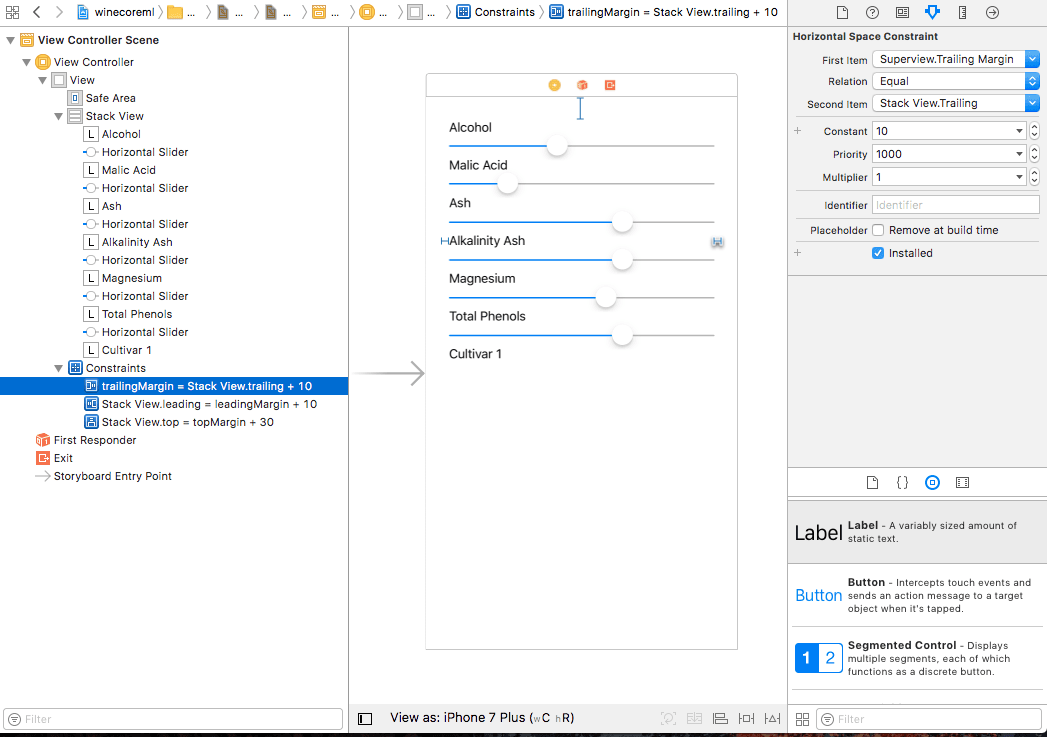
Now let’s put some layout constraints. Select the stack view, control-click inside of it, drag a line to the left and while you keep pressing the alt key, you’ll see that the option Leading Space to Safe Area changes to Leading Space to Container Margin (this is a new option in iOS 11). Choose it and then select the newly created constraint and give it a value of 10. Press the Update Frame button at the bottom if you don’t see any changes:
Do the same to add the top and right constraints, choosing Top Space to Container Margin with a value of 30 and Trailing Space to Container Margin with a value of 10, respectively. Just make sure to add them to the stack view and not to any of the labels or sliders. This is how the view should look:
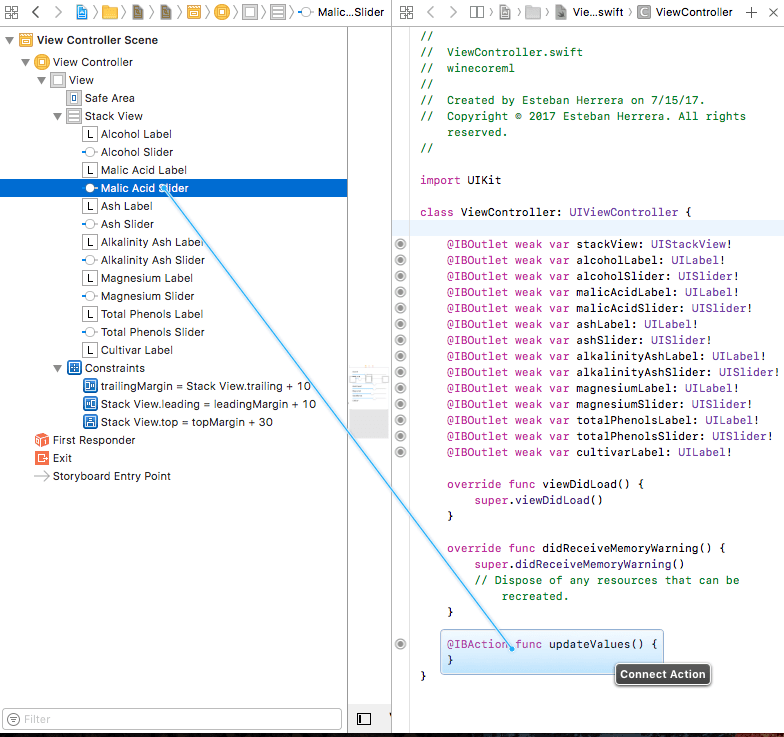
Now create IBOutlets for all the view objects, including the stack view by dragging the object to the ViewController code while pressing the control key. The ViewController class should end up with something like:
1class ViewController: UIViewController { 2 3 @IBOutlet weak var stackView: UIStackView! 4 @IBOutlet weak var alcoholLabel: UILabel! 5 @IBOutlet weak var alcoholSlider: UISlider! 6 @IBOutlet weak var malicAcidLabel: UILabel! 7 @IBOutlet weak var malicAcidSlider: UISlider! 8 @IBOutlet weak var ashLabel: UILabel! 9 @IBOutlet weak var ashSlider: UISlider! 10 @IBOutlet weak var alkalinityAshLabel: UILabel! 11 @IBOutlet weak var alkalinityAshSlider: UISlider! 12 @IBOutlet weak var magnesiumLabel: UILabel! 13 @IBOutlet weak var magnesiumSlider: UISlider! 14 @IBOutlet weak var totalPhenolsLabel: UILabel! 15 @IBOutlet weak var totalPhenolsSlider: UISlider! 16 @IBOutlet weak var cultivarLabel: UILabel! 17 18 ... 19 20 }
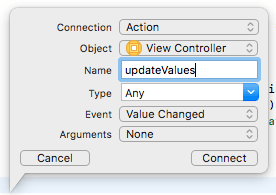
Next, create an action for the Value Changed event of the alcohol slider by dragging the object to the ViewController code while pressing the control key, choosing None in Argument and naming it updateValues:
The following method will be created:
1@IBAction func updateValues() { 2 }
Now, instead of creating a new action for the rest of the sliders, drag them to the method updateValues while pressing the control key to link them all to the same function:
To give our app a better look, select the Stack View and in the attribute inspector, set the spacing to 15 (or any other value you want):
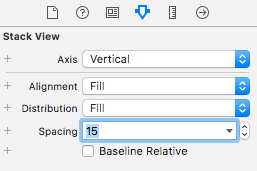
That value will apply to all the elements within the stack view. However, we want the prediction label to have more space to create a visual separation from the other controls. In this case, we can use the method setCustomSpacing in this way:
1override func viewDidLoad() { 2 super.viewDidLoad() 3 4 stackView.setCustomSpacing(30, after: totalPhenolsSlider) 5 }
And make the text of the cultivar label a bigger size and a bold format, something like this:
Now drag the file wine.mlmodel to the Xcode project. When you select the file on the Project Navigator the following screen will show up. Make sure that the file applies to the project’s target:
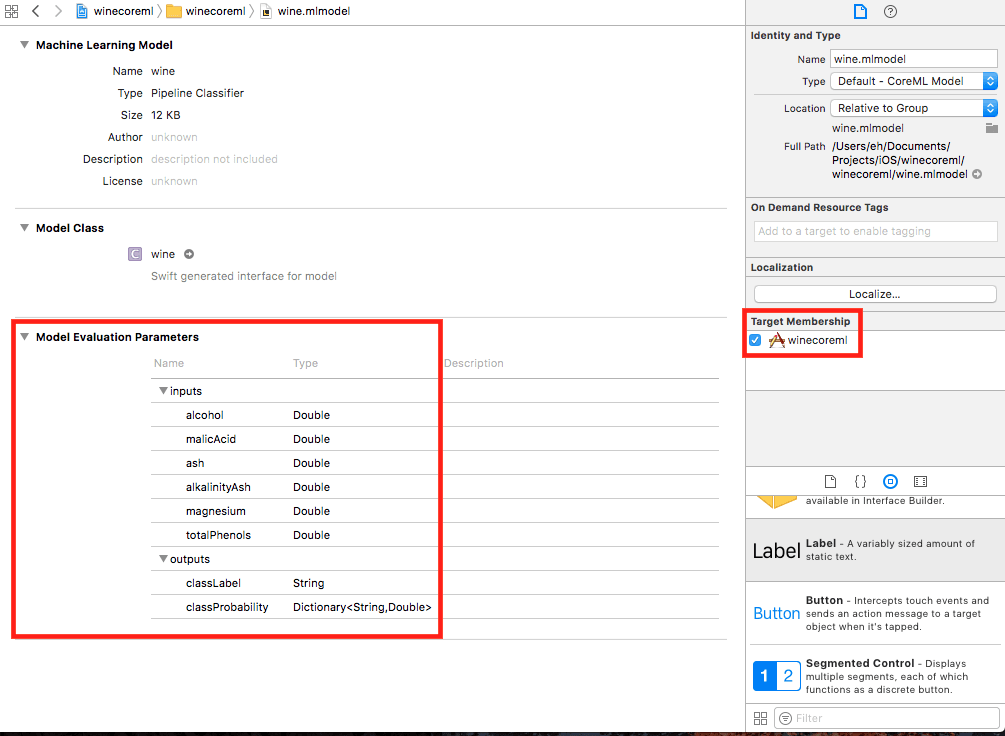
You can see the inputs we define for the model and its outputs. In this case, as it is a classifier, it has two outputs: the top class prediction (classLabel) and a dictionary of scores for each class (classProbability).
A class is generated automatically to use the model. Add a variable to ViewController:
1class ViewController: UIViewController { 2 3 ... 4 5 let model = wine() 6 7 ... 8 9 }
And a formatter for the input values:
1class ViewController: UIViewController { 2 3 ... 4 5 let numberFormatter = NumberFormatter() 6 7 override func viewDidLoad() { 8 ... 9 10 numberFormatter.numberStyle = .decimal 11 numberFormatter.maximumFractionDigits = 2 12 } 13 14 }
The method updateValues will update the labels according to the values of the sliders and call the wine class to predict the cultivar asynchronously:
1@IBAction func updateValues() { 2 DispatchQueue.main.async { 3 self.updateLabels(); 4 self.predictCultivar(); 5 } 6 }
This is the definition of the method updateLabels:
1func updateLabels() { 2 alcoholLabel.text = "Alcohol: \(numberFormatter.string(for: alcoholSlider.value) ?? "0")" 3 malicAcidLabel.text = "Malic Acid: \(numberFormatter.string(for: malicAcidSlider.value) ?? "0")" 4 ashLabel.text = "Ash: \(numberFormatter.string(for: ashSlider.value) ?? "0")" 5 alkalinityAshLabel.text = "Alkalinity Ash: \(numberFormatter.string(for: alkalinityAshSlider.value) ?? "0")" 6 magnesiumLabel.text = "Magnesium: \(numberFormatter.string(for: magnesiumSlider.value) ?? "0")" 7 totalPhenolsLabel.text = "Total Phenols: \(numberFormatter.string(for: totalPhenolsSlider.value) ?? "0")" 8 }
Updating all the labels at once probably isn’t optimal, but to keep things simple in this example let’s do it that way.
The method predictCultivar passes the value of all the sliders as Double to the predict method of the model instance and sets the text of the cultivar label with the number and its probability:
1func predictCultivar() { 2 if let prediction = try? model.prediction(alcohol: Double(alcoholSlider.value), malicAcid: Double(malicAcidSlider.value), ash: Double(ashSlider.value), alkalinityAsh: Double(alkalinityAshSlider.value), magnesium: Double(magnesiumSlider.value), totalPhenols: Double(totalPhenolsSlider.value)) { 3 cultivarLabel.text = "Cultivar \(prediction.classLabel) (\(prediction.classProbability[prediction.classLabel] ?? 0))" 4 } 5 }
Finally, let’s add a call to the method updateValues() in viewDidLoad:
1override func viewDidLoad() { 2 ... 3 4 updateValues() 5 }
And that’s it. Run the app in the simulator. Whenever you change a parameter, the cultivar will be updated:
See if you can see which features influence the final prediction more.
Conclusion
This tutorial has shown you the basics of the process of using Core ML in an iOS app. You have learned how to create a classification model from a data set using scikit-learn, convert that model to Core ML, and use it in an iOS app.
As you can see, Core ML is not a machine learning framework itself, it doesn’t help you choose an algorithm to create a model and train it. You need to have a trained model already and it only supports a few regression and classification algorithms.
In this post, you can find a discussion of the disadvantages of Core ML. However, having an easy way to integrate machine learning into an app is always welcome. You can find the source code for this project on GitHub and the Python script on this gist.


© 2024 Pusher Ltd. All rights reserved.
Pusher Limited is a company registered in England and Wales (No. 07489873) whose registered office is at MessageBird UK Limited, 3 More London Riverside, 4th Floor, London, United Kingdom, SE1 2AQ.