- Products

- Developers
- User stories
- Blog
- Pricing

How to build a realtime map with Swift and Pusher
In this article, discover how we can use Swift, Node.js, Google Maps and Pusher to build a realtime map on iOS.
Introduction
Realtime maps are very popular nowadays. Especially now that there are many on-demand transportation services like Uber and Lyft that have realtime location reporting. In this article, we are going to learn how to build a realtime map with Swift using Pusher.
Before we continue, you’ll need to make sure you have all of the following requirements:
- A MacBook (Xcode only runs on Mac).
- Xcode installed on your machine.
- Knowledge of JavaScript (Node.js).
- Knowledge of Swift and using Xcode. You can get started here.
- NPM and Node.js installed locally.
- Cocoapods package manager installed locally.
- A Google iOS API key. See here for instructions on how to get a key.
- A Pusher application. Create one here.
Assuming you have all of the requirements, let us begin. This is a screen recording of what we will be building:
As you can see in the demo, every time the location is updated, the change is reflected on both devices. This is what we want to replicate. Let’s get started.
Setting up our iOS application
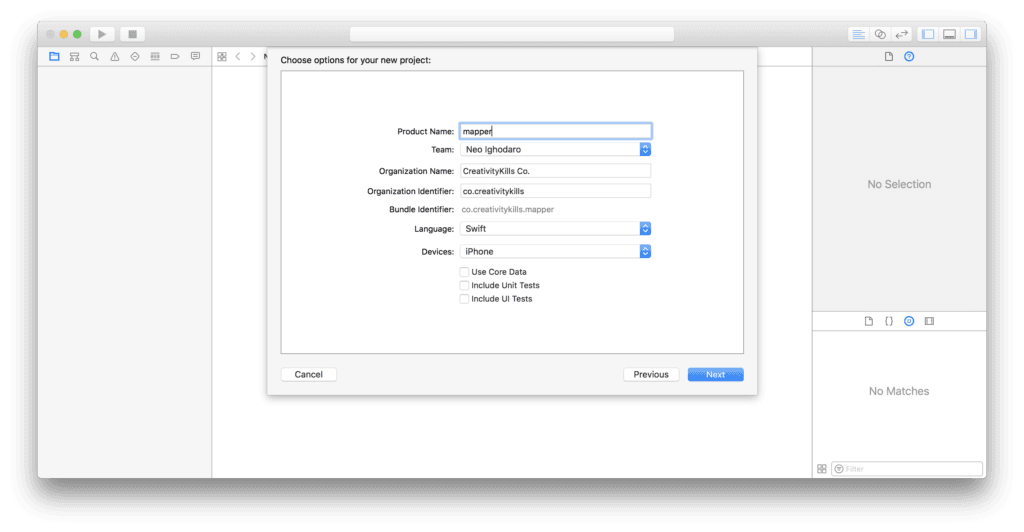
Launch Xcode and create a new “Single-app” project. You can call the project whatever you please.
When the project is created, close Xcode. Open your terminal, cd to the root directory of your application and run the command below to initialize Cocoapods on the project:
1$ pod init
The command above will create a Podfile in the root directory of our application. In this Podfile, we will specify our project dependencies and let Cocoapods pull and manage them. Open the Podfile and replace the content of the file with the content below:
1platform :ios, '10.0'
2 target 'application_name' do
3 use_frameworks!
4
5 pod 'GoogleMaps'
6 pod 'Alamofire', '~> 4.4.0'
7 pod 'PusherSwift', '~> 4.1.0'
8 end
⚠️ Replace
**application_name**with the name of your application.
Run the command below to start installing the packages we specified in our Podfile:
1$ pod install
When the installation is complete, open the *.xcworkspace file that was added to the root of your application directory. This should launch Xcode.
Setting up our Node.js simulator app
Before going back into our iOS application, we need to create a simple Node.js application. This application will send events with data to Pusher. The data sent to Pusher will be simulated GPS coordinates. When our iOS application picks up the event’s data from Pusher, it will update the map’s marker to the new coordinates.
Create a new directory that will hold our Node.js application. Open your terminal and cd to the directory of your Node.js application. In this directory, create a new package.json file. Open that file and paste the JSON below:
1{ 2 "main": "index.js", 3 "dependencies": { 4 "body-parser": "^1.16.0", 5 "express": "^4.14.1", 6 "pusher": "^1.5.1" 7 } 8 }
Now run the command below to install the NPM packages listed as dependencies:
1$ npm run install
Create a new index.js file in the directory and paste the code below into the file:
1// 2 // Load the required libraries 3 // 4 let Pusher = require('pusher'); 5 let express = require('express'); 6 let bodyParser = require('body-parser'); 7 8 // 9 // initialize express and pusher 10 // 11 let app = express(); 12 let pusher = new Pusher(require('./config.js')); 13 14 // 15 // Middlewares 16 // 17 app.use(bodyParser.json()); 18 app.use(bodyParser.urlencoded({ extended: false })); 19 20 21 // 22 // Generates 20 simulated GPS coords and sends to Pusher 23 // 24 app.post('/simulate', (req, res, next) => { 25 let loopCount = 0; 26 let operator = 0.001000 27 let longitude = parseFloat(req.body.longitude) 28 let latitude = parseFloat(req.body.latitude) 29 30 let sendToPusher = setInterval(() => { 31 loopCount++; 32 33 // Calculate new coordinates and round to 6 decimal places... 34 longitude = parseFloat((longitude + operator).toFixed(7)) 35 latitude = parseFloat((latitude - operator).toFixed(7)) 36 37 // Send to pusher 38 pusher.trigger('mapCoordinates', 'update', {longitude, latitude}) 39 40 if (loopCount === 20) { 41 clearInterval(sendToPusher) 42 } 43 }, 2000); 44 res.json({success: 200}) 45 }) 46 47 48 // 49 // Index 50 // 51 app.get('/', (req, res) => { 52 res.json("It works!"); 53 }); 54 55 56 // 57 // Error Handling 58 // 59 app.use((req, res, next) => { 60 let err = new Error('Not Found'); 61 err.status = 404; 62 next(err); 63 }); 64 65 66 // 67 // Serve app 68 // 69 app.listen(4000, function() { 70 console.log('App listening on port 4000!') 71 });
The code above is a simple Express application. We have initialized the Express app and the pusher instance. In the /simulate route, we run a loop in 2-second intervals and break the loop after the 20th run. Every time the loop runs, new GPS coordinates are generated and sent over to Pusher.
Create a new config.js file and paste the code below into it:
1module.exports = { 2 appId: 'PUSHER_APP_ID', 3 key: 'PUSHER_APP_KEY', 4 secret: 'PUSHER_APP_SECRET', 5 cluster: 'PUSHER_APP_CLUSTER', 6 };
Replace the values of *PUSHER_APP_ID*, *PUSHER_APP_KEY*, PUSHER_APP_SECRET and PUSHER_APP_CLUSTER with the values in your Pusher application dashboard. Our Node.js application is now ready to simulate GPS coordinates when our application triggers it.
Now that we are done creating the Node.js application we can return to creating the iOS application.
Creating the views of our realtime map in Xcode
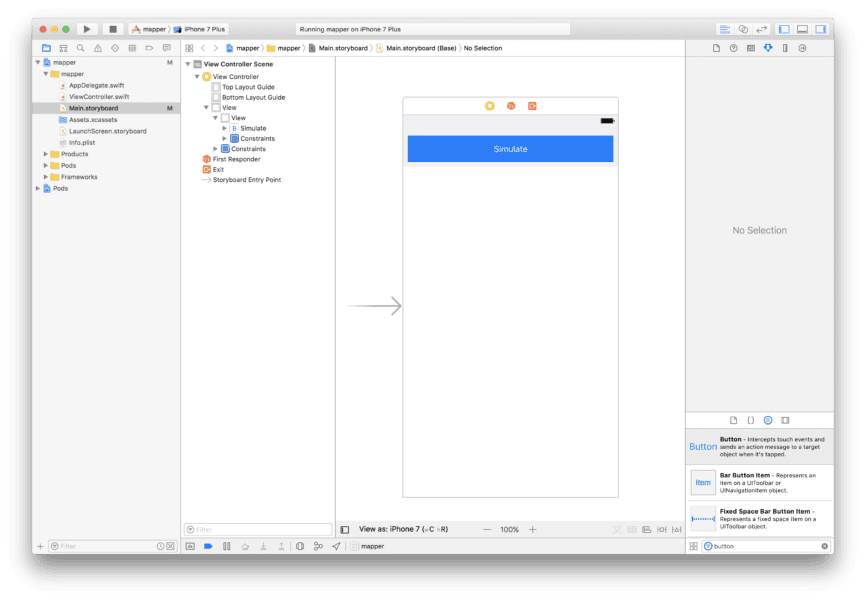
Reopen Xcode with our project and open the Main.storyboard file. In the ViewController we will add a UIView, and in that UIView we will add a simulate button. Something like this:
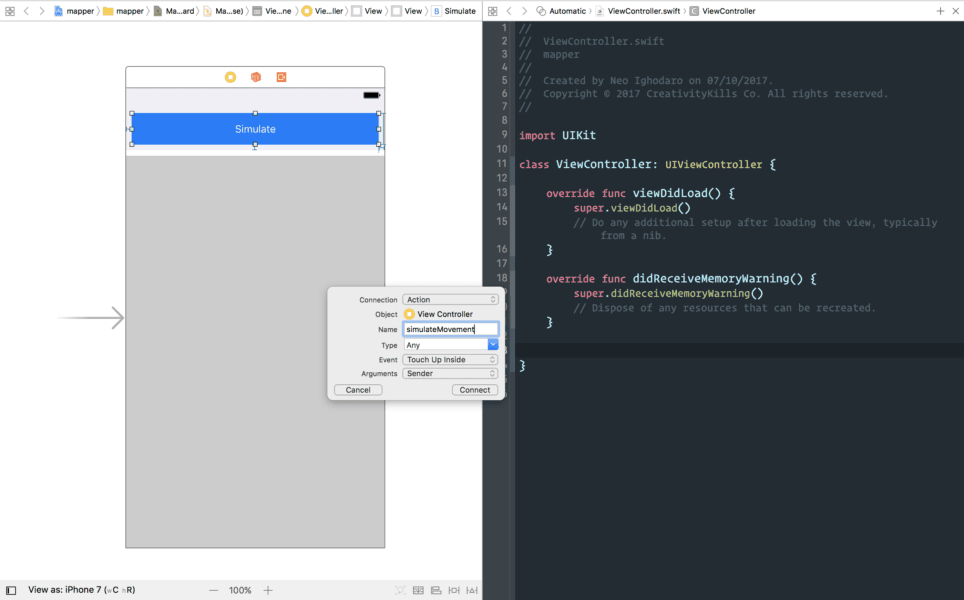
Create an @IBAction from the button to the ViewController. To do this, click on “Show the Assistant Editor” on the top right of the Xcode toolset. This will split the screen into storyboard and code editor. Now ctrl and drag from the button to the code editor to create the @IBAction. We will call the method simulateMovement.
Next, click the “Show standard editor” button on the Xcode toolbar to close the split screen and display just the Main.storyboard. Add another UIView starting from the bottom of the last UIView to the bottom of the screen. This view will be where the map will be displayed.
Set the UIView‘s custom class in the “Identity inspector” to GMSMapView. Now click the “Show the Assistant Editor” on the top right of the Xcode toolset. ctrl and drag from the UIView to the code editor. Create an @IBOutlet and name it mapView.
Click on the “Show standard editor” button on the Xcode toolbar to close the split view. Open the ViewController file and replace the content with the code below:
1//
2 // Import libraries
3 //
4 import UIKit
5 import PusherSwift
6 import Alamofire
7 import GoogleMaps
8
9 //
10 // View controller class
11 //
12 class ViewController: UIViewController, GMSMapViewDelegate {
13 // Marker on the map
14 var locationMarker: GMSMarker!
15
16 // Default starting coordinates
17 var longitude = -122.088426
18 var latitude = 37.388064
19
20 // Pusher
21 var pusher: Pusher!
22
23 // Map view
24 @IBOutlet weak var mapView: GMSMapView!
25
26 //
27 // Fires automatically when the view is loaded
28 //
29 override func viewDidLoad() {
30 super.viewDidLoad()
31
32 //
33 // Create a GMSCameraPosition that tells the map to display the coordinate
34 // at zoom level 15.
35 //
36 let camera = GMSCameraPosition.camera(withLatitude:latitude, longitude:longitude, zoom:15.0)
37 mapView.camera = camera
38 mapView.delegate = self
39
40 //
41 // Creates a marker in the center of the map.
42 //
43 locationMarker = GMSMarker(position: CLLocationCoordinate2D(latitude: latitude, longitude: longitude))
44 locationMarker.map = mapView
45
46 //
47 // Connect to pusher and listen for events
48 //
49 listenForCoordUpdates()
50 }
51
52 //
53 // Send a request to the API to simulate GPS coords
54 //
55 @IBAction func simulateMovement(_ sender: Any) {
56 let parameters: Parameters = ["longitude":longitude, "latitude": latitude]
57
58 Alamofire.request("http://localhost:4000/simulate", method: .post, parameters: parameters).validate().responseJSON { (response) in
59 switch response.result {
60 case .success(_):
61 print("Simulating...")
62 case .failure(let error):
63 print(error)
64 }
65 }
66 }
67
68 //
69 // Connect to pusher and listen for events
70 //
71 private func listenForCoordUpdates() {
72 // Instantiate Pusher
73 pusher = Pusher(key: "PUSHER_APP_KEY", options: PusherClientOptions(host: .cluster("PUSHER_APP_CLUSTER")))
74
75 // Subscribe to a Pusher channel
76 let channel = pusher.subscribe("mapCoordinates")
77
78 //
79 // Listener and callback for the "update" event on the "mapCoordinates"
80 // channel on Pusher
81 //
82 channel.bind(eventName: "update", callback: { (data: Any?) -> Void in
83 if let data = data as? [String: AnyObject] {
84 self.longitude = data["longitude"] as! Double
85 self.latitude = data["latitude"] as! Double
86
87 //
88 // Update marker position using data from Pusher
89 //
90 self.locationMarker.position = CLLocationCoordinate2D(latitude: self.latitude, longitude: self.longitude)
91 self.mapView.camera = GMSCameraPosition.camera(withTarget: self.locationMarker.position, zoom: 15.0)
92 }
93 })
94
95 // Connect to pusher
96 pusher.connect()
97 }
98 }
In the controller class above, we import all the required libraries. Then we instantiate a few properties on the class. In the viewDidLoad method we set the coordinates on the mapView, and also add the locationMarker to it.
In the same method, we make a call to listenForCoordUpdates(). In the listenForCoordUpdates method we create a connection to Pusher and listen for the update event on the mapCoordinates channel.
When the update event is triggered, the callback takes the new coordinates and updates the locationMarker with them. Remember, you need to change the PUSHER_APP_KEY and PUSHER_APP_CLUSTER to the actual values provided for your Pusher application.
In the simulateMovement method we just send a request to our local web server (the Node.js application we created earlier). The request will instruct the Node.js application to generate several GPS coordinates.
? The URL of the endpoint we are hitting (http://localhost:3000/simulate) is a local web server. This means that you will need to change the endpoint URL when building for real cases.
Configuring Google Maps for iOS
We will need to configure the Google Maps iOS SDK to work with our application. First, create a Google iOS SDK key and then, when you have the API key, open the AppDelegate.swift file in Xcode.
In the class, look for the class below:
1func application(_ application: UIApplication, didFinishLaunchingWithOptions launchOptions: [UIApplicationLaunchOptionsKey: Any]?) -> Bool {
2 // Override point for customization after application launch.
3 return true
4 }
and replace it with this:
1func application(_ application: UIApplication, didFinishLaunchingWithOptions launchOptions: [UIApplicationLaunchOptionsKey: Any]?) -> Bool {
2 GMSServices.provideAPIKey("GOOGLE_IOS_API_KEY")
3 return true
4 }
? You need to replace the
**GOOGLE_IOS_API_KEY**with the key you got when you created the Google iOS API key.
At the top of the same file, look for import UIKit and add the following under it:
1import GoogleMaps
With that, we are done configuring Google Maps to work on iOS.
Testing our realtime iOS map
To test our application, we need to start the Node.js application, instruct iOS to allow connections to the local web server, and then run our iOS application.
To run the Node.js application, cd to the Node.js application directory using your terminal and run the command below to start the Node application:
1$ node index.js
Now, before we launch our application we need to make some final changes so our iOS application can connect to our localhost backend. Open the info.plist file in Xcode and make the following adjustments:
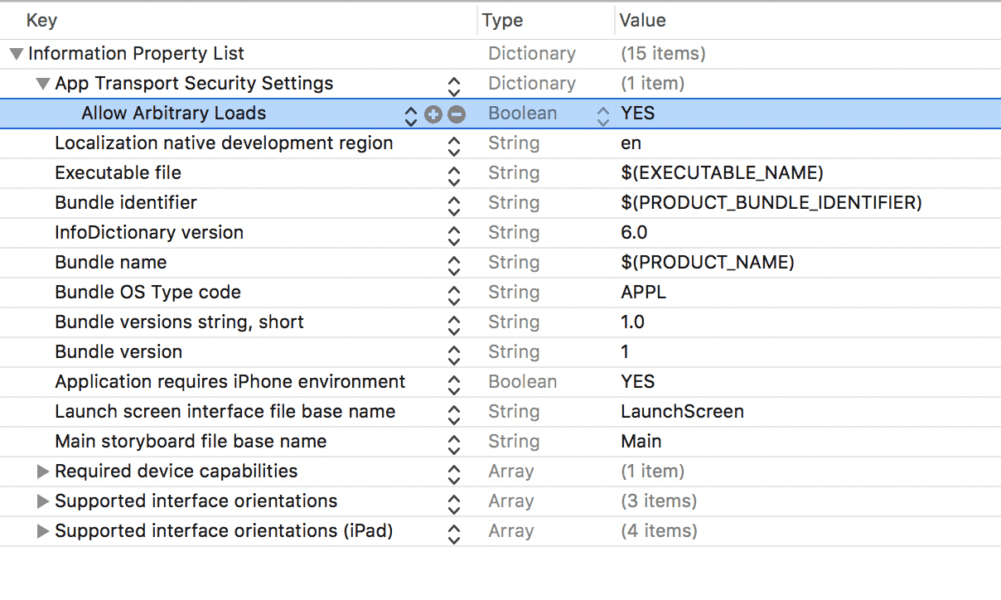
This change will make it possible for our application to connect to localhost. To be clear, this step will not be needed in production environments.
Now build your application. You should see that the iOS application now displays the map and the marker on the map. Clicking the simulate button hits the endpoint which in turn sends the new coordinates to Pusher. Our listener catches the event and updates the locationMarker, thereby moving our marker.
Conclusion
In this article, we have seen how we can use Pusher and Swift to build a realtime map on iOS. Hope you learned a few things on how to create realtime iOS applications. If you have any questions or suggestions, leave a comment below.
The source code for this tutorial is available on GitHub.


© 2024 Pusher Ltd. All rights reserved.
Pusher Limited is a company registered in England and Wales (No. 07489873) whose registered office is at MessageBird UK Limited, 3 More London Riverside, 4th Floor, London, United Kingdom, SE1 2AQ.