- Products

- Developers
- User stories
- Blog
- Pricing

Adding authentication to a React Native app with Auth0

Learn to integrate authentication with Auth0 into a React Native app. Build a sample app that allows users to sign up with Auth0, and log in with Auth0, Facebook or Google.
Introduction
In this tutorial, we’re going to look at how to implement authentication in React Native apps using Auth0. Specifically, we’re going to:
- Set up Auth0 to allow Google and Facebook logins.
- Use the hosted login page to log in users.
Prerequisites
In order to follow this tutorial, you need to have basic knowledge of React and React Native. Knowledge of Auth0 is helpful but not required.
You also need an Auth0 account to follow along. Go ahead and create one if you don’t have already.
What is Auth0?
Before we proceed, it’s important to understand what Auth0 is and what it allows you to do. Auth0 is an authentication and authorization service.
Auth0 provides the tools that allow you to add authentication to your website or app. This includes but not limited to:
- Social login – Auth0 allows users to log in with their existing accounts on some of the well-known websites such as Facebook, Google, and GitHub.
- SDK’s and libraries for different platforms – Auth0 has SDK’s for different development platforms. This includes Python, Java, .NET, JavaScript, Android, Swift, and PHP. There are also libraries created specifically for mobile platforms such as Cordova, Ionic, React Native, and Xamarin.
- Integrations – Auth0 provides marketing, analytics, and single sign-on integrations.
For more information on Auth0, be sure to check out their overview page.
What we’re going to build
We’re going to build an app which allows the user to:
- Sign up using an Auth0 account.
- Log in with their Auth0, Google, or Facebook account.
Here’s what the app is going to look like:
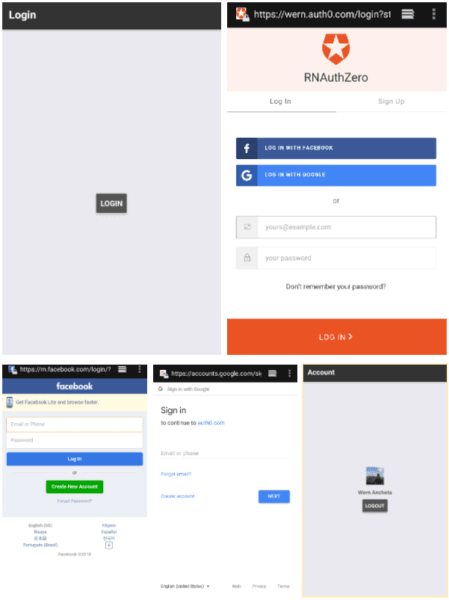
You can find the project’s source code on this GitHub repo.
Setting up an Auth0 app
You first need to create a new application on Auth0. Enter the name of the app and select Native for the application type:

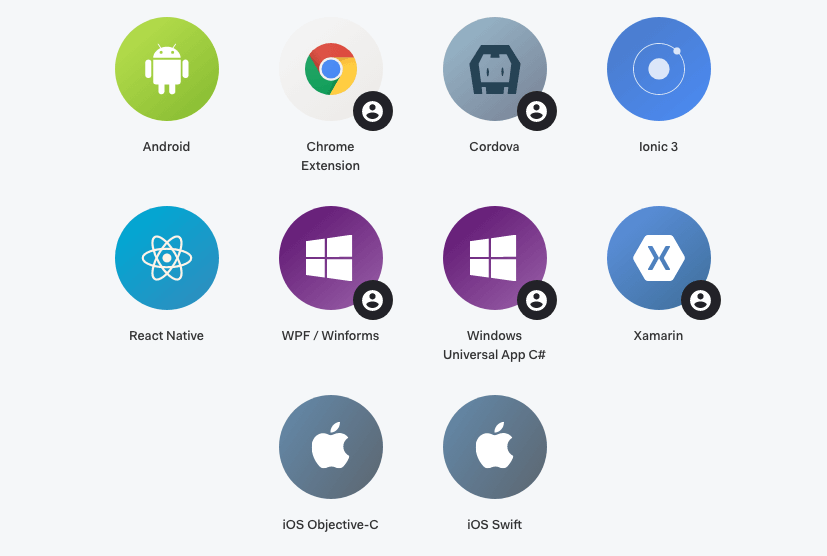
After that, they will ask you to select a native SDK. Select React Native from the list:
After selecting a native SDK, there will be a tutorial that shows you how to set up Auth0 in React Native. You can use the tutorial as a secondary resource for getting set up, but I’ll be showing you all you need to do in order to implement authentication in React Native with Auth0.
Setting up Google and Facebook logins
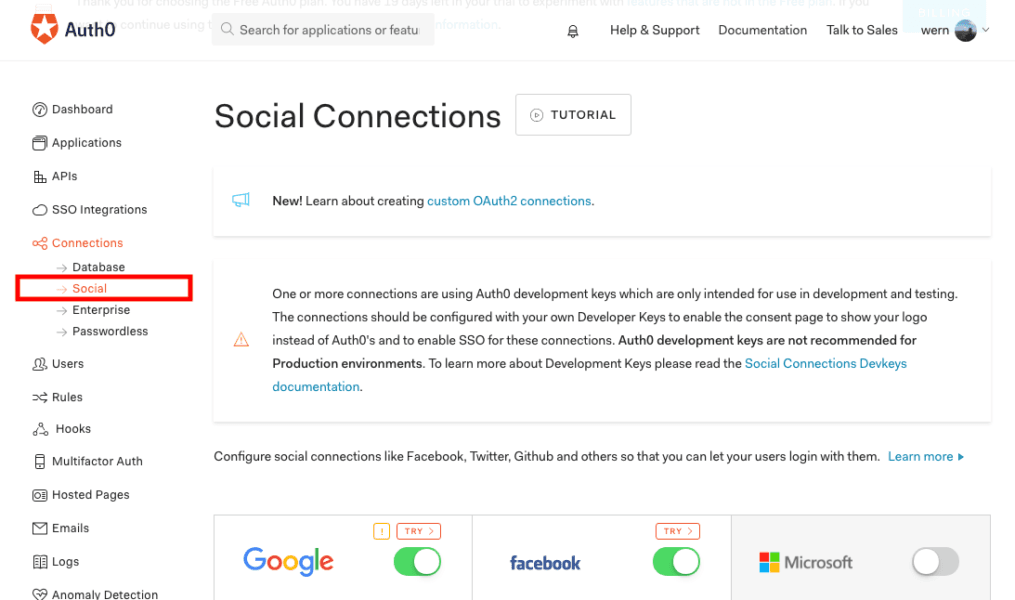
By default, Auth0 only allows users to sign up and log in using an Auth0 account. If you want to add other authentication methods (for example, social login using OpenID), you need to set them up manually. On the left sidebar, click on Connections → Social. The list of websites which Auth0 supports is then listed on the main panel. In the screenshot below, you can see that I’ve enabled Google and Facebook:
If you go to the settings for Google or Facebook, you will see a link to a page that shows you how to obtain a client ID or app ID. It’s the same thing I followed when I was setting up mine, so I’ll just link to them here:
Follow the instructions indicated on those two links and you should be good to go. You can leave the default permissions checked because we’ll only be using those in this tutorial.
Facebook login test
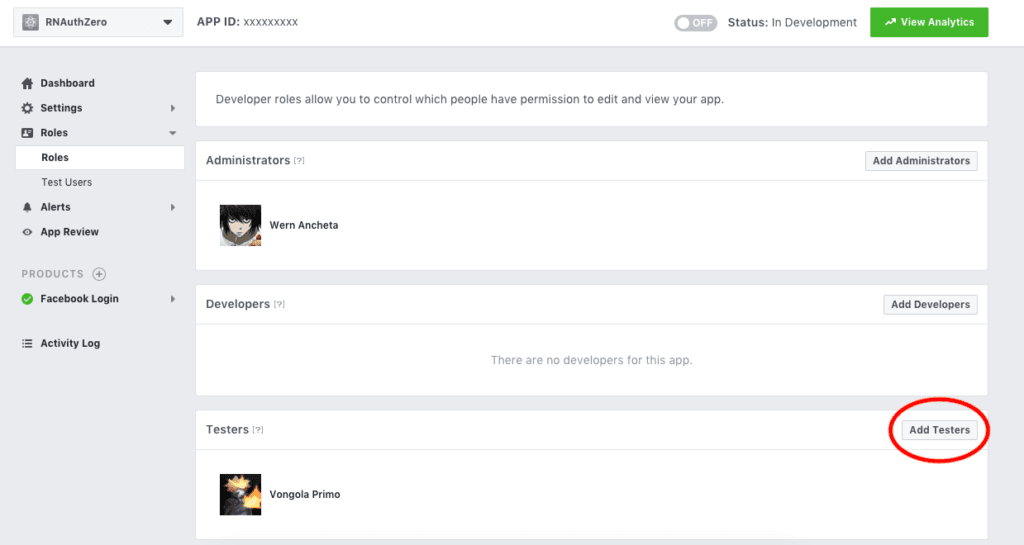
Auth0’s documentation on setting up Facebook login doesn’t really include information on how to test the app’s status if it’s still “In Development”. For that, you have to go to the Roles page of the Facebook app you created. Then click on the Add Testers button to search and add users who can test the app. Note that the users you add still needs to approve your request before they can test the app.
Installing the dependencies
Start by cloning the app’s GitHub repo and install the dependencies:
1git clone https://github.com/anchetaWern/RNAuthZero.git 2 cd RNAuthZero 3 npm install
We’re relying on the following packages to implement the functionalities needed by the app:
- react-native-auth0 – the package that allows us to use Auth0 within a React Native app.
- react-navigation – for easily implementing navigation between screens.
- react-native-device-info – for getting the unique ID of the device. We’ll be using this to provide Auth0 with a device info when we’re logging the user in.
- react-native-sensitive-info – for the storage and retrieval of sensitive data. We’ll be using this to store the access and refresh tokens that comes from Auth0.
- react-native-config ****- for storing the Auth0 config in a
.envfile instead of hard-coding it in the code. - react-native-restart ****- used for restarting the app after acquiring a new access token.
Once the packages are installed, there’s an additional setup needed for all the packages except react-navigation. Below are the links to the installation instructions for the specific package versions that are used in the repo. If you’ve installed the latest versions, then you should be fine with the links I’ve included earlier:
- react-native-auth0 v1.2.2 ****- note that you don’t need to follow the configuration instructions for Android and iOS as I’ll also be going through them below. The instructions below is what worked for me, not the ones included in the package’s
READMEfile. - react-native-device-info v0.21.0
- react-native-sensitive-info v5.1.0
- react-native-config v0.11.5 ****- note that you don’t need to follow the extra step for iOS.
- react-native-restart v0.0.3
I recommend the react-native link method instead of the manual one. Though it’s a good practice to know what it does by going through the manual method. That way, you can easily reverse its effects if something goes wrong.
Configure the app to allow WebAuth
We will be using Auth0’s hosted login page instead of a custom login form because it’s more secure. This section will show you the additional steps that you need to perform in order to enable this feature.
Android configuration
In Android, this requires us to update the AndroidManifest.xml file in order to allow opening a browser window from within the app. Open the the android/app/src/main/AndroidManifest.xml file and in the main app activity, add android:launchMode="singleTask``" as a property. It should look like this after you’ve added the property:
1<application 2 android:name=".MainApplication" 3 android:label="@string/app_name" 4 android:icon="@mipmap/ic_launcher" 5 android:allowBackup="false" 6 android:theme="@style/AppTheme"> 7 <activity 8 android:name=".MainActivity" 9 android:label="@string/app_name" 10 android:launchMode="singleTask" 11 android:configChanges="keyboard|keyboardHidden|orientation|screenSize" 12 android:windowSoftInputMode="adjustResize"> 13 ... 14 </activity> 15 </application>
Next, inside the main activity, add a new intent filter. This allows us to connect to other Android applications (in this case, it’s the default browser) and specify the settings to use when opening it. In this case, the configuration below tells Android to open the Auth0 domain if a link to that page is clicked in the app. Be sure to replace the placeholder value (YOUR_AUTH0_DOMAIN) with your Auth0 domain (mine is wern.auth0.com):
1<intent-filter> 2 <action android:name="android.intent.action.VIEW" /> 3 <category android:name="android.intent.category.DEFAULT" /> 4 <category android:name="android.intent.category.BROWSABLE" /> 5 <data 6 android:host="YOUR_AUTH0_DOMAIN" 7 android:pathPrefix="/android/${applicationId}/callback" 8 android:scheme="${applicationId}" /> 9 </intent-filter>
The last step is to update your application settings to include the allowed callback URL for Android. The callback URL has the following format:
1{YOUR_APP_PACKAGE_NAME}://{YOUR_AUTH0_DOMAIN}/android/{YOUR_APP_PACKAGE_NAME}/callback
When the values inside the curly brackets are replaced, here’s what mine looks like:
1com.rnauthzero://wern.auth0.com/android/com.rnauthzero/callback
This is the URL that Auth0 uses to call back your app after the user has successfully logged in. Remember that the app actually opens a browser window when the user presses on the Login button, so the app needs to be brought back to the foreground so the user can see that they’re already logged in.
iOS configuration
To configure iOS, first find the AppDelegate.m file in the project’s ios directory. For version 0.55.4 of React Native, this file can be found at the ios/RNAuthZero directory.
After the last import statement in that file, add the following:
1#import <React/RCTLinkingManager.h>
Next, add the following function right before the @end:
1- (BOOL)application:(UIApplication *)application openURL:(NSURL *)url 2 sourceApplication:(NSString *)sourceApplication annotation: (id)annotation 3 { 4 return [RCTLinkingManager application:application openURL:url 5 sourceApplication:sourceApplication annotation:annotation]; 6 }
Once that’s done, open the ios/RNAuthZero/Info.plist file and add the following:
1<key>CFBundleURLTypes</key> 2 <array> 3 <dict> 4 <key>CFBundleTypeRole</key> 5 <string>None</string> 6 <key>CFBundleURLName</key> 7 <string>auth0</string> 8 <key>CFBundleURLSchemes</key> 9 <array> 10 <string>org.reactjs.native.example.$(PRODUCT_NAME:rfc1034identifier)</string> 11 </array> 12 </dict> 13 </array>
Also make sure that CFBundleIdentifier has the same value as the first item of the CFBundleURLSchemes array. Mine is org.reactjs.native.example.$(PRODUCT_NAME:rfc1034identifier):
1<key>CFBundleIdentifier</key> 2 <string>org.reactjs.native.example.$(PRODUCT_NAME:rfc1034identifier)</string>
The last step is adding the callback URL in your application settings. There’s a bit of confusion on what the callback URL should be though. As the Auth0 React Native package’s README file tells you that the callback URL should have the following format:
1{YOUR_BUNDLE_IDENTIFIER}://${YOUR_AUTH0_DOMAIN}/ios/{YOUR_BUNDLE_IDENTIFIER}/callback
But mine ended up being the following:
1org.reactjs.native.example.rnauthzero://wern.auth0.com/ios/org.reactjs.native.example.RNAuthZero/callback
See the difference? YOUR_BUNDLE_IDENTIFIER doesn’t actually have the same value on the first and last instances. On the first instance, the package name is all in small letters (rnauthzero). While the second instance follows the name given to the app (RNAuthZero) when you used the react-native init command.
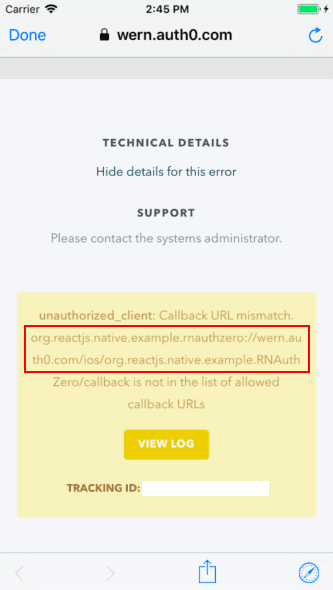
A way to easily find the correct value is to run the app immediately. It should give you an error when you press the Login button. But viewing the technical details of the error will show you the actual URL that you need to add in the application settings:
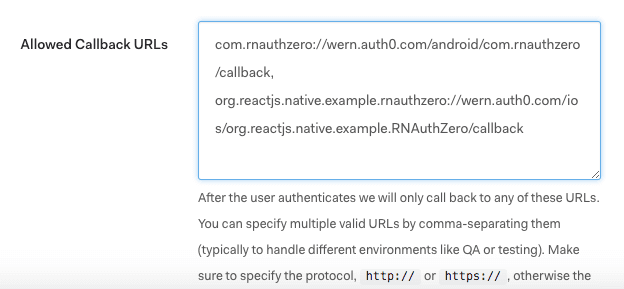
After adding the callback URL’s the application settings should now look like this:
Coding the app
Once you’ve followed the additional setup instructions, you should be ready to start coding the app.
Adding the config
At the root of the project directory, create a .env file and add the following:
1AUTH0_DOMAIN="YOUR_AUTH0_DOMAIN" 2 AUTH0_CLIENT_ID="YOUR_AUTH0_APP_CLIENT_ID" 3 AUTHO_SCOPE="openid offline_access profile email" 4 AUTH0_AUDIENCE="https://YOUR_AUTH0_DOMAIN/userinfo"
This file will serve as the app’s configuration file to be used for Auth0. The only values which you need to replace here are the following:
AUTH0_DOMAIN– the domain assigned by Auth0 to your account.AUTH0_CLIENT_ID– the client ID specific to the Auth0 app you created earlier.AUTH0_AUDIENCE– you only have to replace the value ofAUTH0_DOMAINin here. This is the URL of the client who’s requesting for authorization.
AUTH0_SCOPE is the space separated list of the info and privileges which we’re going to require from the user who will log in to our app. I’ll discuss more about this later when we go through the code for logging in with Auth0.
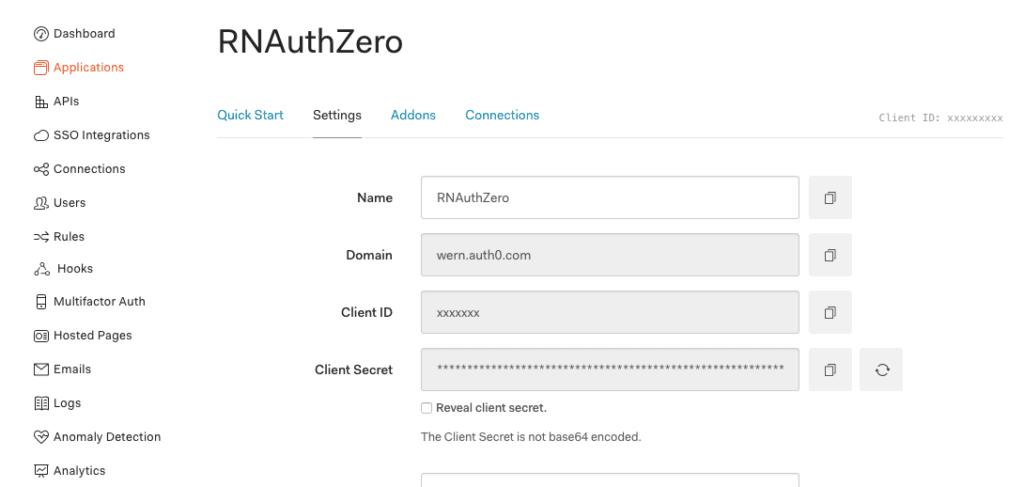
You can find the values for the config above on your app’s settings page:
Main app component
Open the App.js at the root of the project directory and add the following:
1// App.js 2 /** 3 * Sample React Native App 4 * https://github.com/facebook/react-native 5 * @flow 6 */ 7 8 import React, { Component } from "react"; 9 import { StyleSheet, View } from "react-native"; 10 11 import Root from "./Root"; 12 13 export default class App extends Component { 14 render() { 15 return ( 16 <View style={styles.container}> 17 <Root /> 18 </View> 19 ); 20 } 21 } 22 23 const styles = StyleSheet.create({ 24 container: { 25 flex: 1, 26 backgroundColor: "#fff" 27 } 28 });
Root component
The Root component’s job is to wrap all the screens of the app into a StackNavigator. This allows us to easily implement stack navigation. Below, we’re importing two components which serve as the screens of the app. We’ll be creating them shortly:
1// Root.js 2 import React from "react"; 3 import { StackNavigator } from "react-navigation"; 4 5 import LoginScreen from "./src/screens/Login"; 6 import AccountScreen from "./src/screens/Account"; 7 8 const Stack = StackNavigator( 9 { 10 Login: { 11 screen: LoginScreen 12 }, 13 Account: { 14 screen: AccountScreen 15 } 16 }, 17 { 18 initialRouteName: "Login" // show the login screen by default 19 } 20 ); 21 22 export default Stack;
If you’re new to the React Navigation library, be sure to check their getting started guide.
Login screen
The Login screen allows the user to login to their account via Auth0. First, import all the packages that we need:
1// Login.js 2 import React, { Component } from "react"; 3 import { View, Text, Button, ActivityIndicator } from "react-native"; 4 import { NavigationActions, StackActions } from "react-navigation"; 5 import Auth0 from "react-native-auth0"; 6 import Config from "react-native-config"; 7 import DeviceInfo from "react-native-device-info"; 8 import SInfo from "react-native-sensitive-info"; 9 import RNRestart from "react-native-restart";
I’ve already provided an overview of the packages that we’re using earlier, so the only thing that’s not clear is the NavigationActions and StackActions if you’re not already familiar with React Navigation. We’ll be using those two later to navigate to the Account screen.
Next, import the styles that we’ll be using. We will be creating these files later:
1import { 2 headerColorStyle, 3 headerTextColorStyle, 4 buttonStyle 5 } from "../styles/colors"; 6 import styles from "../styles/Login";
Next, initialize the Auth0 library:
1const auth0 = new Auth0({ 2 domain: Config.AUTH0_DOMAIN, 3 clientId: Config.AUTH0_CLIENT_ID 4 }); 5 // next: create Login component
Create the Login component and specify the navigation options. This allows us to control what to show in the header when this screen is accessed:
1export default class Login extends Component { 2 static navigationOptions = ({ navigation }) => { 3 return { 4 headerTitle: "Login", // the title to display in the header 5 headerStyle: { // style of the headers body 6 backgroundColor: headerColorStyle 7 }, 8 headerTitleStyle: { // style of the header text 9 color: headerTextColorStyle 10 } 11 }; 12 }; 13 14 // next: initialize state 15 }
The only state for the Login screen is used for controlling the visibility of the ActivityIndicator. As you’ll see later, the ActivityIndicator allows us to show the user that the app is doing something while it’s trying to determine whether the user is already logged in or not:
1state = { 2 hasInitialized: false 3 };
Once the component is mounted, we retrieve the user’s access token from the secure storage. If it hasn’t found an access token, it means that no user is currently logged in. We can then update hasInitialized to true so that the login button becomes visible and the ActivityIndicator is hidden:
1componentDidMount() { 2 SInfo.getItem("accessToken", {}).then(accessToken => { 3 if (accessToken) { 4 // next: get user details 5 } else { 6 // no access token 7 this.setState({ 8 hasInitialized: true 9 }); 10 } 11 }); 12 }
If an access token is present, we get the user’s info via the Auth0 library. The userInfo method requires an object containing the user’s access token as the argument. When this method is called, the Auth0 library makes a request to Auth0’s API to get the user’s info. Once we have the user’s details, we supply it as an argument for the gotoAccount function. All this function does is navigate to the Account screen:
1auth0.auth 2 .userInfo({ token: accessToken }) 3 .then(data => { 4 this.gotoAccount(data); 5 }) 6 .catch(err => { 7 // next: add code for dealing with invalid access token 8 });
If for some reason, the access token is invalid, it commonly means that it has already expired. By default, Auth0’s access tokens are only valid for 24 hours after it was first received when the user logged in. If this happens, we can request a new access token by using the refresh token which we also receive when the user logged in. Once we have the new access token, we save it to the secure storage and reload the app so that componentDidMount gets triggered again:
1SInfo.getItem("refreshToken", {}).then(refreshToken => { // get the refresh token from the secure storage 2 // request for a new access token using the refresh token 3 auth0.auth 4 .refreshToken({ refreshToken: refreshToken }) 5 .then(newAccessToken => { 6 SInfo.setItem("accessToken", newAccessToken); 7 RNRestart.Restart(); 8 }) 9 .catch(accessTokenErr => { 10 console.log("error getting new access token: ", accessTokenErr); 11 }); 12 });
Here’s the render function:
1render() { 2 return ( 3 <View style={styles.container}> 4 <ActivityIndicator 5 size="large" 6 color="#05a5d1" 7 animating={!this.state.hasInitialized} 8 /> 9 {this.state.hasInitialized && ( 10 <Button onPress={this.login} title="Login" color={buttonStyle} /> 11 )} 12 </View> 13 ); 14 }
When the Login button is pressed, we trigger the app to open the browser with Auth0’s hosted login page. The authorize method requires an object containing the scope and audience:
scopeis used for specifying which authentication protocol, user data and privileges we want a user to provide us. If you’ve seen the.envfile earlier, this is stored in theAUTH0_SCOPEkey which containsopenid offline_access profile email. Here’s what each one does:openidis the authentication protocol we want to use.offline_accessallows us to get the user’s refresh token. This token allows us to make a request for a new access token after the existing one expires.profilereturns the user’s profile data.emailreturns the user’s email if the provider (for example: Facebook, Google) allows it. Most of the time, the providers doesn’t really return an email so it’s safe to remove this.
audienceis used for specifying the URL of the client whose requesting for authorization. In this case, it should be your very own Auth0 URL for requesting the user’s details.
Below, we’ve also supplied two optional arguments, device and prompt:
deviceis a requirement if you have specifiedoffline_accessin the scope. This is where we use the react-native-device-info library to get the unique ID of the device.promptallows us to prompt for the user’s password everytime the user triggers Auth0’s login from the app. This makes the application more secure, especially in Android which doesn’t really clear the user’s session if they log out. There are providers which doesn’t support thepromptoption though, one of which is Google. This means if the user is currently logged in, Google won’t prompt the user for their password. This becomes a security risk if an attacker gets a hold of your physical device:
1login = () => { 2 auth0.webAuth 3 .authorize({ 4 scope: Config.AUTHO_SCOPE, 5 audience: Config.AUTH0_AUDIENCE, 6 device: DeviceInfo.getUniqueID(), 7 prompt: "login" 8 }) 9 .then(res => { 10 // next: add code for getting user info 11 }) 12 .catch(error => { 13 console.log("error occurred while trying to authenticate: ", error); 14 }); 15 };
Once the user has successfully logged in, Auth0 returns the user’s access token and refresh token. We securely store those locally using the react-native-sensitive-info library. The first argument is the key and second is the value. The third argument is optional so we can leave it as an empty object. If it’s supplied, this allows us to specify which keychain service (for iOS) or shared preference name (for Android) to use for storing the data:
1SInfo.setItem("accessToken", res.accessToken, {}); 2 SInfo.setItem("refreshToken", res.refreshToken, {});
Next, we make a separate request for the user’s details. This is because the login response doesn’t already return this data. Once we have the user’s details, we navigate to the Account screen:
1auth0.auth 2 .userInfo({ token: res.accessToken }) 3 .then(data => { 4 this.gotoAccount(data); // go to the Account screen 5 }) 6 .catch(err => { 7 console.log("error occurred while trying to get user details: ", err); 8 });
Here’s the gotoAccount function, all it does is navigate to the Account screen. We don’t navigate using the normal method though. We don’t really want the user to be going back to the Login screen unless they explicitly log out.
The way React Navigation’s Stack Navigation works by default is that it will “push” the new screen on top of a stack. This allows the user to navigate to the previous screen by “popping” the screen that’s currently on top of the stack.
We don’t really want this, that’s why we need to use NavigationActions and StackActions to reset the navigation stack. StackActions allows us to reset the stack to a specific index. In the code below, we’ve specified 0 as the index. This means that whatever new screen we try to navigate to will be considered as the very first screen. NavigationActions allows us to navigate to a specific screen, in this case, it’s the Account screen:
1gotoAccount = data => { 2 this.setState({ 3 hasInitialized: true 4 }); 5 6 const resetAction = StackActions.reset({ 7 index: 0, 8 actions: [ 9 NavigationActions.navigate({ 10 routeName: "Account", 11 params: { 12 name: data.name, 13 picture: data.picture 14 } 15 }) 16 ] 17 }); 18 19 this.props.navigation.dispatch(resetAction); 20 };
Next, add the styles. The styles/colors.js file serve as the central file for storing color values that we’re using throughout the app. That way, we can refer to the colors using variable names instead of repeating it on every file where we need them:
1const headerColorStyle = "#333"; 2 const headerTextColorStyle = "#FFF"; 3 const buttonStyle = "#555"; 4 5 export { headerColorStyle, headerTextColorStyle, buttonStyle };
The styles/Login.js file contains the styles for the Login screen:
1import { StyleSheet } from "react-native"; 2 3 const styles = StyleSheet.create({ 4 container: { 5 flex: 1, 6 justifyContent: "center", 7 alignItems: "center" 8 } 9 }); 10 11 export default styles;
Account screen
The Account screen is where the user gets redirected after successfully logging in. First, we import all the packages and styles we need:
1import React, { Component } from "react"; 2 import { View, Text, Image, Button } from "react-native"; 3 import { NavigationActions, StackActions } from "react-navigation"; 4 5 import Auth0 from "react-native-auth0"; 6 import Config from "react-native-config"; 7 import SInfo from "react-native-sensitive-info"; 8 9 const auth0 = new Auth0({ 10 domain: Config.AUTH0_DOMAIN, 11 clientId: Config.AUTH0_CLIENT_ID 12 }); 13 14 import { 15 headerColorStyle, 16 headerTextColorStyle, 17 buttonStyle 18 } from "../styles/colors"; 19 20 import styles from "../styles/Account";
Create the component for the Account screen:
1export default class Account extends Component { 2 static navigationOptions = ({ navigation }) => { 3 return { 4 headerTitle: "Account", 5 headerStyle: { 6 backgroundColor: headerColorStyle 7 }, 8 headerTitleStyle: { 9 color: headerTextColorStyle 10 } 11 }; 12 }; 13 14 // next: add code for rendering the component 15 }
Here’s the render function. This shows the user’s profile picture and name, and below it is the button for logging out:
1render() { 2 const { navigation } = this.props; 3 const name = navigation.getParam("name"); 4 const picture = navigation.getParam("picture"); 5 6 return ( 7 <View style={styles.container}> 8 {name && ( 9 <View style={styles.profileContainer}> 10 <Image style={styles.picture} source={{ uri: picture }} /> 11 12 <Text style={styles.usernameText}>{name}</Text> 13 <Button onPress={this.logout} title="Logout" color={buttonStyle} /> 14 </View> 15 )} 16 </View> 17 ); 18 }
When the Logout button is pressed, we delete the access and refresh token from the secure storage and clear the user’s session from the browser window that was opened earlier. Note that this only works on iOS. This is because the Auth0 library cannot determine which browser was used on Android because there are lots of possibilities. While iOS only uses one browser (even if other browsers are installed) to open URL’s that are triggered by apps:
1logout = () => { 2 SInfo.deleteItem("accessToken", {}); 3 SInfo.deleteItem("refreshToken", {}); 4 5 auth0.webAuth 6 .clearSession() 7 .then(res => { 8 console.log("clear session ok"); 9 }) 10 .catch(err => { 11 console.log("error clearing session: ", err); 12 }); 13 14 this.gotoLogin(); // go to login screen 15 };
Here’s the gotoLogin function. This works the same way as the gotoAccount function from earlier so the user cannot go back to the Account screen without logging in first:
1gotoLogin = () => { 2 const resetAction = StackActions.reset({ 3 index: 0, 4 actions: [ 5 NavigationActions.navigate({ 6 routeName: "Login" 7 }) 8 ] 9 }); 10 11 this.props.navigation.dispatch(resetAction); 12 };
Lastly, add the styles for the Account screen:
1import { StyleSheet } from "react-native"; 2 3 const styles = StyleSheet.create({ 4 container: { 5 flex: 1, 6 justifyContent: "center", 7 alignItems: "center" 8 }, 9 profileContainer: { 10 alignItems: "center" 11 }, 12 usernameText: { 13 fontSize: 15, 14 fontWeight: "bold", 15 marginTop: 10, 16 marginBottom: 10 17 }, 18 picture: { 19 width: 50, 20 height: 50 21 } 22 }); 23 24 export default styles;
Conclusion
That’s it! In this tutorial, you’ve learned how to use Auth0 to easily implement authentication in your React Native app. You can find the full source code of the app in its GitHub repo.
As you have seen, there are limitations to using Auth0 in React Native. First is the fact that custom authentication forms are a second-class citizen, we still have to use the hosted login form because custom forms (created using React Native components) are less secure. Second is that the user session isn’t truly cleared in Android if the user logs out. Hopefully, things will improve in the future as React Native and Auth0 mature.
We’ve barely scratched the surface of what’s possible with Auth0 though. Be sure to check out their full features if you want to learn more on what else you can do with Auth0.


© 2024 Pusher Ltd. All rights reserved.
Pusher Limited is a company registered in England and Wales (No. 07489873) whose registered office is at MessageBird UK Limited, 3 More London Riverside, 4th Floor, London, United Kingdom, SE1 2AQ.