- Products

- Developers
- User stories
- Blog
- Pricing

Using React in a Laravel application

Learn how to use React with Laravel by building a simple task management app. Discover how easy it is to integrate React and Laravel.
Introduction
Vue.js is with no doubts the preferred JavaScript framework in the Laravel community. In fact, a fresh Laravel application comes with Vue.js already set up out of the box. Prefer to use React instead? Then you are in the right place, as we’ll be looking at how to use React in a Laravel application in this tutorial.
Prerequisites
This tutorial assumes the following:
- Basic knowledge of PHP and Laravel
- Basic knowledge of JavaScript and React
- PHP installed on your computer
- Composer installed on your computer
- Laravel installer installed on your computer
- SQLite installed on your computer
What we’ll be building
For the purpose of demonstrating how to use React in a Laravel application, we’ll build a task management app. Below is a working demo of the final application:
Planning the application
Our task management app, will consist of two main components: tasks and projects. Let’s break each of these component down.
- Tasks: a task is an item that needs to be done by a user and usually consists of a brief and concise title of what needs to be done to complete that task. Tasks also need to indicate whether they have been completed or not. Finally, a task is usually associated with a project that contains similar or related tasks.
- Projects: projects group related tasks together and usually have a descriptive name, and a description associated with them. We also need to be able to indicate whether or not a project is completed.
With that said, our app will have the following tables and fields:
| Table | Fields |
|---|---|
| tasks | id, title, project_id, is_completed, created_at, updated_at |
| projects | id, name, description, is_completed, created_at, updated_at |
Let’s get started already!
Getting started
We’ll start by creating a fresh Laravel application:
$ laravel new tasksman
Once that’s is done, we need to swap the default Vue.js scaffolding with React. Luckily for us, there is a preset Artisan command we can use for that. The preset command was added in Laravel 5.5, which allows us to specify our JavaScript framework of choice. To specify we want to use React in place of Vue.js, we’ll run the command below:
1$ cd tasksman 2 $ php artisan preset react
We should now have an Example.js file inside resources/assets/js/components, which is a basic React component. Also, resources/assets/js/app.js has been updated to make use of the Example component.
Next, run the command below to install our app dependencies:
$ npm install
Creating the app models and migrations
As already outlined in the planning the application section, we need to create two models: Task and Project:
1$ php artisan make:model Task -m 2 $ php artisan make:model Project -m
Adding the -m flag to the make:model command will generate the accompanying migration for the model.
Next, open app/Task.php and update it content as below:
1// app/Task.php 2 3 <?php 4 5 namespace App; 6 7 use Illuminate\Database\Eloquent\Model; 8 9 class Task extends Model 10 { 11 protected $fillable = ['title', 'project_id']; 12 }
We specify the fields we want to be mass assignable.
Similarly, open app/Project.php and update as below:
1// app/Project.php 2 3 <?php 4 5 namespace App; 6 7 use Illuminate\Database\Eloquent\Model; 8 9 class Project extends Model 10 { 11 protected $fillable = ['name', 'description']; 12 13 public function tasks() 14 { 15 return $this->hasMany(Task::class); 16 } 17 }
In addition to specifying the fields we want mass assignable, we also define a relationship between the Project and the Task models using the tasks method. This is a one-to-many relationship, as a project can have numerous number of tasks, but a task can only belong to a particular project.
You’ll notice we didn’t define the inverse of the relationship on the Task model, as we are only defining what’s needed for the purpose of this tutorial.
Next, let’s update the generated migrations for our models. Open database/migrations/TIMESTAMP_create_tasks_table.php and update the up method as below:
1// database/migrations/TIMESTAMP_create_tasks_table.php 2 3 public function up() 4 { 5 Schema::create('tasks', function (Blueprint $table) { 6 $table->increments('id'); 7 $table->string('title'); 8 $table->unsignedInteger('project_id'); 9 $table->boolean('is_completed')->default(0); 10 $table->timestamps(); 11 }); 12 }
You’ll notice we are setting the is_completed field to be false by default.
Similarly, open database/migrations/TIMESTAMP_create_projects_table.php and update the up method as below:
1// database/migrations/TIMESTAMP_create_projects_table.php 2 3 public function up() 4 { 5 Schema::create('projects', function (Blueprint $table) { 6 $table->increments('id'); 7 $table->string('name'); 8 $table->text('description'); 9 $table->boolean('is_completed')->default(0); 10 $table->timestamps(); 11 }); 12 }
Before we run the migrations, let’s set up our database. We’ll be using SQLite. So, create a database.sqlite file inside the database directory then update the .env file as below:
1// .env 2 3 DB_CONNECTION=sqlite 4 DB_DATABASE=/full/path/to/database/database.sqlite
Run the migrations:
$ php artisan migrate
Creating the app API
We’ll start by defining the API endpoints. Open routes/api.php and replace it content with the code below:
1// routes/api.php 2 3 Route::get('projects', 'ProjectController@index'); 4 Route::post('projects', 'ProjectController@store'); 5 Route::get('projects/{id}', 'ProjectController@show'); 6 Route::put('projects/{project}', 'ProjectController@markAsCompleted'); 7 Route::post('tasks', 'TaskController@store'); 8 Route::put('tasks/{task}', 'TaskController@markAsCompleted');
Here, we define endpoints for fetching all projects as well for fetching a single project. Then endpoints for creating new projects and tasks respectively. Finally, endpoints for marking a project and task as completed respectively.
Next, let’s move on to create the controllers:
1$ php artisan make:controller ProjectController 2 $ php artisan make:controller TaskController
Open app/Http/Controllers/ProjectController.php and update it as below:
1// app/Http/Controllers/ProjectController.php 2 3 <?php 4 5 namespace App\Http\Controllers; 6 7 use App\Project; 8 use Illuminate\Http\Request; 9 10 class ProjectController extends Controller 11 { 12 public function index() 13 { 14 $projects = Project::where('is_completed', false) 15 ->orderBy('created_at', 'desc') 16 ->withCount(['tasks' => function ($query) { 17 $query->where('is_completed', false); 18 }]) 19 ->get(); 20 21 return $projects->toJson(); 22 } 23 24 public function store(Request $request) 25 { 26 $validatedData = $request->validate([ 27 'name' => 'required', 28 'description' => 'required', 29 ]); 30 31 $project = Project::create([ 32 'name' => $validatedData['name'], 33 'description' => $validatedData['description'], 34 ]); 35 36 return response()->json('Project created!'); 37 } 38 39 public function show($id) 40 { 41 $project = Project::with(['tasks' => function ($query) { 42 $query->where('is_completed', false); 43 }])->find($id); 44 45 return $project->toJson(); 46 } 47 48 public function markAsCompleted(Project $project) 49 { 50 $project->is_completed = true; 51 $project->update(); 52 53 return response()->json('Project updated!'); 54 } 55 }
The index method fetches all the projects that are yet to be marked as completed in a descending order to when they are created. Also, we get the number of tasks that are yet to be marked as completed belonging to individual project. Then we convert the projects to JSON and return them.
The store method is used to create a new project. First, it validates the incoming request data against the defined rules for each field. Then once the validation passes, we create a new project using the validated data in the database, and return a JSON response.
The show method fetches a single project by its id. In addition to fetching the project, we also fetch all the tasks that are yet to be marked as completed for the particular project. Finally, we return the project in JSON.
The markAsCompleted method simply update a specified project by setting is_completed to true.
Next, let’s open app/Http/Controllers/TaskController.php and update it as below:
1// app/Http/Controllers/TaskController.php 2 3 <?php 4 5 namespace App\Http\Controllers; 6 7 use App\Task; 8 use Illuminate\Http\Request; 9 10 class TaskController extends Controller 11 { 12 public function store(Request $request) 13 { 14 $validatedData = $request->validate(['title' => 'required']); 15 16 $task = Task::create([ 17 'title' => $validatedData['title'], 18 'project_id' => $request->project_id, 19 ]); 20 21 return $task->toJson(); 22 } 23 24 public function markAsCompleted(Task $task) 25 { 26 $task->is_completed = true; 27 $task->update(); 28 29 return response()->json('Task updated!'); 30 } 31 }
We won’t be going over each of the method as they are similar to those in the ProjectController.
With that, we have completed the API for our application.
Now, let’s move to the frontend of our application.
Creating a wildcard route
We’ll be using React Router to handle routing in our application. For this, we need to render a single view file for all our application routes. Open routes/web.php and replace it content with the code below:
1// routes/web.php 2 3 Route::view('/{path?}', 'app');
We define a wildcard route. An app.blade.php view file will be rendered for all our app routes. This way, we can render our React components from within this view file, and we’ll be able use all the goodies that React has to offer.
Next, let’s create the app.blade.php view file. We’ll create this file directly within the resources/views directory, then paste the following code in it:
1// resources/views/app.blade.php 2 3 <!DOCTYPE html> 4 <html lang="{{ app()->getLocale() }}"> 5 <head> 6 <meta charset="utf-8"> 7 <meta http-equiv="X-UA-Compatible" content="IE=edge"> 8 <meta name="viewport" content="width=device-width, initial-scale=1"> 9 <!-- CSRF Token --> 10 <meta name="csrf-token" content="{{ csrf_token() }}"> 11 <title>Tasksman</title> 12 <!-- Styles --> 13 <link href="{{ asset('css/app.css') }}" rel="stylesheet"> 14 </head> 15 <body> 16 <div id="app"></div> 17 18 <script src="{{ asset('js/app.js') }}"></script> 19 </body> 20 </html>
We add references to both a CSS file and a JavaScript file (containing React and other dependencies bundled up). We have an empty div with an id of app. This is where our React components will be rendered. Also, you’ll notice we have a meta tag containing a CSRF token, which will be attached as a common header to all outgoing HTTP requests we make using Axios. This is defined in resources/assets/js/bootstrap.js.
Creating the App componnet
The App component will serve as the base for our React components. Let’s rename the default Example component to App and replace it content with the following code:
1// resources/assets/js/components/App.js 2 3 import React, { Component } from 'react' 4 import ReactDOM from 'react-dom' 5 import { BrowserRouter, Route, Switch } from 'react-router-dom' 6 import Header from './Header' 7 8 class App extends Component { 9 render () { 10 return ( 11 <BrowserRouter> 12 <div> 13 <Header /> 14 </div> 15 </BrowserRouter> 16 ) 17 } 18 } 19 20 ReactDOM.render(<App />, document.getElementById('app'))
We render a Header component (which we’ll create shortly). The Header component will be rendered for all our app pages. As you can see, we are making use of React Router, so let’s install it:
$ npm install react-router-dom
While that’s installing, open and update resources/assets/js/app.js as below:
1// resources/assets/js/app.js 2 3 require('./bootstrap') 4 require('./components/App')
Instead of referencing the Example component, we reference the App component we just created.
Creating the Header component
Let’s create the Header component referenced above. Create a new Header.js file within the resources/assets/js/components directory and paste the code below in it:
1// resources/assets/js/components/Header.js 2 3 import React from 'react' 4 import { Link } from 'react-router-dom' 5 6 const Header = () => ( 7 <nav className='navbar navbar-expand-md navbar-light navbar-laravel'> 8 <div className='container'> 9 <Link className='navbar-brand' to='/'>Tasksman</Link> 10 </div> 11 </nav> 12 ) 13 14 export default Header
A basic Bootstrap navbar with a link to the homepage. As you can see, we are making use of the Link component from React Router. This will prevent our page from refreshing whenever we navigate around our app.
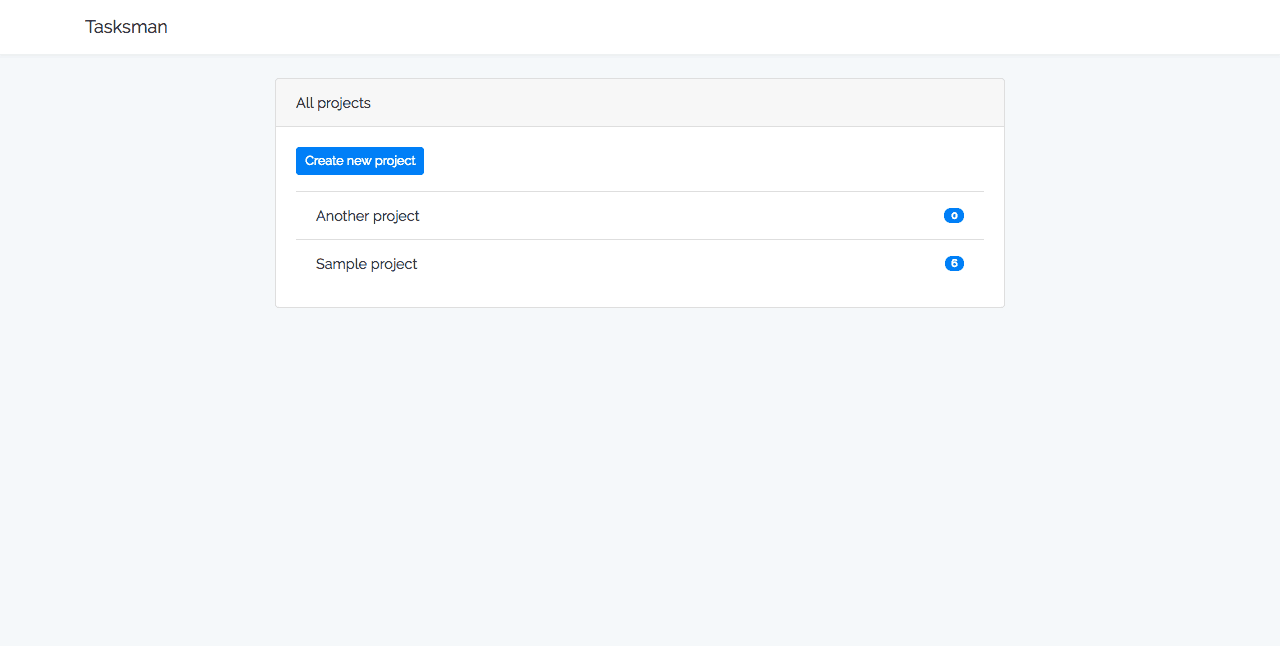
Displaying all projects yet to be completed
To display a list of projects that are yet to be completed, we’ll create a ProjectsList component. Within resources/assets/js/components, create a new ProjectsList.js file and paste the code below in it:
1// resources/assets/js/components/ProjectsList.js 2 3 import axios from 'axios' 4 import React, { Component } from 'react' 5 import { Link } from 'react-router-dom' 6 7 class ProjectsList extends Component { 8 constructor () { 9 super() 10 this.state = { 11 projects: [] 12 } 13 } 14 15 componentDidMount () { 16 axios.get('/api/projects').then(response => { 17 this.setState({ 18 projects: response.data 19 }) 20 }) 21 } 22 23 render () { 24 const { projects } = this.state 25 return ( 26 <div className='container py-4'> 27 <div className='row justify-content-center'> 28 <div className='col-md-8'> 29 <div className='card'> 30 <div className='card-header'>All projects</div> 31 <div className='card-body'> 32 <Link className='btn btn-primary btn-sm mb-3' to='/create'> 33 Create new project 34 </Link> 35 <ul className='list-group list-group-flush'> 36 {projects.map(project => ( 37 <Link 38 className='list-group-item list-group-item-action d-flex justify-content-between align-items-center' 39 to={`/${project.id}`} 40 key={project.id} 41 > 42 {project.name} 43 <span className='badge badge-primary badge-pill'> 44 {project.tasks_count} 45 </span> 46 </Link> 47 ))} 48 </ul> 49 </div> 50 </div> 51 </div> 52 </div> 53 </div> 54 ) 55 } 56 } 57 58 export default ProjectsList
We define a projects state and initialize it to be an empty array. Using React’s componentDidMount lifecycle, we make an HTTP request using Axios to our app API endpoint to fetch all the projects that are yet to be marked as completed. Then we update the projects state with the response data gotten from our app API.
Finally, we display a list of the projects by iterating over the projects state.
Before we go on to test this out, let’s update the App component as below:
1// resources/assets/js/components/App.js 2 3 import React, { Component } from 'react' 4 import ReactDOM from 'react-dom' 5 import { BrowserRouter, Route, Switch } from 'react-router-dom' 6 import Header from './Header' 7 import ProjectsList from './ProjectsList' 8 9 class App extends Component { 10 render () { 11 return ( 12 <BrowserRouter> 13 <div> 14 <Header /> 15 <Switch> 16 <Route exact path='/' component={ProjectsList} /> 17 </Switch> 18 </div> 19 </BrowserRouter> 20 ) 21 } 22 } 23 24 ReactDOM.render(<App />, document.getElementById('app'))
Here, we add a new route / (homepage). So whenever the / route is visited, the ProjectsList component will be rendered.
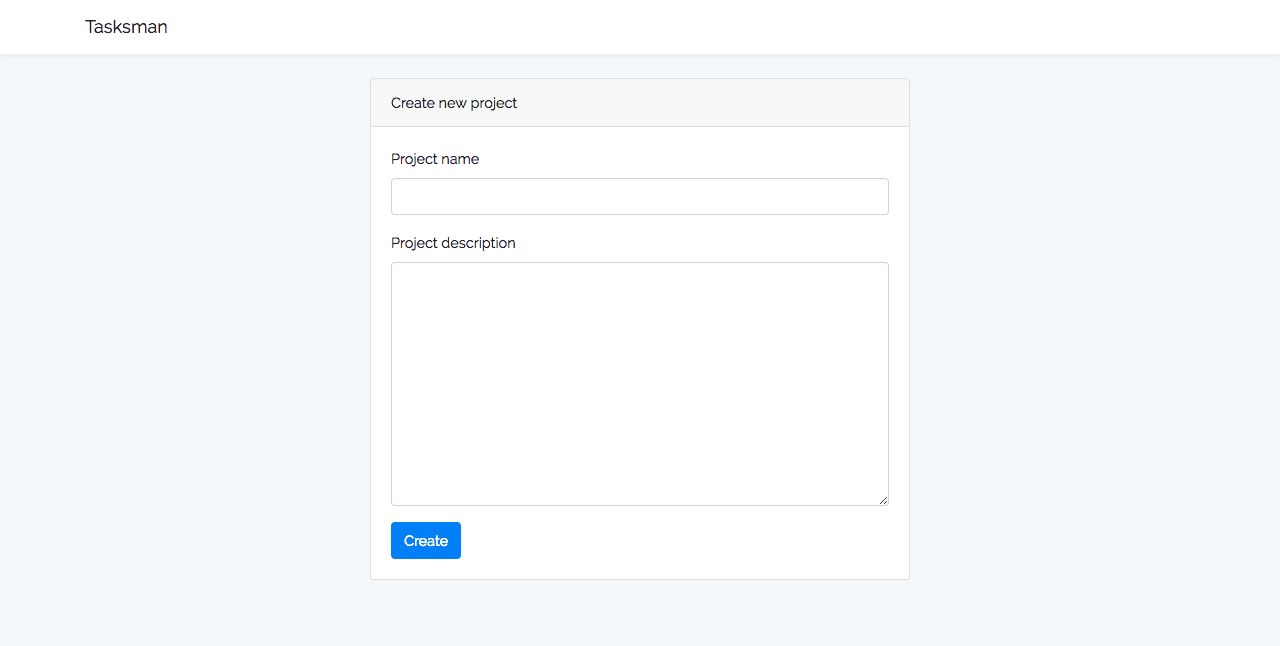
Creating a new project
From the ProjectsList component, you’ll notice we have a link to create a new project. Let’s implement it. Create a new NewProject.js file within resources/assets/js/components, and paste the code below in it:
1// resources/assets/js/components/NewProject.js 2 3 import axios from 'axios' 4 import React, { Component } from 'react' 5 6 class NewProject extends Component { 7 constructor (props) { 8 super(props) 9 this.state = { 10 name: '', 11 description: '', 12 errors: [] 13 } 14 this.handleFieldChange = this.handleFieldChange.bind(this) 15 this.handleCreateNewProject = this.handleCreateNewProject.bind(this) 16 this.hasErrorFor = this.hasErrorFor.bind(this) 17 this.renderErrorFor = this.renderErrorFor.bind(this) 18 } 19 20 handleFieldChange (event) { 21 this.setState({ 22 [event.target.name]: event.target.value 23 }) 24 } 25 26 handleCreateNewProject (event) { 27 event.preventDefault() 28 29 const { history } = this.props 30 31 const project = { 32 name: this.state.name, 33 description: this.state.description 34 } 35 36 axios.post('/api/projects', project) 37 .then(response => { 38 // redirect to the homepage 39 history.push('/') 40 }) 41 .catch(error => { 42 this.setState({ 43 errors: error.response.data.errors 44 }) 45 }) 46 } 47 48 hasErrorFor (field) { 49 return !!this.state.errors[field] 50 } 51 52 renderErrorFor (field) { 53 if (this.hasErrorFor(field)) { 54 return ( 55 <span className='invalid-feedback'> 56 <strong>{this.state.errors[field][0]}</strong> 57 </span> 58 ) 59 } 60 } 61 62 render () { 63 return ( 64 <div className='container py-4'> 65 <div className='row justify-content-center'> 66 <div className='col-md-6'> 67 <div className='card'> 68 <div className='card-header'>Create new project</div> 69 <div className='card-body'> 70 <form onSubmit={this.handleCreateNewProject}> 71 <div className='form-group'> 72 <label htmlFor='name'>Project name</label> 73 <input 74 id='name' 75 type='text' 76 className={`form-control ${this.hasErrorFor('name') ? 'is-invalid' : ''}`} 77 name='name' 78 value={this.state.name} 79 onChange={this.handleFieldChange} 80 /> 81 {this.renderErrorFor('name')} 82 </div> 83 <div className='form-group'> 84 <label htmlFor='description'>Project description</label> 85 <textarea 86 id='description' 87 className={`form-control ${this.hasErrorFor('description') ? 'is-invalid' : ''}`} 88 name='description' 89 rows='10' 90 value={this.state.description} 91 onChange={this.handleFieldChange} 92 /> 93 {this.renderErrorFor('description')} 94 </div> 95 <button className='btn btn-primary'>Create</button> 96 </form> 97 </div> 98 </div> 99 </div> 100 </div> 101 </div> 102 ) 103 } 104 } 105 106 export default NewProject
This component renders a form for creating a new project. We define some states: name, description and errors. Then we define a handleFieldChange method that gets called whenever the create a new project form input fields changes. Base on these changes, we update the states (name and description) accordingly. For this to work, we add an onChange event to each of the field.
Once the form is submitted, a handleCreateNewProject method is called, which first prevents the default behavior of form submission. Then it makes an HTTP request to our app API endpoint passing along the form data. If everything went well, we simply redirect the user to the homepage. otherwise, we update the errors state with the response error gotten from our app API.
The hasErrorFor method checks if the specified field has an error or not, and will either return true or false. The renderErrorFor method renders the error message for the specified field, if the field has error.
Just as we did with the ProjectsList component, let’s add the NewProject component to the App component. Update the App component as below:
1// resources/assets/js/components/App.js 2 3 import React, { Component } from 'react' 4 import ReactDOM from 'react-dom' 5 import { BrowserRouter, Route, Switch } from 'react-router-dom' 6 import Header from './Header' 7 import NewProject from './NewProject' 8 import ProjectsList from './ProjectsList' 9 10 class App extends Component { 11 render () { 12 return ( 13 <BrowserRouter> 14 <div> 15 <Header /> 16 <Switch> 17 <Route exact path='/' component={ProjectsList} /> 18 <Route path='/create' component={NewProject} /> 19 </Switch> 20 </div> 21 </BrowserRouter> 22 ) 23 } 24 } 25 26 ReactDOM.render(<App />, document.getElementById('app'))
We define the route /create for creating a new project, and the NewProject component will be rendered whenever the route is visited.
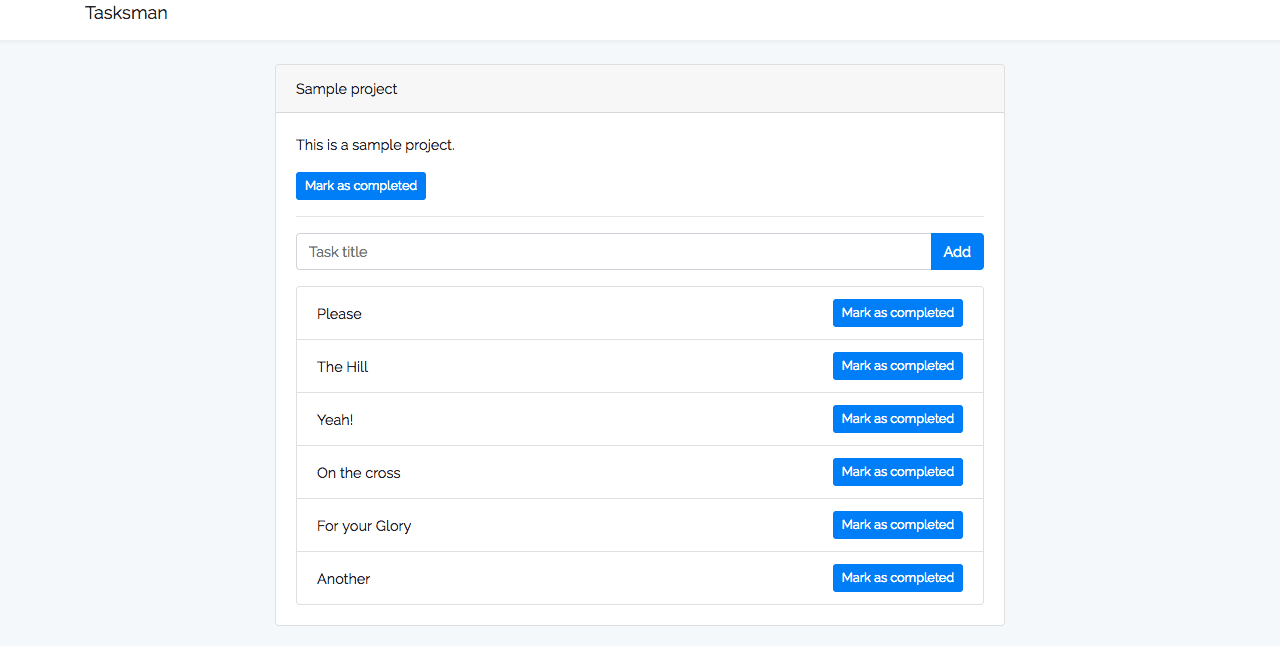
Display a single project
Now let’s display a single project. You’ll notice from the ProjectsList component that each project is listed with an anchor (to the project ID) to view the project. Create a new SingleProject component within resources/assets/js/components and paste the code below in it:
1// resources/assets/js/components/SingleProject.js 2 3 import axios from 'axios' 4 import React, { Component } from 'react' 5 6 class SingleProject extends Component { 7 constructor (props) { 8 super(props) 9 this.state = { 10 project: {}, 11 tasks: [] 12 } 13 } 14 15 componentDidMount () { 16 const projectId = this.props.match.params.id 17 18 axios.get(`/api/projects/${projectId}`).then(response => { 19 this.setState({ 20 project: response.data, 21 tasks: response.data.tasks 22 }) 23 }) 24 } 25 26 render () { 27 const { project, tasks } = this.state 28 29 return ( 30 <div className='container py-4'> 31 <div className='row justify-content-center'> 32 <div className='col-md-8'> 33 <div className='card'> 34 <div className='card-header'>{project.name}</div> 35 <div className='card-body'> 36 <p>{project.description}</p> 37 38 <button className='btn btn-primary btn-sm'> 39 Mark as completed 40 </button> 41 42 <hr /> 43 44 <ul className='list-group mt-3'> 45 {tasks.map(task => ( 46 <li 47 className='list-group-item d-flex justify-content-between align-items-center' 48 key={task.id} 49 > 50 {task.title} 51 52 <button className='btn btn-primary btn-sm'> 53 Mark as completed 54 </button> 55 </li> 56 ))} 57 </ul> 58 </div> 59 </div> 60 </div> 61 </div> 62 </div> 63 ) 64 } 65 } 66 67 export default SingleProject
We define two state properties: project and tasks. The project state will hold the details of the specified project, while the tasks state will hold the tasks for the project. Inside the componentDidMount lifecycle method, we make an HTTP request to our app API to fetch the project with the specified project ID. The project ID is passed to the URL, so we can get it using this.props.match.params.id. Then we update the state (project and tasks) with the response data gotten from our app API.
Finally, we display the details about the project as well as the project’s tasks. Also, we display buttons to mark the project and its tasks as completed.
Next, let’s add the SingleProject component to the App component. Update the App component as below:
1// resources/assets/js/components/App.js 2 3 import React, { Component } from 'react' 4 import ReactDOM from 'react-dom' 5 import { BrowserRouter, Route, Switch } from 'react-router-dom' 6 import Header from './Header' 7 import NewProject from './NewProject' 8 import ProjectsList from './ProjectsList' 9 import SingleProject from './SingleProject' 10 class App extends Component { 11 render () { 12 return ( 13 <BrowserRouter> 14 <div> 15 <Header /> 16 <Switch> 17 <Route exact path='/' component={ProjectsList} /> 18 <Route path='/create' component={NewProject} /> 19 <Route path='/:id' component={SingleProject} /> 20 </Switch> 21 </div> 22 </BrowserRouter> 23 ) 24 } 25 } 26 27 ReactDOM.render(<App />, document.getElementById('app'))
Now we can view a particular project.
Marking a project as completed
Now, let’s add the ability to mark a project as completed. Add the following code to the SingleProject component:
1// resources/assets/js/components/SingleProject.js 2 3 // add this inside the `constructor` 4 this.handleMarkProjectAsCompleted = this.handleMarkProjectAsCompleted.bind(this) 5 6 // add these outside the `constructor`, as a standalone method 7 handleMarkProjectAsCompleted () { 8 const { history } = this.props 9 10 axios.put(`/api/projects/${this.state.project.id}`) 11 .then(response => history.push('/')) 12 }
Once the mark as completed button is clicked, the handleMarkProjectAsCompleted method will be called. This method makes an HTTP request to our app API passing along the ID of the project we want to mark as completed. Once the request is successful, we simply redirect the user to the homepage.
Next, update the first Mark as completed ****button, which is below the project’s description as below:
1// resources/assets/js/components/SingleProject.js 2 3 <button 4 className='btn btn-primary btn-sm' 5 onClick={this.handleMarkProjectAsCompleted} 6 > 7 Mark as completed 8 </button>
Adding a task to project
Let’s the ability to add new tasks to a project. Add the following code to the SingleProject component:
1// resources/assets/js/components/SingleProject.js 2 3 this.state = { 4 ..., 5 title: '', 6 errors: [] 7 } 8 9 // add these inside the `constructor` 10 this.handleFieldChange = this.handleFieldChange.bind(this) 11 this.handleAddNewTask = this.handleAddNewTask.bind(this) 12 this.hasErrorFor = this.hasErrorFor.bind(this) 13 this.renderErrorFor = this.renderErrorFor.bind(this) 14 15 // add these outside the `constructor`, as a standalone methods 16 handleFieldChange (event) { 17 this.setState({ 18 title: event.target.value 19 }) 20 } 21 22 handleAddNewTask (event) { 23 event.preventDefault() 24 25 const task = { 26 title: this.state.title, 27 project_id: this.state.project.id 28 } 29 30 axios.post('/api/tasks', task) 31 .then(response => { 32 // clear form input 33 this.setState({ 34 title: '' 35 }) 36 // add new task to list of tasks 37 this.setState(prevState => ({ 38 tasks: prevState.tasks.concat(response.data) 39 })) 40 }) 41 .catch(error => { 42 this.setState({ 43 errors: error.response.data.errors 44 }) 45 }) 46 } 47 48 hasErrorFor (field) { 49 return !!this.state.errors[field] 50 } 51 52 renderErrorFor (field) { 53 if (this.hasErrorFor(field)) { 54 return ( 55 <span className='invalid-feedback'> 56 <strong>{this.state.errors[field][0]}</strong> 57 </span> 58 ) 59 } 60 }
handleFieldChange, hasErrorFor and renderErrorFor are the same from the NewProject component, so we won’t be going over them again. The handleAddNewTask method is also similar to the handleCreateNewProject method from the NewProject component, so we’ll go over only the new part. If the HTTP request is successful, we first clear out the form input, then we update the tasks state by adding the new task to list of tasks.
Next, add the code below inside the render method just below <hr />:
1// resources/assets/js/components/SingleProject.js 2 3 <form onSubmit={this.handleAddNewTask}> 4 <div className='input-group'> 5 <input 6 type='text' 7 name='title' 8 className={`form-control ${this.hasErrorFor('title') ? 'is-invalid' : ''}`} 9 placeholder='Task title' 10 value={this.state.title} 11 onChange={this.handleFieldChange} 12 /> 13 <div className='input-group-append'> 14 <button className='btn btn-primary'>Add</button> 15 </div> 16 {this.renderErrorFor('title')} 17 </div> 18 </form>
This renders the form for adding new tasks.
Marking a task as completed
For the last feature of our task management app, we’ll add the ability to mark a task as completed. This will be very much similar to what we did with marking a project as completed. Add the following code to the SingleProject component:
1// resources/assets/js/components/SingleProject.js 2 3 handleMarkTaskAsCompleted (taskId) { 4 axios.put(`/api/tasks/${taskId}`).then(response => { 5 this.setState(prevState => ({ 6 tasks: prevState.tasks.filter(task => { 7 return task.id !== taskId 8 }) 9 })) 10 }) 11 }
Unlike the handleMarkProjectAsCompleted method, the handleMarkTaskAsCompleted accepts the ID of the task to be marked as completed as an argument. Then with the task ID, it makes an HTTP request to our app API. Once the request is successful, we update the tasks state by filtering out the task with the ID passed to the method.
Lastly, update the Mark as completed button next to each task as below:
1// resources/assets/js/components/SingleProject.js 2 3 <button 4 className='btn btn-primary btn-sm' 5 onClick={this.handleMarkTaskAsCompleted.bind(this,task.id)} 6 > 7 Mark as completed 8 </button>
Once the button is clicked, we called the handleMarkTaskAsCompleted method passing to it the task ID.
Testing out the app
Before testing out our app, we need to compile the JavaScript files using Laravel Mix using:
$ npm run dev
Then we need to start the app:
$ php artisan serve
The app should be running on 127.0.0.1:8000. Then we can start to test it out.
Conclusion
In this tutorial, we saw how to use React in a Laravel application. We also saw how to display Laravel validation error messages in a React component. Following the approach used in this tutorial allows us to have all our source code in one place.
The complete code for this tutorial is available on GitHub.


© 2024 Pusher Ltd. All rights reserved.
Pusher Limited is a company registered in England and Wales (No. 07489873) whose registered office is at MessageBird UK Limited, 3 More London Riverside, 4th Floor, London, United Kingdom, SE1 2AQ.