- Products

- Developers
- User stories
- Blog
- Pricing

Component error handling in React using Error Boundaries

In this tutorial, we will handle Component Error in React using Error Boundaries. Before React 16, errors emitted from a component’s rendering proved hard to handle.
Introduction
In this tutorial, we will handle Component Error in React using Error Boundaries. Before React 16, errors emitted from a component’s rendering proved hard to handle.
This caused cryptic errors in the console as well as unexpected behaviors in the user’s experience. These kinds of render-based errors cannot be caught since React components are declarative. Hence, you can’t just throw in a try…catch block inside a component.
Error Boundaries
Errors are good things, they are feedback we get from malfunctions or bad inputs from users. They shouldn’t be ignored even when they don’t have immediate side effects. Side effects may also occur in another render phase, and when it does it becomes increasingly hard to deal with.
React 16 introduced a component called Error Boundaries to help handle component-based errors. Basically, you wrap a component that might emit errors with an Error Boundary and the Error Boundary component catches the error once that happens.

Another lifecycle method
What makes a component an Error Boundary is a lifecycle method called componentDidCatch. When a component implements this method it automatically becomes an Error Boundary and can handle errors emitted in a child’s render().
Here is the signature for componentDidCatch:
1componentDidCatch(error, errorInfo)
The method has two arguments:
error: the actual error message that tells you what went wrongerrorInfo: additional details about the error including the stack trace to help you debug the error.
A buggy component
componentDidCatch catches errors in render) and other lifecycle methods. Here is an example of a component that has a catchable error:
1class Buggy extends React.Component { 2 state = { greeting: "Welcome"}; 3 componentDidMount() { 4 throw new Error("An error has occured in Buggy component!"); 5 } 6 render() { 7 return <h2>{this.state.greeting}</h2>; 8 } 9 }
This component keeps throwing the error in the componentDidMount lifecycle method. It’s not a real use-case example but enough to show a component that has errors with rendering.
When you try rendering this component, nothing happens and the user gets no feedback on what is going on:
1const App = () => ( 2 <div style={styles}> 3 <h2>Error Boundaries Example</h2> 4 <Buggy /> 5 </div> 6 ); 7 8 ReactDOM.render(<App />, document.getElementById("root"));
The demo below shows that nothing renders because of the error:
See the Pen Buggy Component by Chris Nwamba (@codebeast) on CodePen.
Wrapping with an Error Boundary
Let’s add the following component to the app:
1class ErrorBoundary extends React.Component { 2 state = { error: null, errorInfo: null }; 3 4 componentDidCatch(error, errorInfo) { 5 this.setState({ 6 error: error, 7 errorInfo: errorInfo 8 }); 9 } 10 11 render() { 12 if (this.state.errorInfo) { 13 return ( 14 <div> 15 <h2>Something went wrong.</h2> 16 <details style={{ whiteSpace: "pre-wrap" }}> 17 {this.state.error && this.state.error.toString()} 18 <br /> 19 {this.state.errorInfo.componentStack} 20 </details> 21 </div> 22 ); 23 } 24 25 return this.props.children; 26 } 27 }
Borrowed from Dan’s example, when you wrap this component with the Buggy component, componentDidCatch will handle errors thrown. In the example above, we are setting the value of the error and errorInfo states then rendering the content to the browser.
In the App component, update render() to wrap Buggy:
1const App = () => ( 2 <div style={styles}> 3 4 <h2>Error Boundaries Example</h2> 5 <ErrorBoundary> 6 <Buggy /> 7 </ErrorBoundary> 8 </div> 9 );
See the Pen Buggy by Chris Nwamba (@codebeast) on CodePen.
Single vs multiple Boundaries
When you wrap a component tree with a single Error Boundary, the entire tree gets affected by errors caught in just one of the components. Take an example:
1class NotBuggy extends React.Component { 2 state = { greeting: "Welcome"}; 3 render() { 4 return <h2>{this.state.greeting}</h2>; 5 } 6 } 7 8 const App = () => ( 9 <div style={styles}> 10 <h2>Error Boundaries Example</h2> 11 <ErrorBoundary> 12 <Buggy /> 13 <NotBuggy /> 14 </ErrorBoundary> 15 </div> 16 );
We’re rendering <Buggy /> and <NotBuggy /> within the same boundary, even though <NotBuggy /> has no error, the Error Boundary doesn’t render it because one of its descendants is buggy.
Here is a demo:
See the Pen Buggy by Chris Nwamba (@codebeast) on CodePen.
Notice that we still get the same error as before. You can have different Error Boundary trees for a component or a set of components as shown in the image below:
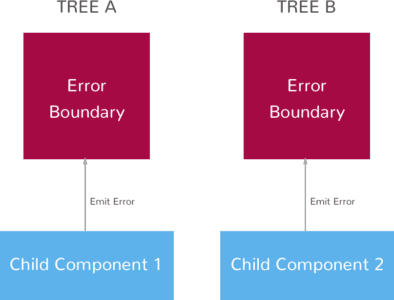
Now try separating the two components to have their own respective ErrorBoundary component:
1const App = () => ( 2 <div style={styles}> 3 4 <h2>Error Boundaries Example</h2> 5 <ErrorBoundary> 6 <Buggy /> 7 </ErrorBoundary> 8 9 <ErrorBoundary> 10 <NotBuggy /> 11 </ErrorBoundary> 12 13 </div> 14 );
See the Pen Buggy by Chris Nwamba (@codebeast) on CodePen.
The reason for this behaviour is, according to the React team, it’s safer to tear down the entire component tree and tell the user what went wrong rather than having a corrupt UI which could even lead to a security issue.
Not for all errors
Error Boundaries were introduced to solve a particular problem which we described in the beginning of the post. It was introduced to solve the problem of being unable to handle render errors due to the declarative nature of React components.
That said, do not use Boundaries to handle errors in things like event handlers or other stand-alone logic. Stick to try…catch for such cases as shown in the example below:
1handleClick(e) { 2 try { 3 JSON.parse(this.state.payload) 4 } catch(err) { 5 this.setState(...) 6 } 7 }
Conclusion
It’s easy to migrate to using the new Error Boundaries component. Upgrade React, wrap your component tree with the boundary and start drilling down to find where errors are happening in your existing code base. One confusion you might run into is expecting a Boundary to handle non-component errors which will disappoint you. Know when to use Error Boundaries vs try…catch.


© 2024 Pusher Ltd. All rights reserved.
Pusher Limited is a company registered in England and Wales (No. 07489873) whose registered office is at MessageBird UK Limited, 3 More London Riverside, 4th Floor, London, United Kingdom, SE1 2AQ.