- Products

- Developers
- User stories
- Blog
- Pricing

Online Text RPG: Exploring the World (Part 2)

In the second part of our tutorial, using Graphql and React create a structure to our world, allowing characters to explore it and to see the other characters as they come and go.
Introduction
This tutorial will expand on that by giving some structure using Graphql and React, allowing our characters to explore the world and to see the other characters as they come and go. Our world is going to be a fairly traditional Dungeons and Dragons dungeon, with a number of rooms and corridors that players can wander around in. The end result will look something like this:
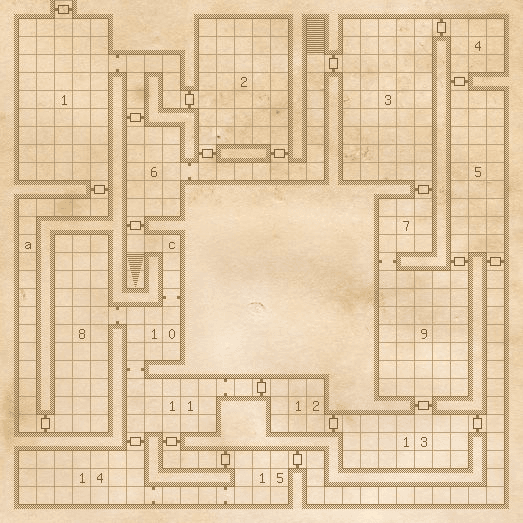
Dungeon Map, generated by https://donjon.bin.sh/fantasy/dungeon/
This article is part of
In the previous article, we created a basic game that allows players to create a character and join into a shared world. Unfortunately, at this point, we don’t have any actual structure to the world. Instead, all characters are simply in the same space and can see each other but nothing else.
Of course, the players themselves will never see this full map unless they draw it themselves. Instead, they will see descriptions of the room that they are currently in, and a system to allow them to move from room to room and explore the world around them.
Room Definitions
We are building our game using the concept of “Rooms”, where a Room is one area of the game world. In our map, this means that each individual room and each corridor will become one game Room, and will have appropriate exits onto the other rooms. We also need to keep track of the doors between rooms, since these are in various states – either open or closed – and are shared between rooms. For example, there is a door between rooms “11” and “14” at the bottom left of the map. This is the same door from both sides, and if it is opened from one side it should be reflected on the other side.
For the sake of ease, we will represent our world as a single JSON data file that we can load on server startup. In reality, this would be better off in a database, which would then allow for changes to be made to the world whilst the server is running, and for multiple server deployments to work from the same data. That is overkill for this tutorial.
Create a new file in the root of your backend project called world.json. The actual contents for the full map would be too long to display here but will look something like this:
1{ 2 "doors": { 3 "enter": { 4 "state": "arch" 5 }, 6 "room-1-corridor-1-8": { 7 "state": "closed" 8 } 9 }, 10 "rooms": { 11 "start": { 12 "description": "You stand at the entrance to The Crypts of Kas the Betrayer. Before you is a large stone archway leading into a long room", 13 "exits": { 14 "south": { 15 "name": "Enter", 16 "door": "enter" 17 } 18 } 19 }, 20 "room-1": { 21 "description": "A shallow pit lies in the north side of the room. The north and west walls are covered with cracks", 22 "exits": { 23 "north": { 24 "name": "Exit", 25 "door": "enter" 26 }, 27 "south": { 28 "name": "South", 29 "door": "room-1-corridor-1-8" 30 } 31 } 32 }, 33 "corridor-1-8": { 34 "description": "The corridor has flagstone flooring and reinforced masonry walls.", 35 "exits": { 36 "north": { 37 "name": "North", 38 "door": "room-1-corridor-1-8" 39 } 40 } 41 } 42 } 43 }
This file will be used to power the entire game world and lets us work out everything we need to in order for our characters to navigate the map. We have a special room called “start” that characters will start in, and then from that point on navigation is done by following “exits” from one room to the next.
Next, we need to be able to access this data. In the previous article, we created a GraphQL Service to act as the API for the backend service. We will use this to expose our world data for the client to access.
Inside routes/graphql.js, we need to expand our GraphQL Schema to allow the world data to be accessed. Add the following into the GraphqlSchema string:
1type Door { 2 name: ID! 3 state: String! 4 } 5 type Exit { 6 name: ID! 7 description: String! 8 door: Door! 9 } 10 type Room { 11 name: ID! 12 description: String! 13 exits: [Exit!]! 14 } 15 type Query { 16 version: String 17 room(name: ID!) : Room 18 }
Amongst other things, this defines a new top-level query field that allows us to get the details of any Room from its name. You’ll also notice that there’s no way of using this structure to navigate the world – you can see how to get out of any Room but not where the Exit will take you. This will be rectified later on.
Now we need to actually implement this structure. Firstly we need access to our World data. This is a simple require statement to load our JSON file:
1const worldData = require('../world.json');
Then we need the actual resolvers for our data. We do this by expanding the resolvers object as follows:
1Query: { 2 version: () => '1.0.0', 3 room: (_, { name }) => { 4 const room = worldData.rooms[name]; 5 if (room) { 6 const roomExits = room.exits || {}; 7 const exits = Object.keys(roomExits) 8 .map((exitName) => { 9 const exit = roomExits[exitName]; 10 return { 11 name: exitName, 12 description: exit.name, 13 doorName: exit.door 14 }; 15 }); 16 return { 17 name, 18 description: room.description, 19 exits 20 } 21 } else { 22 return null; 23 } 24 } 25 }, 26 Exit: { 27 door: ({ doorName }) => { 28 const door = worldData.doors[doorName]; 29 return { 30 name: doorName, 31 state: door.state 32 }; 33 } 34 },
Here we have two fields that we are resolving. The room field on the top-level Query object will look up a Room from the provided name and, if it was found, return the details of that room, including all of the Exits. For each Exit, it only returns the name of the Door rather than the Door details. Separate to that, we define the door field on the Exit object. This takes the name of the Door, looks it up and returns the details of that specific Door.
We can then test this out in our GraphiQL UI:
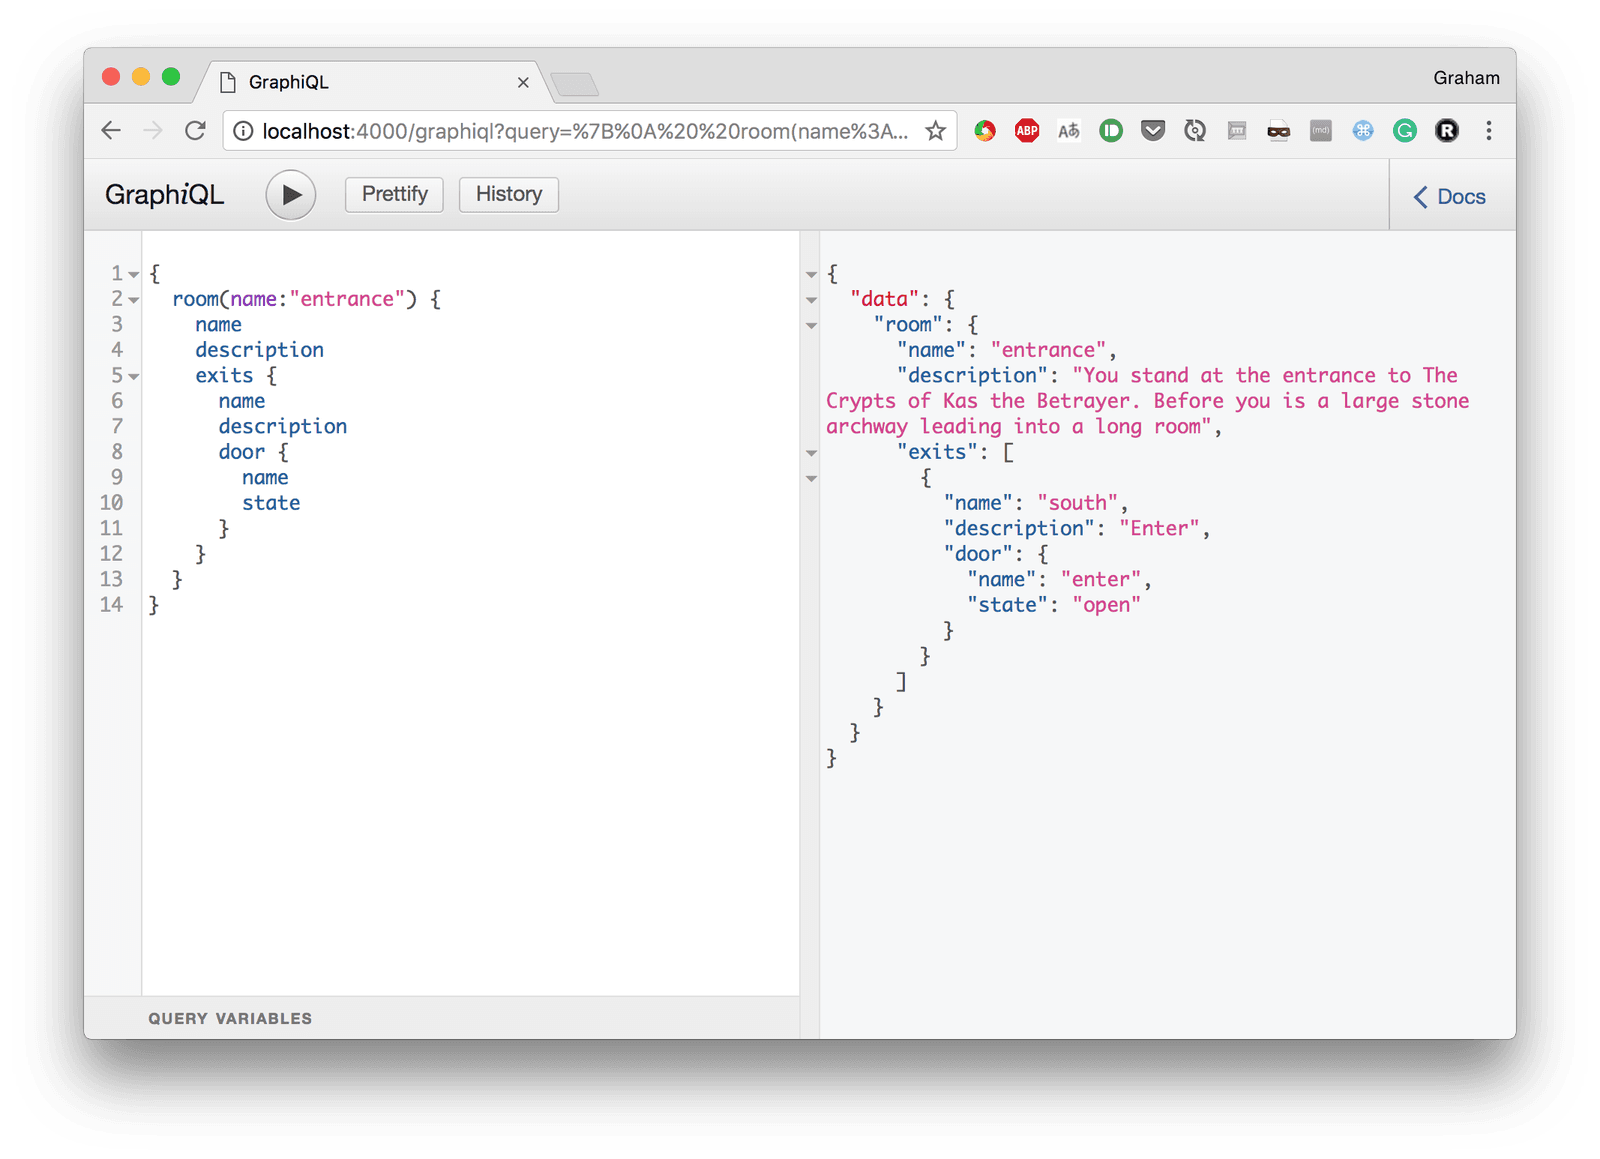
The above query gets all of the details of our “start” room, and the result shows exactly what we would expect from it.
Navigating the World
Now that we have the ability to see where we are in the world, we need to be able to move about it. This is a two-fold process. The main thing that we want to do is move from one room to the next using an exit. The second thing, however, is that we want to be able to open and close doors. Any character can open and close any door, but a character can only walk through an open door.
These are going to be handled as Mutations – because we are changing something about the world. To this end, we need to update our GraphqlSchema string as follows:
1type ExitRoomError { 2 reason: ID! 3 } 4 5 union ExitRoomResult = Room | ExitRoomError 6 7 type Mutation { 8 signin(sessionId: ID!, name: String!, race: String!, class: String!): String 9 openDoor(room: ID!, exit: ID!): Door! 10 closeDoor(room: ID!, exit: ID!): Door! 11 exitRoom(room: ID!, exit: ID!): ExitRoomResult! 12 }
This defined three new mutations that can be called:
openDoor– This will open the door defined by the named exit of the named room. If the door is not currently closed then no action will occur.closeDoor– This will close the door defined by the named exit of the named room. If the door is not currently open then no action will occur.exitRoom– This will follow the exit defined. This might fail, for example, if the door is closed. As such, we return either a success result – the new Room, or a failure result – the reason why exiting the room failed.
These just need implementing now. This is done by adding the following to the Mutation field of the resolvers object:
1openDoor: (_, { room, exit }) => { 2 const roomData = worldData.rooms[room]; 3 const exitData = roomData.exits[exit]; 4 const doorName = exitData.door; 5 const doorData = worldData.doors[doorName]; 6 if (doorData.state === 'closed') { 7 doorData.state = 'open'; 8 } 9 return { 10 name: doorName, 11 state: doorData.state 12 }; 13 }, 14 closeDoor: (_, { room, exit }) => { 15 const roomData = worldData.rooms[room]; 16 const exitData = roomData.exits[exit]; 17 const doorName = exitData.door; 18 const doorData = worldData.doors[doorName]; 19 if (doorData.state === 'open') { 20 doorData.state = 'closed'; 21 } 22 return { 23 name: doorName, 24 state: doorData.state 25 }; 26 }, 27 exitRoom: (_, { room, exit }) => { 28 const roomData = worldData.rooms[room]; 29 const exitData = roomData.exits[exit]; 30 const doorName = exitData.door; 31 const doorData = worldData.doors[doorName]; 32 if (doorData.state === 'closed') { 33 return { 34 reason: 'DOOR_CLOSED' 35 }; 36 } 37 const targetRoomName = Object.keys(worldData.rooms) 38 .filter(roomName => room !== roomName) 39 .find(roomName => { 40 const roomDetails = worldData.rooms[roomName]; 41 const hasDoor = Object.keys(roomDetails.exits) 42 .map(exitName => roomDetails.exits[exitName]) 43 .map(exitDetails => exitDetails.door) 44 .includes(doorName); 45 return hasDoor; 46 }); 47 const targetRoom = worldData.rooms[targetRoomName]; 48 const roomExits = targetRoom.exits || {}; 49 const exits = Object.keys(roomExits) 50 .map((exitName) => { 51 const exit = roomExits[exitName]; 52 return { 53 name: exitName, 54 description: exit.name, 55 doorName: exit.door 56 }; 57 }); 58 return { 59 name: targetRoomName, 60 description: targetRoom.description, 61 exits 62 } 63 }
Note that the result of exitRoom is a union, meaning that the actual value could be one of several types. In order to make this work, the GraphQL Server needs to know exactly which type it is. This is done by adding a special resolver method called __resolveType to the union type, as follows:
1ExitRoomResult: { 2 __resolveType: (obj) => { 3 if (obj.reason) { 4 return 'ExitRoomError'; 5 } else { 6 return 'Room'; 7 } 8 } 9 }
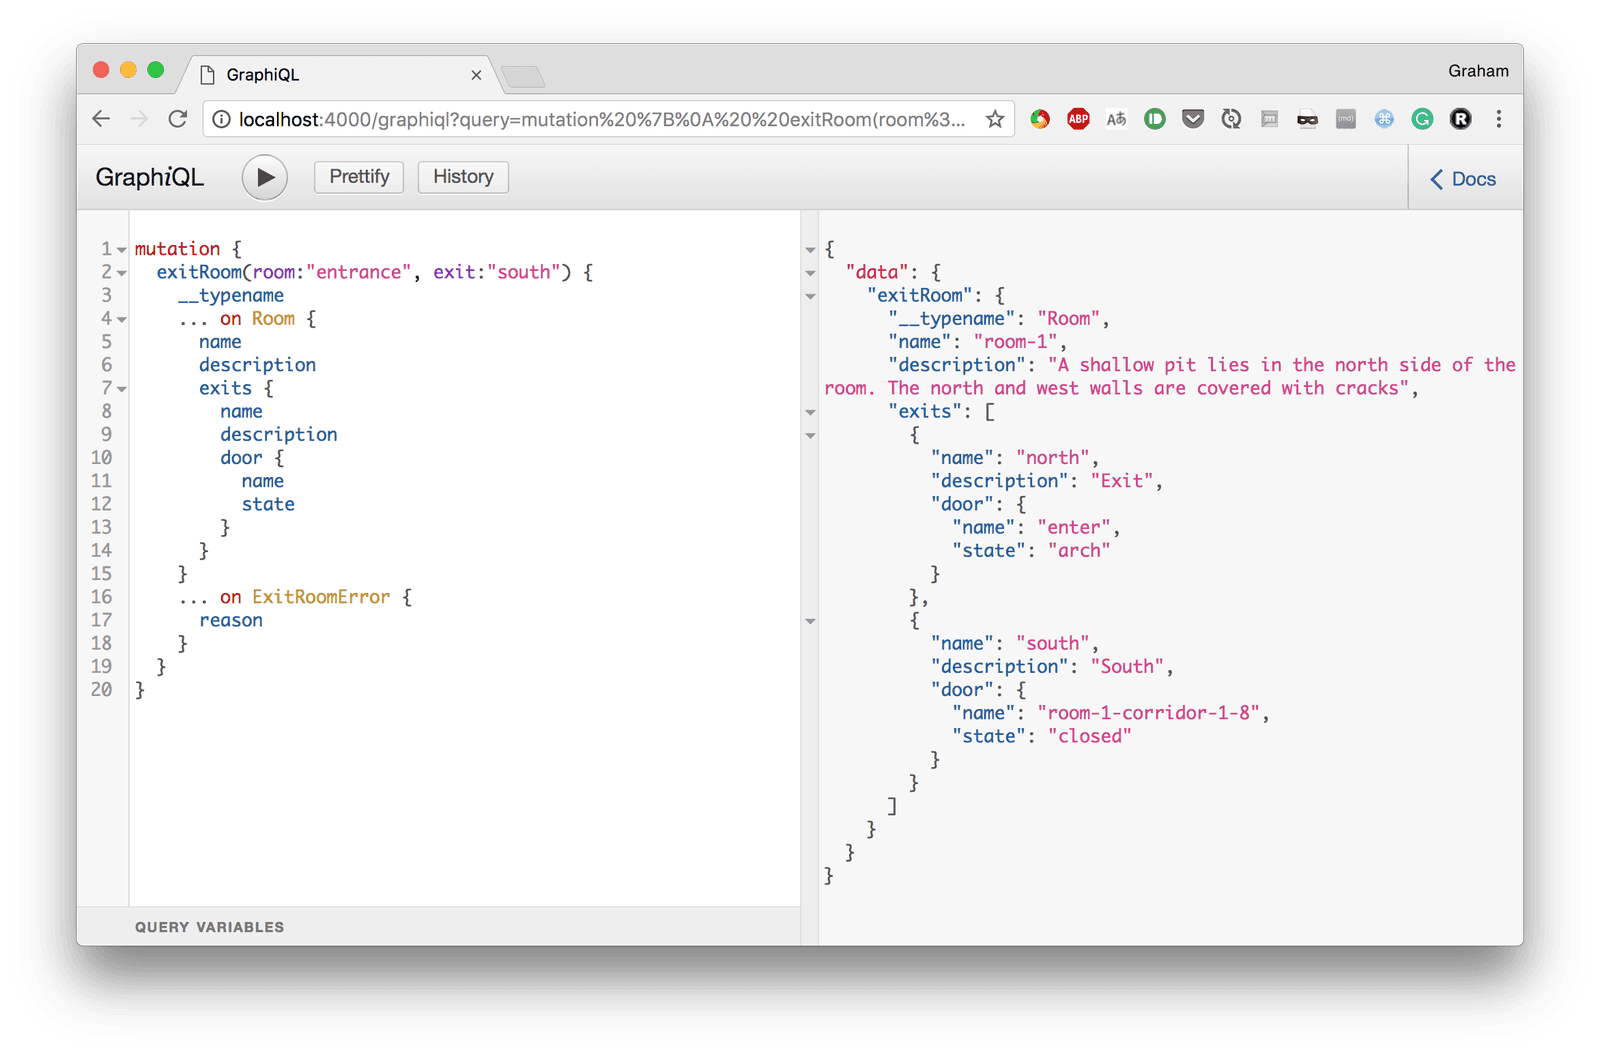
At this point, we can open and close doors, and we can exit one room into the next:
? Note that the query fields are more complicated to account for the fact that we could get one of several types back. This is discussed in the GraphQL documentation here.
Displaying World Details
Once our backend supports returning the details of the world and allows us to navigate from one room to another, we need to be able to actually show this to the player. This will involve displaying the details of the current room, the exits that are available, and ensuring that the list of characters in the room is kept correct.
Firstly, we want a component to render the room description. This will go into src/RoomDescription.js. Firstly we need some imports and a query to execute:
1import React, { Component } from 'react'; 2 import graphqlClient from './graphql'; 3 import gql from 'graphql-tag'; 4 5 const ROOM_QUERY_MUTATION = gql`query($room:ID!) { 6 room(name:$room) { 7 description 8 exits { 9 name 10 description 11 door { 12 state 13 } 14 } 15 } 16 }`;
This query will be called with a single parameter – the name of the room to get the details of and will return those details. Next, we want an actual component that renders the details:
1class RoomDescription extends Component { 2 constructor(props) { 3 super(props); 4 this._handleExitRoom = this._onExitRoom.bind(this); 5 } 6 _onExitRoom(e, exit) { 7 e.preventDefault(); 8 this.props.exitRoomHandler(exit.name); 9 } 10 render() { 11 const { room } = this.props; 12 const exits = room.exits.map((exit) => 13 <li className="list-inline-item"> 14 <a href="#" onClick={(e) => this._handleExitRoom(e, exit)}> 15 {exit.description} 16 </a> 17 </li> 18 ); 19 return ( 20 <div> 21 <div> 22 { room.description } 23 </div> 24 <br /> 25 <h5>Exits</h5> 26 <ul className="list-inline"> 27 { exits } 28 </ul> 29 </div> 30 ); 31 } 32 }
When this is rendered, this is provided the room details as returned by the GraphQL Query and will render them. It displays the room description, and then the list of exits as clickable links. Clicking on one of these will trigger a provided callback that will, soon, actually move through that exit.
Finally, we are going to write a special Wrapper component that makes the GraphQL call and, when we have a response, renders the above component with the details:
1class RoomDescriptionWrapper extends Component { 2 constructor(props) { 3 super(props); 4 this.state = {}; 5 } 6 componentDidMount() { 7 const { room } = this.props; 8 this._getRoomDetails(room); 9 } 10 componentWillReceiveProps(nextProps) { 11 const { room } = nextProps; 12 this._getRoomDetails(room); 13 } 14 _getRoomDetails(room) { 15 graphqlClient.query({ 16 query: ROOM_QUERY_MUTATION, 17 variables: { 18 room: room 19 } 20 }).then((roomData) => { 21 this.setState({ 22 room: roomData.data.room 23 }); 24 }); 25 } 26 render() { 27 const { room } = this.state; 28 if (room) { 29 return <RoomDescription room={ room } exitRoomHandler={this.props.exitRoomHandler} /> 30 } else { 31 return ( 32 <div></div> 33 ); 34 } 35 } 36 } 37 38 export default RoomDescriptionWrapper;
Note that the API call is made in both componentDidMount – for when this is first rendered – and in componentWillReceiveProps – for when a new room name is provided instead.
This file exposes a single component that is rendered with the name of the room and the handler to call to move through an exit. It then retrieves the room details and displays those returned.
Next we need to make use of this component and actually show the room details. This is done in the file src/Game.js. Firstly we want some more imports:
1import RoomDescription from './RoomDescription'; 2 import graphqlClient from './graphql'; 3 import gql from 'graphql-tag';
And then a GraphQL Mutation to trigger when the exit is used:
1const EXIT_ROOM_MUTATION = gql`mutation($room:ID!, $exit:ID!) { 2 exitRoom(room:$room, exit:$exit) { 3 __typename 4 ... on Room { 5 name 6 } 7 ... on ExitRoomError { 8 reason 9 } 10 } 11 }`;
We now want to be able to call this mutation and update the component state as appropriate. We need a new method inside our Game component as follows:
1_onExitRoom(exit) { 2 const { room } = this.state; 3 graphqlClient.mutate({ 4 mutation: EXIT_ROOM_MUTATION, 5 variables: { 6 room: room, 7 exit: exit 8 } 9 }).then((result) => { 10 if (result.data.exitRoom["__typename"] === 'Room') { 11 const roomName = result.data.exitRoom.name; 12 pusher.unsubscribe(`presence-room-${room}`); 13 pusher.subscribe(`presence-room-${roomName}`); 14 this.setState({ 15 room: roomName 16 }); 17 } else { 18 // Failure to leave the room is handled here 19 } 20 }); 21 }
And then bind the handler so that we can easily call it, by adding the following to the constructor:
1this._handleExitRoom = this._onExitRoom.bind(this);
The _onExitRoom will call our exitRoom mutation, and check the response. If we got a Room response then we have successfully used the exit, so we update the component state to reflect this and we then change the Pusher subscriptions from the old room to the new one.
Finally, we update the render method to make use of this information as follows:
1<div className="game-roomDescription"> 2 <RoomDescription room={ this.state.room } exitRoomHandler={this._handleExitRoom} /> 3 </div>
Once all of this is done, the room descriptions will display and the links will work to move between rooms:
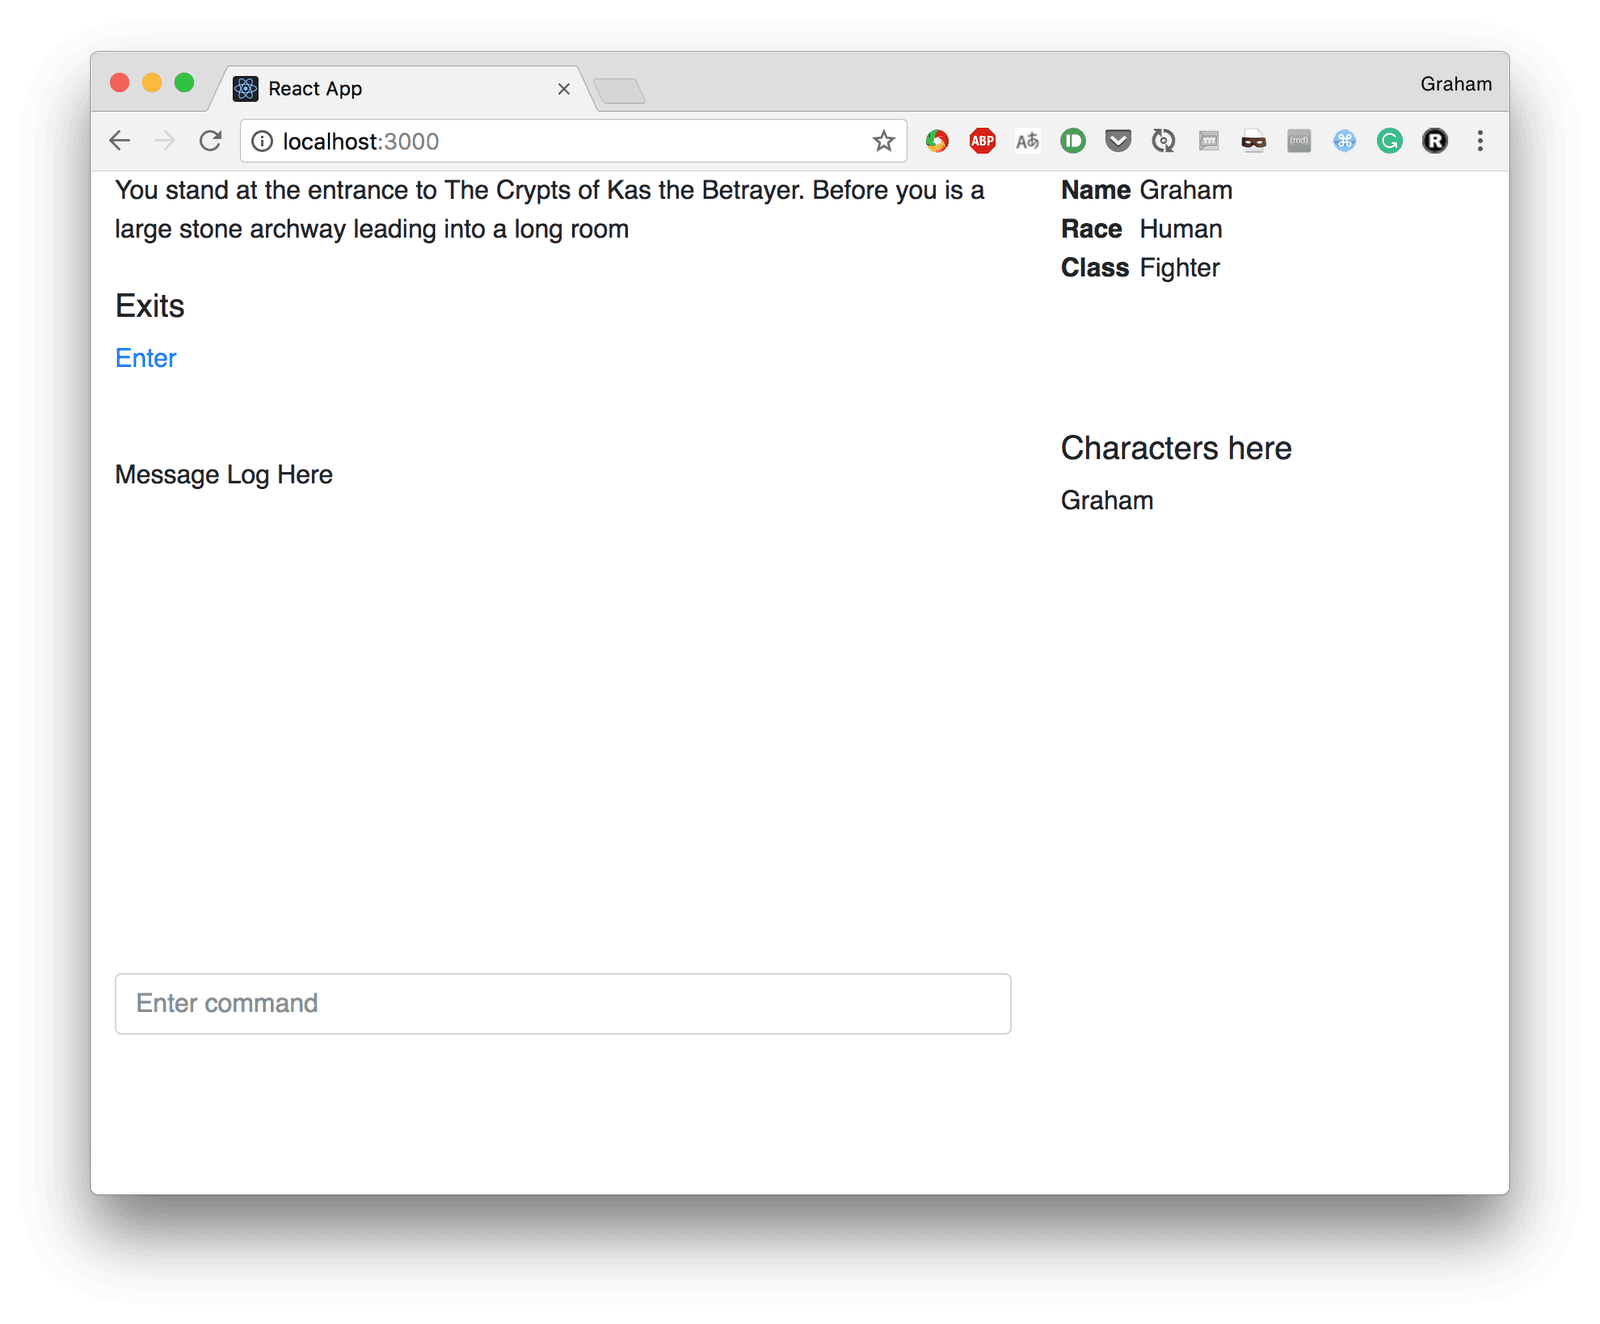
However, you might notice that the Characters here list doesn’t correctly update as you move between rooms. This is because the component is not re-rendered and so the Pusher bindings are not correctly updated. We are going to take the easy option here and force the component to re-render instead of correctly managing the bindings. This is because there is no need to do better in this case, as we have no component state that we need to manage otherwise. This is done by updating the render method of the Game class again to contain the following:
1<CharacterList room={ this.state.room } key={this.state.room} />
The addition of the key prop is special to React, and it will cause the entire component to be re-rendered when it changes instead of simply being updated with new prop values.
Failing to move between rooms
On occasion, you might find that it’s not possible to move between rooms. For example, our “South” exit from our second room doesn’t work. This is because the API refuses to let you move through a closed door, so send back an error instead. What we need to do now is to display these errors to the player so that they can see what’s going on.
In order to do this we are going to create a message log component in order to display messages to the player and add an appropriate message to it when the door is closed.
Firstly, create a new component in Messages.js as follows:
1import React, { Component } from 'react'; 2 class Messages extends Component { 3 render() { 4 const messageRows = this.props.messages 5 .map((message) => <li>{message.timestamp.toString()} - {message.message}</li>); 6 return ( 7 <ul className="list-unstyled"> 8 {messageRows} 9 </ul> 10 ); 11 } 12 } 13 export default Messages;
This simply takes in a list of messages – consisting of a timestamp and a string – and displays them in a list.
Then we need to display them. This is all done in Game.js. Firstly we need to ensure our new component is imported:
1import Messages from './Messages';
Next, add a new piece of state to store the messages. Update the constructor as follows:
1this.state = { 2 room: 'start', 3 messages: [] 4 };
Then update the render method to show the messages:
1<div className="game-messageLog"> 2 <Messages messages={this.state.messages} /> 3 </div>
Then we simply need to add a message whenever we fail to move through an exit. This is done by updating the response handler in the _onExitRoom method so that, when we fail to exit the room, a message is added to our state instead:
1if (result.data.exitRoom["__typename"] === 'Room') { 2 const roomName = result.data.exitRoom.name; 3 pusher.unsubscribe(`presence-room-${room}`); 4 pusher.subscribe(`presence-room-${roomName}`); 5 this.setState({ 6 room: roomName 7 }); 8 } else { 9 const messages = this.state.messages; 10 if (result.data.exitRoom.reason === 'DOOR_CLOSED') { 11 messages.unshift({ 12 timestamp: new Date(), 13 message: "That door is closed!" 14 }); 15 } 16 this.setState({ 17 messages 18 }); 19 }
When we try to use a closed door, we are now informed of this fact instead of being left with no idea what happened:
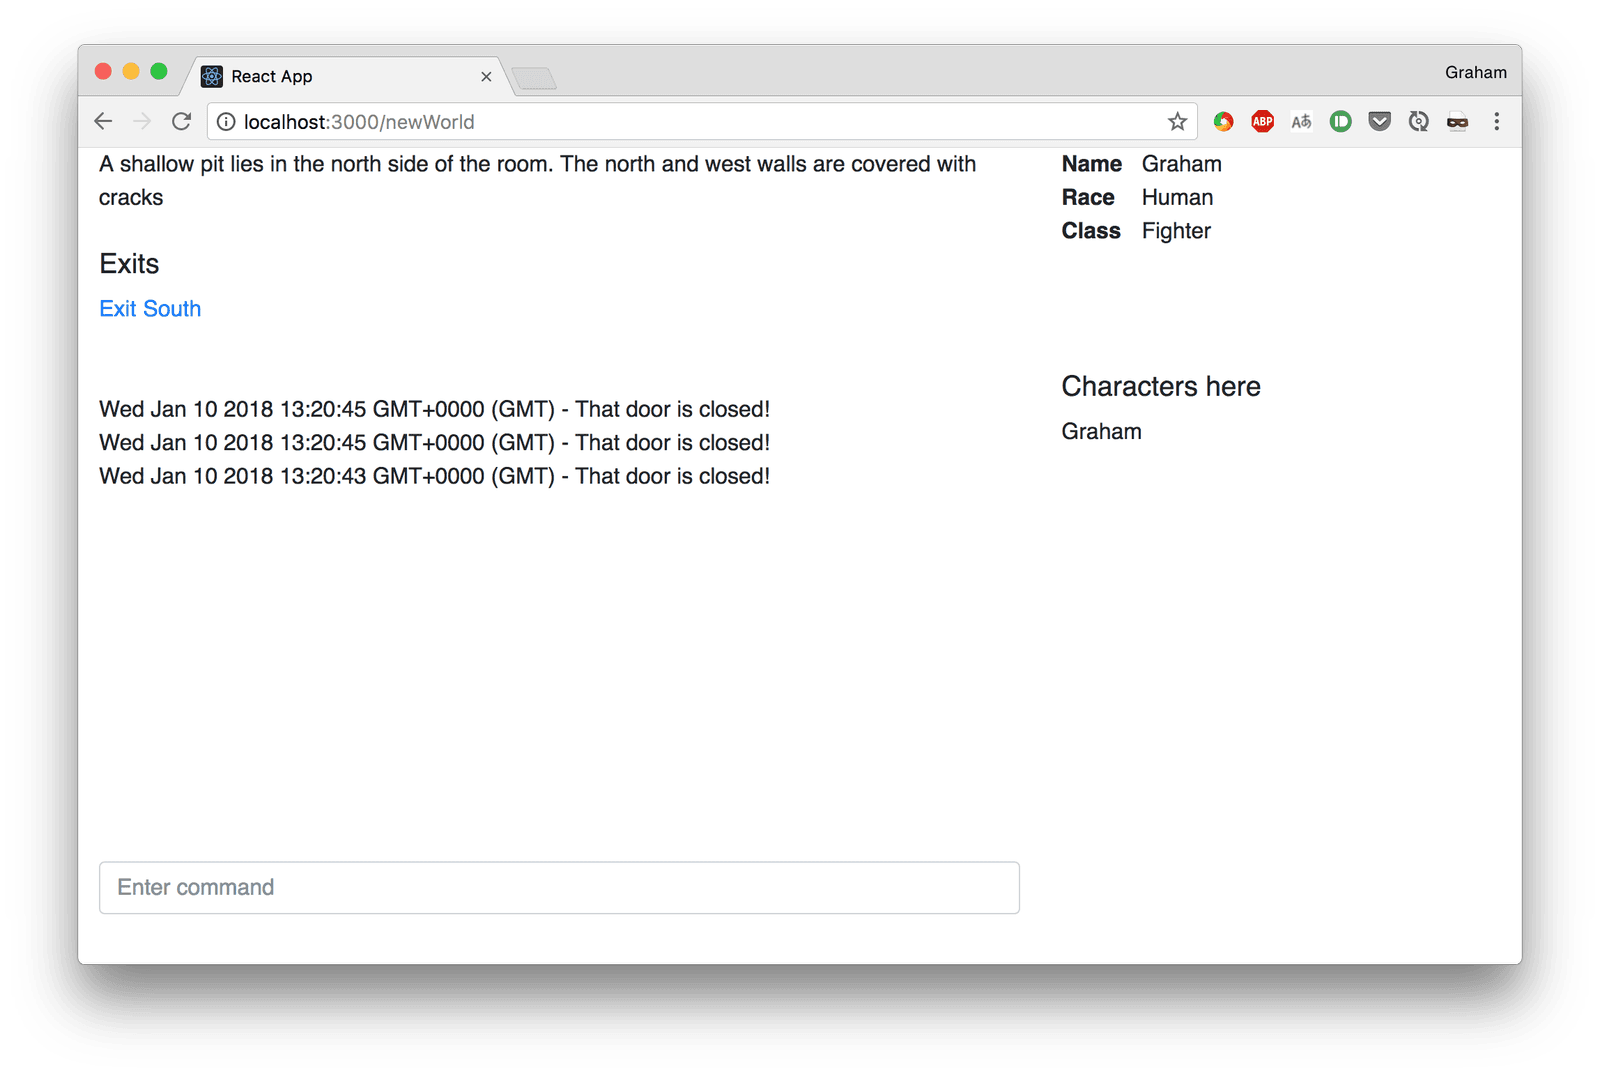
Note that we still can’t actually open this door from the UI. The API will let you do this if you want to use that to manually explore the world, but interacting with it is left for the next article.
Conclusion
This article has taken our initial setup, a game world where people can join and see each other, and extended it to give some depth to the world and to allow you to wander around and explore – at least as much as is possible without being able to affect anything. The full code for this article is available in GitHub.
In our next tutorial, we are going to make the game much more interactive, allowing characters to interact with both the world and each other, and giving realtime updates to all of this as it happens.


© 2024 Pusher Ltd. All rights reserved.
Pusher Limited is a company registered in England and Wales (No. 07489873) whose registered office is at MessageBird UK Limited, 3 More London Riverside, 4th Floor, London, United Kingdom, SE1 2AQ.