- Products

- Developers
- User stories
- Blog
- Pricing

Online Text RPG: Entering The World (Part 1)
Discover how to create an online text RPG using React, Node.js, GraphQL and Pusher. The first part is focused on building the backend and the frontend.
Introduction
To embrace more modern development practices, we are going to build our game as a web-based interface, allowing anyone with a modern web browser to join. We will use Pusher as the mechanism allowing players to get immediate updates of anything happening in the game world, with a frontend written using React, and a GraphQL backend built on Node.js controlling the game itself. The interface to our backend will be primarily a GraphQL API, allowing for a rich interface between web app and server.
This article is part of Build an online text RPG with React and GraphQL course.
Throughout these tutorials, we are going to build a relatively simple online role-playing game, similar to the MUD games in the 1970s and 1980s which are themselves the predecessors to the modern MMO games millions of people play today. Our game will allow players to log in with a character name, explore the world and interact with both the world and other players.
By the end of this article, we will have a game world that players can connect to, and see other players in the same area as themselves. We will be using the Pusher Presence Channels to determine which players are connected and in each area. This requires an authentication server to ensure that the clients are actually allowed to connect to the channels.
The game at the end of this article will look as follows:
Prerequisites
In order to follow this article, you will need to have a modern version of Node.js installed. You should also have an understanding of working with React, as they will feature heavily in the end result.
You will also need to have created a Pusher account and registered an Application. Upon doing so, you will receive an App ID, Key, Secret, and Cluster. These will be needed later on to connect to Pusher from our Backend and Frontend applications.
Writing the Backend Server
The first thing we will do is set up our backend server. This will have the following purposes:
- Act as the Authentication Server necessary for Pusher Presence Channels to work.
- Allow the web app to inform the server of a new player
We will write our server using Express and Apollo Server, set up using Express Generator.
Setting up Express
Express Generator allows for a very quick way to get an Express server started. Firstly, make sure this is installed:
1$ npm install -g express-generator 2 ~/.nvm/versions/node/v8.2.1/bin/express -> ~/.nvm/versions/node/v8.2.1/lib/node_modules/express-generator/bin/express-cli.js 3 + express-generator@4.15.5 4 added 6 packages in 1.105s
Once this is done, a new project can be started:
1$ express pusher-mud-backend 2 3 warning: the default view engine will not be jade in future releases 4 warning: use `--view=jade' or `--help' for additional options 5 6 7 create : pusher-mud-backend 8 create : pusher-mud-backend/package.json 9 create : pusher-mud-backend/app.js 10 create : pusher-mud-backend/public 11 create : pusher-mud-backend/routes 12 create : pusher-mud-backend/routes/index.js 13 create : pusher-mud-backend/routes/users.js 14 create : pusher-mud-backend/views 15 create : pusher-mud-backend/views/index.jade 16 create : pusher-mud-backend/views/layout.jade 17 create : pusher-mud-backend/views/error.jade 18 create : pusher-mud-backend/bin 19 create : pusher-mud-backend/bin/www 20 create : pusher-mud-backend/public/javascripts 21 create : pusher-mud-backend/public/stylesheets 22 create : pusher-mud-backend/public/stylesheets/style.css 23 24 install dependencies: 25 $ cd pusher-mud-backend && npm install 26 27 run the app: 28 $ DEBUG=pusher-mud-backend:* npm start 29 30 create : pusher-mud-backend/public/images 31 $ cd pusher-mud-backend 32 $ npm install 33 npm WARN deprecated jade@1.11.0: Jade has been renamed to pug, please install the latest version of pug instead of jade 34 npm WARN deprecated transformers@2.1.0: Deprecated, use jstransformer 35 added 102 packages in 3.514s
? The warnings about the default view engine can be ignored, since we do not intend to use them at all.
There are some parts of this that we do not need and can safely remove. You can safely delete:
- The
publicdirectory. - The
viewsdirectory. - The
routes/users.jsfile.
And, to go along with this, delete the following lines from app.js:
1var users = require('./routes/users'); 2 3 // view engine setup 4 app.set('views', path.join(__dirname, 'views')); 5 app.set('view engine', 'jade'); 6 7 app.use(express.static(path.join(__dirname, 'public'))); 8 9 app.use('/users', users);
Finally, we want to change the default port that is being used. This is because by default this app will be using the same port as our frontend, which will cause conflicts. This is done by editing bin/www and changing it as follows:
1/** 2 * Get port from environment and store in Express. 3 */ 4 5 var port = normalizePort(process.env.PORT || '4000'); 6 app.set('port', port);
The new port value that was selected was 4000, but you can use anything that you like as long as it’s free.
Setting up CORS
Cross-Origin Resource Sharing (CORS) allows for a webpage running on one server to connect to a web application running on another server. Without this, the browser’s security model will block these requests as insecure.
For our needs, we can simply allow all incoming requests to our server. In reality, this might not be the best fit security-wise, and you will need to decide how best to manage that at that point.
In order to support CORS, we will use the cors module:
1$ npm install --save cors 2 npm notice created a lockfile as package-lock.json. You should commit this file. 3 + cors@2.8.4 4 added 3 packages in 1.323s
Once installed, we configure it by adding the following lines to app.js:
1// At the top, with the other require statements 2 var cors = require('cors'); 3 ...... 4 // Lower down, in the various app.use() lines 5 app.use(cors());
Setting up GraphQL
Now that we have our Express server, we can add GraphQL in. This will be done using Apollo Server, which is a powerful GraphQL setup that is very easy to use with Express.
First, we need to install the appropriate modules:
1$ npm install --save apollo-server-express graphql graphql-tools 2 + apollo-server-express@1.2.0 3 + graphql@0.11.7 4 + graphql-tools@2.7.2 5 added 15 packages in 2.999s
And then set up our server to actually accept our GraphQL requests. GraphQL works by defining a schema that the server works against, and then by attaching Resolvers to points in the schema. We will be using GraphQL Tools to define our schema and attach our resolvers, as this allows us to do so in a very easy-to-read and flexible way.
All of our GraphQL handlings will live in routes/graphql.js for this example. Realistically, you would want to split it over multiple files for easy maintenance, but that is out of scope here. Create this file and put the following into it:
1const graphqlTools = require('graphql-tools'); 2 3 const GraphqlSchema = ` 4 type Query { 5 version: String 6 } 7 8 type Mutation { 9 signin(sessionId: ID!, name: String!, race: String!, class: String!): String 10 } 11 `; 12 13 14 const resolvers = { 15 Query: { 16 version: () => '1.0.0' 17 }, 18 Mutation: { 19 signin: (_, user) => { 20 return "Success"; 21 } 22 } 23 }; 24 25 const builtSchema = graphqlTools.makeExecutableSchema({ 26 typeDefs: GraphqlSchema, 27 resolvers 28 }); 29 30 module.exports = builtSchema;
There’s quite a lot going on here, so let’s take it one piece at a time.
To start with, we define the GraphQL Schema. This is done using the GraphQL Schema Language. Our schema defines one Query field and one Mutation field:
- version – This is a simple helper to check that the correct API version is present.
- signin – This will take some user details – including a Session ID – and register this user as logged in. This will be important for the Pusher Authentication endpoint later on.
Next, we define our resolvers. This is a JavaScript object where the outermost keys are the GraphQL type that is being resolved, and each of those is itself an object containing a GraphQL field to resolver function. This can be read in more detail in the GraphQL Tools documentation.
Note that for now, our resolvers don’t do anything useful. This will change soon though.
Finally, we need to actually build the GraphQL Schema. This is done using the graphqlTools.makeExecutableSchema function, which takes our Schema definition and our Resolvers and builds a live GraphQL Schema object that can be used by the running server.
After all of this, we need to wire it up into the server. This is done inside app.js, as follows:
1// At the top, with the other require statements 2 var apollo = require('apollo-server-express'); 3 var graphqlSchema = require('./routes/graphql'); 4 5 // Lower down, with the route handlers 6 app.use('/graphql', apollo.graphqlExpress({ schema: graphqlSchema })); 7 app.use('/graphiql', apollo.graphiqlExpress({ endpointURL: '/graphql' }));
This ultimately registers two different URL handlers:
/graphql– This handles the actual GraphQL Query requests/graphiql– This displayed the GraphiQL development tools, which are very useful for testing the system.
The application could now be started up and will work, though not doing anything useful yet:
1$ npm start 2 3 > pusher-mud-backend@0.0.0 start ~/source/pusher-mud-backend 4 > node ./bin/www
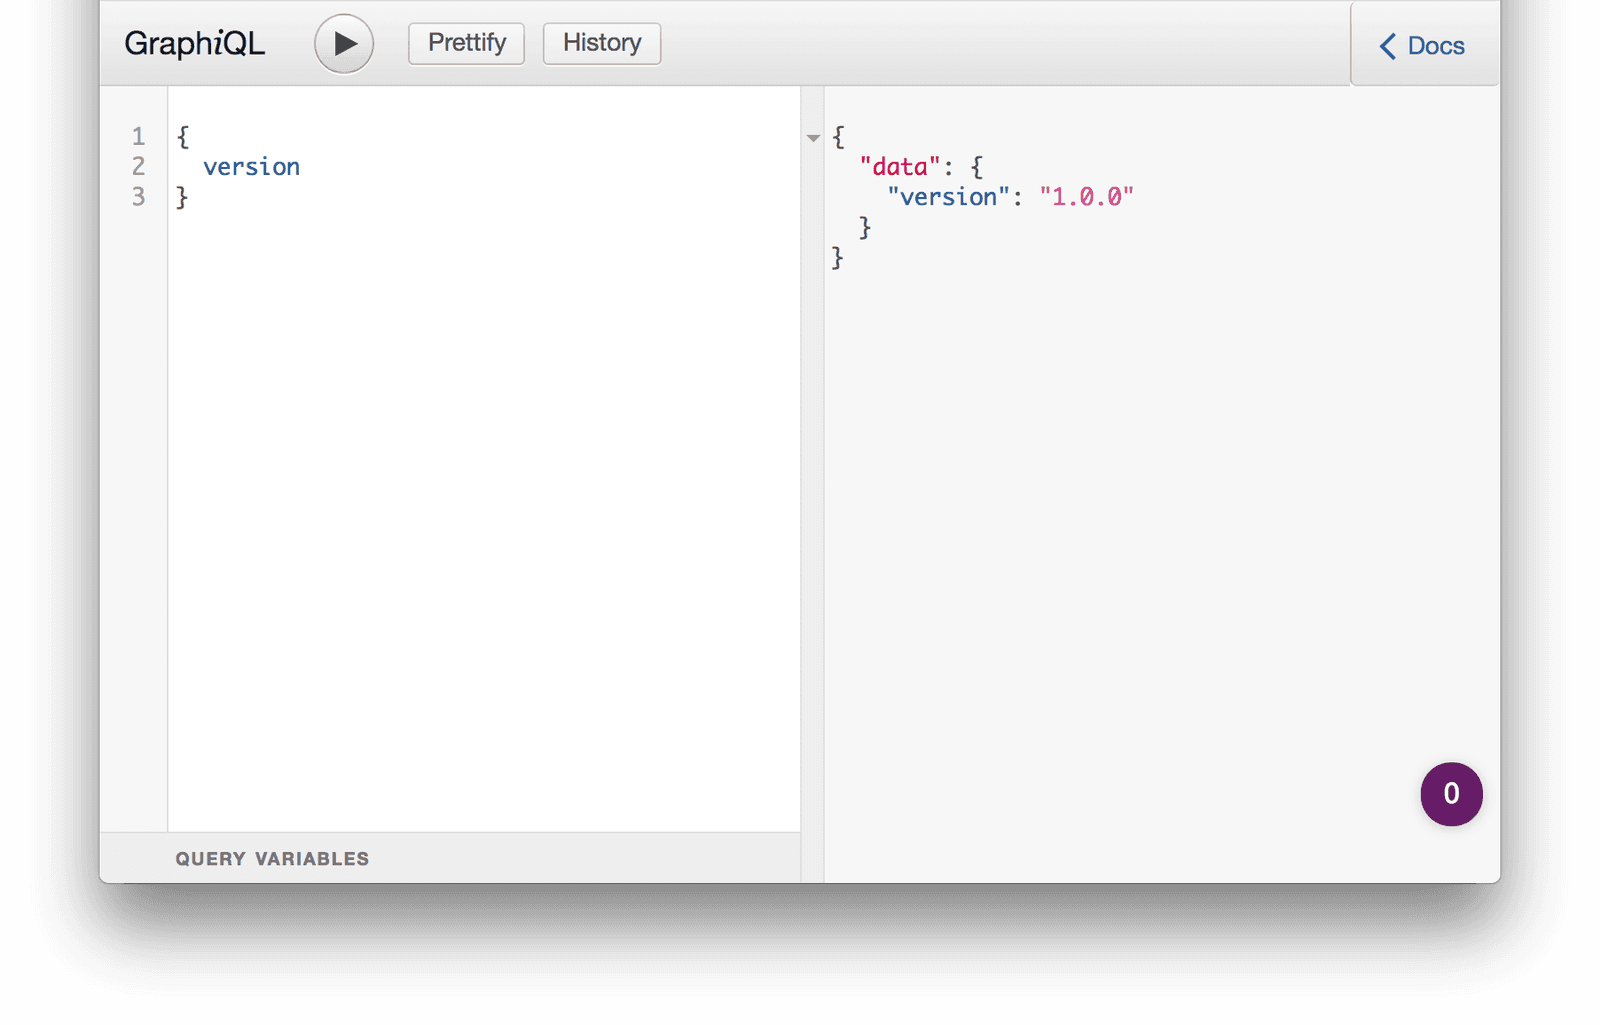
Here we can see the GraphiQL interface proving that we can request our version field and be getting the correct value back.
Allowing Characters to Sign In
The final action we need on our GraphQL endpoint is the ability for a character to inform the server that they are signing in. This will pass along a Session ID – which we will later see is our Pusher Socket ID – along with the Character Name, Race, and Class.
For this, we will use a fake user data store. This could be implemented using a real session storage strategy, or a system such as Redis, but for this article that is unnecessary.
Create a new file called users.js with the following contents:
1const users = {}; 2 3 function registerUser(sessionId, name, race, cls) { 4 users[sessionId] = { 5 name: name, 6 race: race, 7 class: cls 8 }; 9 } 10 11 function getUser(sessionId) { 12 return users[sessionId]; 13 } 14 15 module.exports = { 16 registerUser: registerUser, 17 getUser: getUser 18 };
Very simply, this gives us two methods that we can use:
- registerUser – This adds a new user to the store
- getUser – This retrieves an existing user from the store
Next, we wire this up to the GraphQL endpoint. This is simply a case of calling our registerUser function from the signin Mutation. Update routes/graphql.js as follows:
1// At the top with the requires section 2 var users = require('../users'); 3 4 // In the GraphQL Resolvers 5 Mutation: { 6 signin: (_, user) => { 7 users.registerUser(user.sessionId, user.name, user.race, user.class); 8 return "Success"; 9 } 10 }
This allows the signin Mutation to call our registerUser function and then return a Success message. In reality, there might be more checks on this, but that is unnecessary here.
Pusher Authentication Endpoint
We now need an endpoint that Pusher will call on our server to ensure that a user is allowed access to our Presence channel, and to return the user information to include on that channel subscription. This will check that the user exists and nothing more.
Firstly we need the Pusher module available to use. This allows our server to communicate with the Pusher service and generate authentication tokens:
1# npm install --save pusher 2 npm WARN deprecated node-uuid@1.4.8: Use uuid module instead 3 + pusher@1.5.1 4 added 70 packages in 4.098s
Now we need to add our new route file. Create a file called routes/pusher.js with the following information:
1var express = require('express'); 2 var router = express.Router(); 3 var Pusher = require('pusher'); 4 var users = require('../users'); 5 6 var pusher = new Pusher({ 7 appId: 'PUSHER_APP_ID', 8 key: 'PUSHER_KEY', 9 secret: 'PUSHER_SECRET', 10 cluster: 'PUSHER_CLUSTER' 11 }); 12 13 /* GET home page. */ 14 router.post('/auth', function(req, res, next) { 15 var socketId = req.body.socket_id; 16 var channel = req.body.channel_name; 17 var user = users.getUser(socketId); 18 var presenceData = { 19 user_id: socketId, 20 user_info: { 21 name: user.name, 22 race: user.race, 23 class: user.class 24 } 25 }; 26 27 var auth = pusher.authenticate(socketId, channel, presenceData); 28 res.send(auth); 29 }); 30 31 module.exports = router;
Replace the placeholders PUSHER_APP_ID, PUSHER_KEY, PUSHER_SECRET, and PUSHER_CLUSTER with the values obtained earlier.
This creates a new route on /auth that accepts a Socket ID and Channel Name, looks up the User information using the Socket ID as the key, and then calls to Pusher to authenticate the connection.
Now we need to register this into our application. Update the app.js file as follows:
1// Up the top with the other require statements 2 var pusher = require('./routes/pusher'); 3 4 // Lower down with the routes 5 app.use('/pusher', pusher);
The end result of this is that the Frontend application will be able to use /pusher/auth in order to authenticate a Pusher connection for use on our Presence channel, as long as the Socket ID for that Pusher Connection has previously called our signin mutation on our GraphQL server.
Writing the Frontend
Now that we have our Backend working, we need a UI to go with it. This will be built using React and Bootstrap and using the Apollo Client and Pusher libraries to communicate with the backend.
Setting up React
In order to set up our frontend, we will use Create React App. This very quickly allows us to get started on our User Interface with very little work needed.
Firstly, ensure that this is installed:
1> npm install -g create-react-app 2 ~/.nvm/versions/node/v8.2.1/bin/create-react-app -> ~/.nvm/versions/node/v8.2.1/lib/node_modules/create-react-app/index.js 3 + create-react-app@1.4.3 4 added 106 packages in 4.77s
Once finished, use it to bootstrap our application:
1> create-react-app pusher-mud-frontend 2 3 Creating a new React app in ~/source/pusher-mud-frontend. 4 5 Installing packages. This might take a couple of minutes. 6 Installing react, react-dom, and react-scripts... 7 8 9 > fsevents@1.1.2 install ~/source/pusher-mud-frontend/node_modules/fsevents 10 > node install 11 12 [fsevents] Success: "~/source/pusher-mud-frontend/node_modules/fsevents/lib/binding/Release/node-v57-darwin-x64/fse.node" already installed 13 Pass --update-binary to reinstall or --build-from-source to recompile 14 15 > uglifyjs-webpack-plugin@0.4.6 postinstall ~/source/pusher-mud-frontend/node_modules/uglifyjs-webpack-plugin 16 > node lib/post_install.js 17 18 + react-scripts@1.0.17 19 + react-dom@16.1.1 20 + react@16.1.1 21 added 1266 packages in 32.058s 22 23 Success! Created pusher-mud-frontend at ~/source/pusher-mud-frontend 24 Inside that directory, you can run several commands: 25 26 npm start 27 Starts the development server. 28 29 npm run build 30 Bundles the app into static files for production. 31 32 npm test 33 Starts the test runner. 34 35 npm run eject 36 Removes this tool and copies build dependencies, configuration files 37 and scripts into the app directory. If you do this, you can’t go back! 38 39 We suggest that you begin by typing: 40 41 cd pusher-mud-frontend 42 npm start 43 44 Happy hacking! 45 46 $ cd pusher-mud-frontend 47 $ npm start 48 Compiled successfully! 49 50 You can now view pusher-mud-frontend in the browser. 51 52 Local: http://localhost:3000/ 53 On Your Network: http://192.168.0.15:3000/ 54 55 Note that the development build is not optimized. 56 To create a production build, use npm run build.
We now have a fully-functional React webapp that we can work with. You should have even seen it open in your web browser, but if not you can simply visit the links output:
Before anything else though, we will install some extra modules that we are going to need. After that, we can leave the server running and it will hot-reload changes as we make them:
1> npm install --save pusher-js apollo-client-preset graphql graphql-tag react-apollo 2 npm WARN apollo-link-dedup@1.0.2 requires a peer of apollo-link@^1.0.3 but none is installed. You must install peer dependencies yourself. 3 4 + graphql@0.11.7 5 + pusher-js@4.2.1 6 + graphql-tag@2.5.0 7 + apollo-client-preset@1.0.3 8 + react-apollo@2.0.1 9 added 24 packages in 11.576s
Finally, we will be using Bootstrap 4 for our look and feel. This is easily introduced by simply adding the CDN links to our Index page. Edit public/index.html and add the following inside the <head> section:
1<link rel="stylesheet" href="https://maxcdn.bootstrapcdn.com/bootstrap/4.0.0-beta.2/css/bootstrap.min.css" integrity="sha384-PsH8R72JQ3SOdhVi3uxftmaW6Vc51MKb0q5P2rRUpPvrszuE4W1povHYgTpBfshb" crossorigin="anonymous"> 2 <script src="https://code.jquery.com/jquery-3.2.1.slim.min.js" integrity="sha384-KJ3o2DKtIkvYIK3UENzmM7KCkRr/rE9/Qpg6aAZGJwFDMVNA/GpGFF93hXpG5KkN" crossorigin="anonymous"></script> 3 <script src="https://cdnjs.cloudflare.com/ajax/libs/popper.js/1.12.3/umd/popper.min.js" integrity="sha384-vFJXuSJphROIrBnz7yo7oB41mKfc8JzQZiCq4NCceLEaO4IHwicKwpJf9c9IpFgh" crossorigin="anonymous"></script> 4 <script src="https://maxcdn.bootstrapcdn.com/bootstrap/4.0.0-beta.2/js/bootstrap.min.js" integrity="sha384-alpBpkh1PFOepccYVYDB4do5UnbKysX5WZXm3XxPqe5iKTfUKjNkCk9SaVuEZflJ" crossorigin="anonymous"></script>
Once done, restart the application using npm start and leave it running. You should also ensure that your backend application is still running as we will soon be depending on that.
Character Creation Screen
The first screen we will create is our Character Creation screen. This is the screen the player will be presented with on loading the page and will allow them to enter their Character Name, Race and Class.
We are going to be lazy and use the Character Race and Class names from the Dungeons & Dragons 3.5 SRD.
The first thing to do is to create some data files. These are shared between a couple of screens, so abstracting it out makes things a bit easier for us.
In the src directory, create a file called races.js containing:
1const races = [ 2 { 3 id: 'human', 4 name: 'Human' 5 }, { 6 id: 'dwarf', 7 name: 'Dwarf' 8 }, { 9 id: 'elf', 10 name: 'Elf' 11 }, { 12 id: 'gnome', 13 name: 'Gnome' 14 }, { 15 id: 'halfelf', 16 name: 'Half-Elf' 17 }, { 18 id: 'halforc', 19 name: 'Half-Orc' 20 }, { 21 id: 'halfling', 22 name: 'Halfling' 23 } 24 ]; 25 26 export default races;
And another file in the same directory called classes.js containing:
1const classes = [ 2 { 3 id: 'fighter', 4 name: 'Fighter' 5 }, { 6 id: 'cleric', 7 name: 'Cleric' 8 }, { 9 id: 'ranger', 10 name: 'Ranger' 11 }, { 12 id: 'rogue', 13 name: 'Rogue' 14 }, { 15 id: 'wizard', 16 name: 'Wizard' 17 }, { 18 id: 'barbarian', 19 name: 'Barbarian' 20 }, { 21 id: 'bard', 22 name: 'Bard' 23 }, { 24 id: 'druid', 25 name: 'Druid' 26 }, { 27 id: 'monk', 28 name: 'Monk' 29 }, { 30 id: 'paladin', 31 name: 'Paladin' 32 }, { 33 id: 'sorcerer', 34 name: 'Sorcerer' 35 } 36 ]; 37 38 export default classes;
In reality, this data would be loaded from the server, so that it can be adjusted as necessary. However, for this example, this is more than adequate.
Next, we need the actual component for the Character Creation screen. This will be in src/Login.js and will contain:
1import React, { Component } from 'react'; 2 import races from './races'; 3 import classes from './classes'; 4 5 class Login extends Component { 6 constructor(props) { 7 super(props); 8 9 this.state = { 10 name: '', 11 race: 'human', 12 cls: 'fighter' 13 }; 14 15 this._handleLogin = this._onLogin.bind(this); 16 this._handleNameChange = this._onNameChange.bind(this); 17 this._handleRaceChange = this._onRaceChange.bind(this); 18 this._handleClassChange = this._onClassChange.bind(this); 19 } 20 21 render() { 22 const { name, race, cls } = this.state; 23 const racesOptions = races.map((race) => <option value={race.id}>{race.name}</option>); 24 const classesOptions = classes.map((cls) => <option value={cls.id}>{cls.name}</option>); 25 26 return ( 27 <div className="row justify-content-center"> 28 <div className="col-sm-6 col-md-4"> 29 <div className="card"> 30 <div className="card-body"> 31 <h4 className="card-title">Join Game</h4> 32 <form onSubmit={ this._handleLogin }> 33 <div className="form-group"> 34 <label htmlFor="characterName">Name</label> 35 <input type="text" className="form-control" id="characterName" placeholder="Enter name" value={ name } onChange={ this._handleNameChange }/> 36 </div> 37 <div className="form-group"> 38 <label htmlFor="characterRace">Race</label> 39 <select id="characterRace" className="form-control" value={ race } onChange={ this._handleRaceChange }> 40 { racesOptions } 41 </select> 42 </div> 43 <div className="form-group"> 44 <label htmlFor="characterClass">Class</label> 45 <select id="characterClass" className="form-control" value={ cls } onChange={ this._handleClassChange }> 46 { classesOptions } 47 </select> 48 </div> 49 <div className="form-group"> 50 <input type="submit" className="btn btn-primary" value="Join Game" /> 51 </div> 52 </form> 53 </div> 54 </div> 55 </div> 56 </div> 57 ); 58 } 59 60 _onLogin(e) { 61 const { name, race, cls } = this.state; 62 e.preventDefault(); 63 64 this.props.handleLogin(name, race, cls); 65 } 66 67 _onNameChange(e) { 68 this.setState({name: e.target.value}); 69 } 70 71 _onRaceChange(e) { 72 this.setState({race: e.target.value}); 73 } 74 75 _onClassChange(e) { 76 this.setState({cls: e.target.value}); 77 } 78 } 79 80 export default Login;
This looks complicated, but in actuality, it simply displays a form with three fields on it – one each for Name, Race, and Class – and allows the user to log in with these values. When the user has selected their character details, a callback passed in will be triggered, informing something higher in the React structure that this has happened.
Now we need to update the main App component that renders the core application. For now, this will always render the Login component and nothing else, but that will soon change.
Update src/App.js as follows:
1import React, { Component } from 'react'; 2 import Login from './Login'; 3 4 class App extends Component { 5 constructor(props) { 6 super(props); 7 8 this._handleLogin = this._onLogin.bind(this); 9 } 10 11 render() { 12 return ( 13 <div className="App container-fluid"> 14 <Login handleLogin={ this._handleLogin } /> 15 </div> 16 ); 17 } 18 19 _onLogin(name, race, cls) { 20 } 21 } 22 23 export default App;
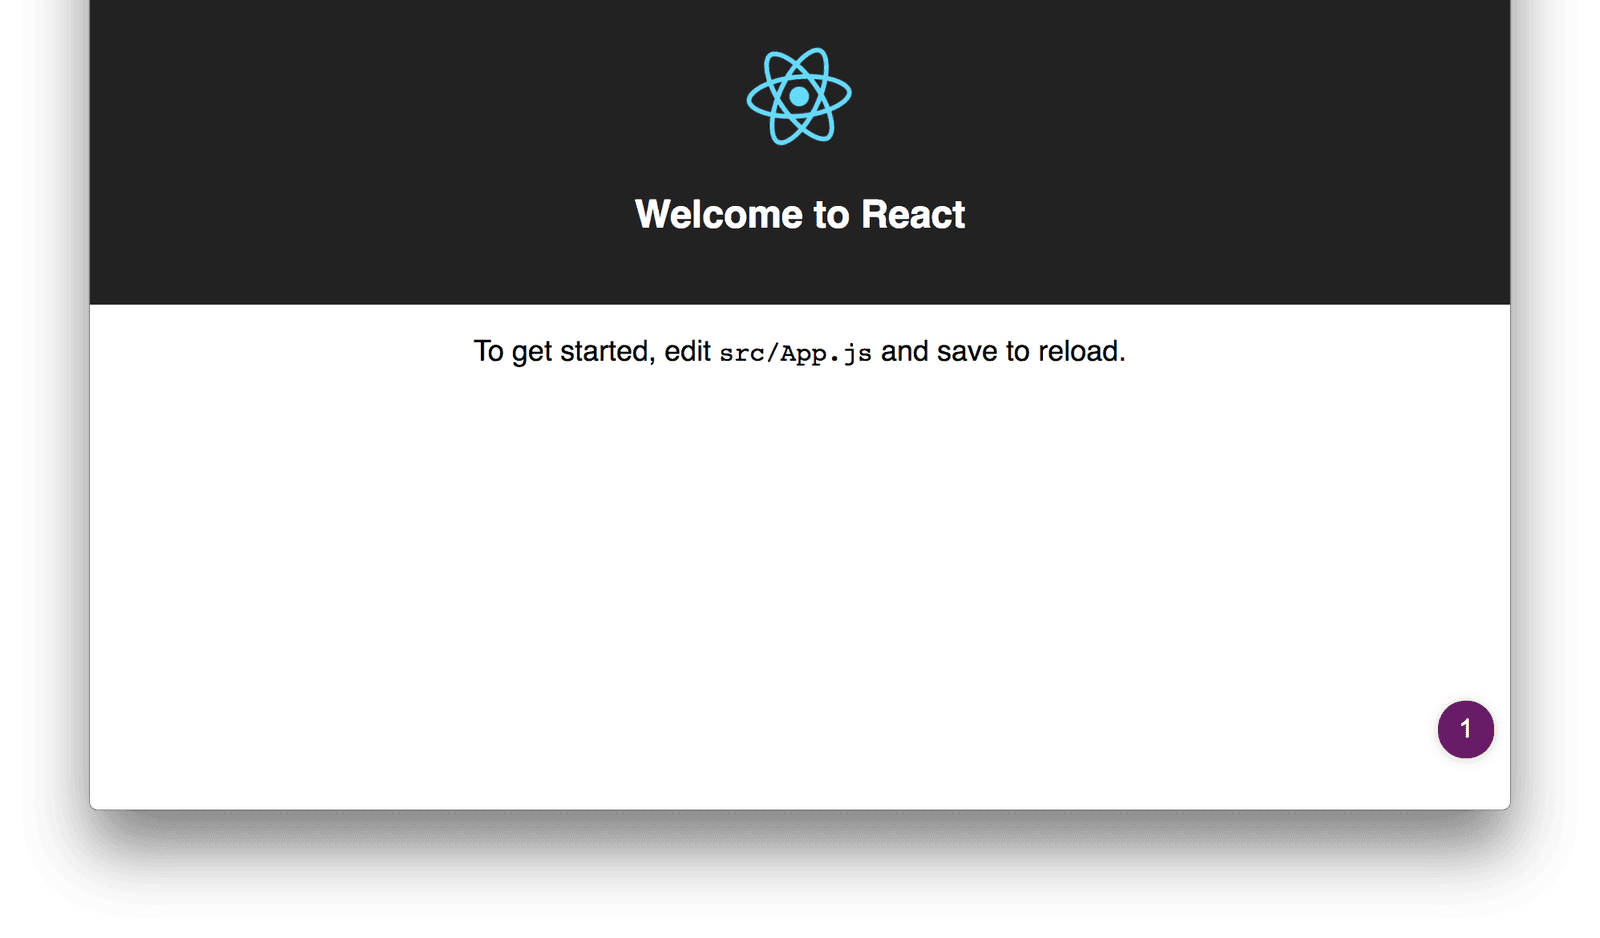
We now have our Login Screen, though it will not do anything yet. If you switch back to your browser you should see that it’s automatically reloaded to show this:
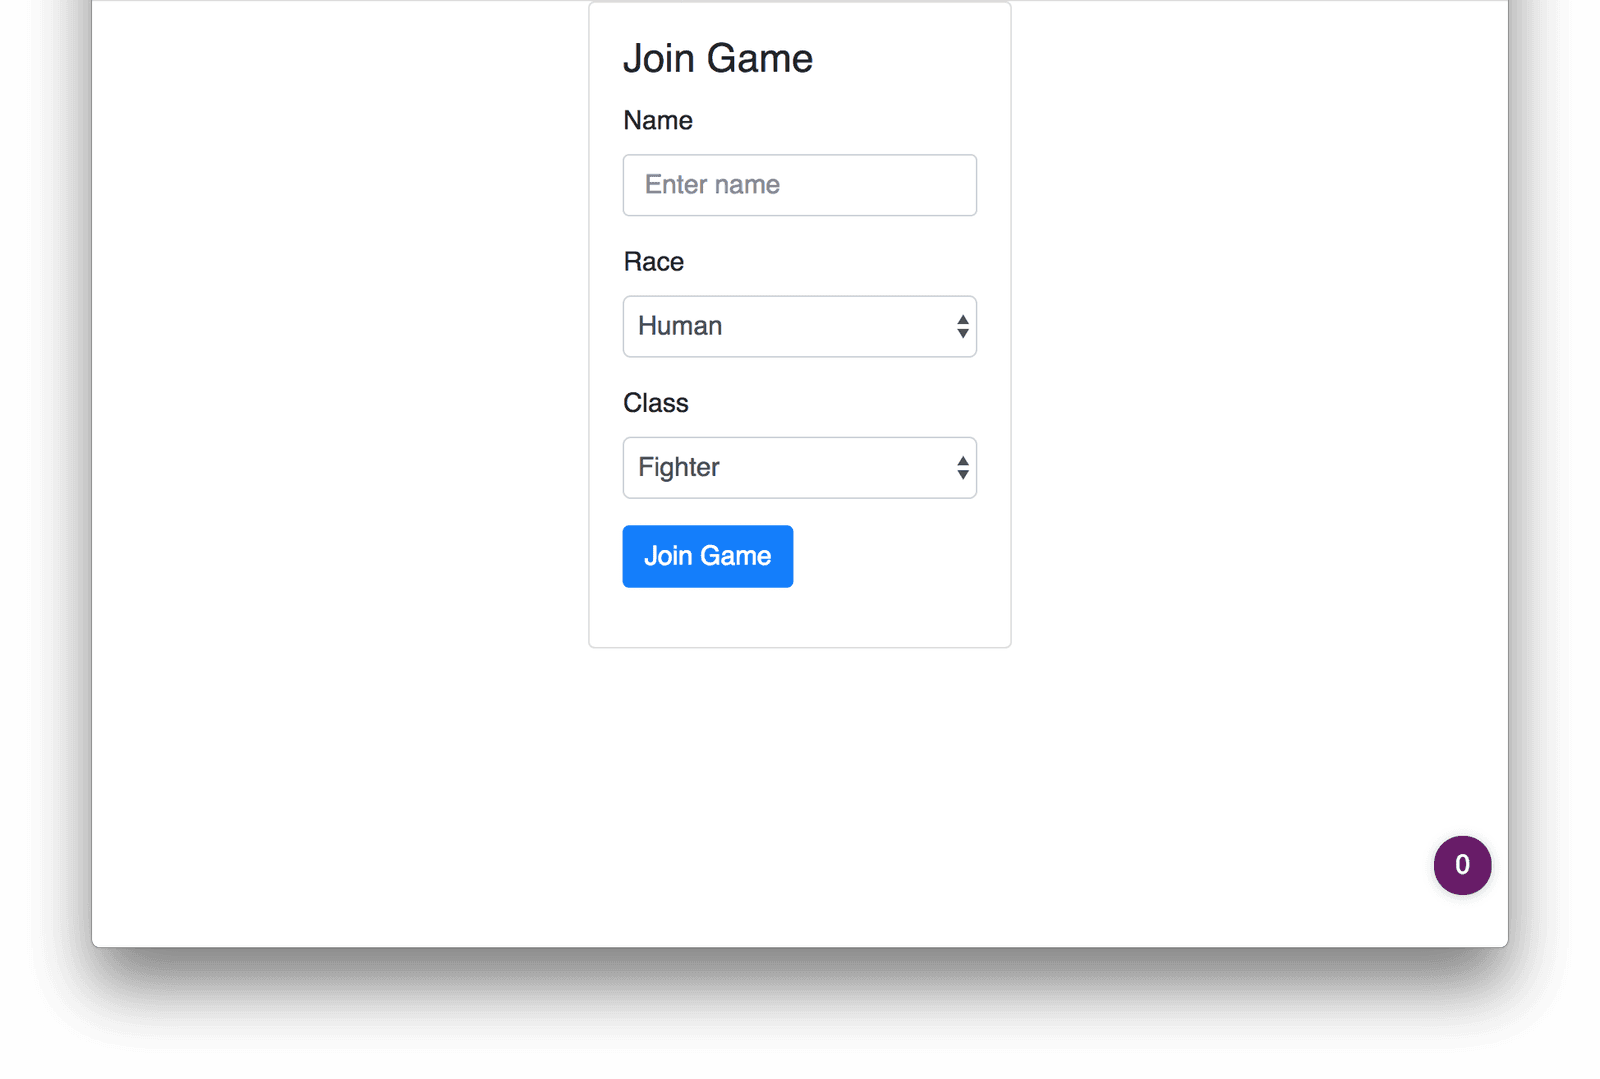
Note that our App component has a function called _onLogin. This will be called, passing along the characters Name, Race and Class, when the user presses that “Join Game” button. Soon we will make this actually log the character into the game.
Supporting communications with the Server
In order for our frontend to communicate with the backend server, we need to set up two different communication mechanisms – Pusher and GraphQL.
For the Pusher communications, we will write a file src/pusher.js containing the following:
1import Pusher from 'pusher-js'; 2 3 const socket = new Pusher('PUSHER_KEY', { 4 cluster: 'PUSHER_CLUSTER', 5 encrypted: true, 6 authEndpoint: 'http://localhost:4000/pusher/auth' 7 }); 8 9 export default socket;
Note the authEndpoint property. This must point to our /pusher/auth route on our running server, wherever that is deployed.
Again, make sure to replace PUSHER_APP_ID and PUSHER_CLUSTER with the correct values from our Pusher dashboard.
Next, we will write a file src/graphql.js containing the following:
1import { ApolloClient } from 'apollo-client'; 2 import { HttpLink } from 'apollo-link-http'; 3 import { InMemoryCache } from 'apollo-cache-inmemory'; 4 5 const client = new ApolloClient({ 6 link: new HttpLink({ uri: 'http://localhost:4000/graphql' }), 7 cache: new InMemoryCache() 8 }); 9 10 export default client;
This time, the link property points to the /graphql route on the same deployed server.
These will give us everything we need to enable our application to communicate with the server.
Calling the Server to Sign In
When the user enters their character details and signs in, we need to inform the server of this fact. And, more importantly, we need to have done so before the frontend client tries to communicate with Pusher on any channels that need authentication.
We will do this from the _onLogin callback in our src/App.js file, making a call to our signin mutation on our GraphQL endpoint and then setting the component state to reflect the fact that the player has signed in. This will later be used to change the view that is displayed to reflect the fact that we are now in the world.
In order to achieve this, we need to make the following changes, all in src/App.js.
First, some more module imports are needed:
1import pusher from './pusher'; 2 import graphqlClient from './graphql'; 3 import gql from 'graphql-tag';
Then, a GraphQL statement that will be executed. Place this above the App class but after the require statements:
1const SIGN_IN_MUTATION = gql`mutation($sessionId: ID!, $name:String!, $race:String!, $class:String!) { 2 signin(sessionId: $sessionId, name:$name, race:$race, class:$class) 3 } 4 `;
This will be used to call the signin mutation and is parameterized so that our code can always execute this same statement and simply provide the appropriate values from our character.
Finally, update the _onLogin method as follows:
1_onLogin(name, race, cls) { 2 graphqlClient.mutate({ 3 mutation: SIGN_IN_MUTATION, 4 variables: { 5 sessionId: pusher.connection.socket_id, 6 name: name, 7 race: race, 8 class: cls 9 } 10 }).then(() => { 11 this.setState({ 12 player: { 13 name, 14 race, 15 cls 16 } 17 }); 18 }); 19 }
This makes a call to our GraphQL endpoint, executing our provided statement with our character details, and afterward it sets a state variable called player containing the player details.
Note that we provide the Socket ID from our Pusher connection as the sessionId to our GraphQL call. This is consistent with what we saw earlier, and it ensures that we are using the Pusher connection ID as our session identifier throughout the entire application.
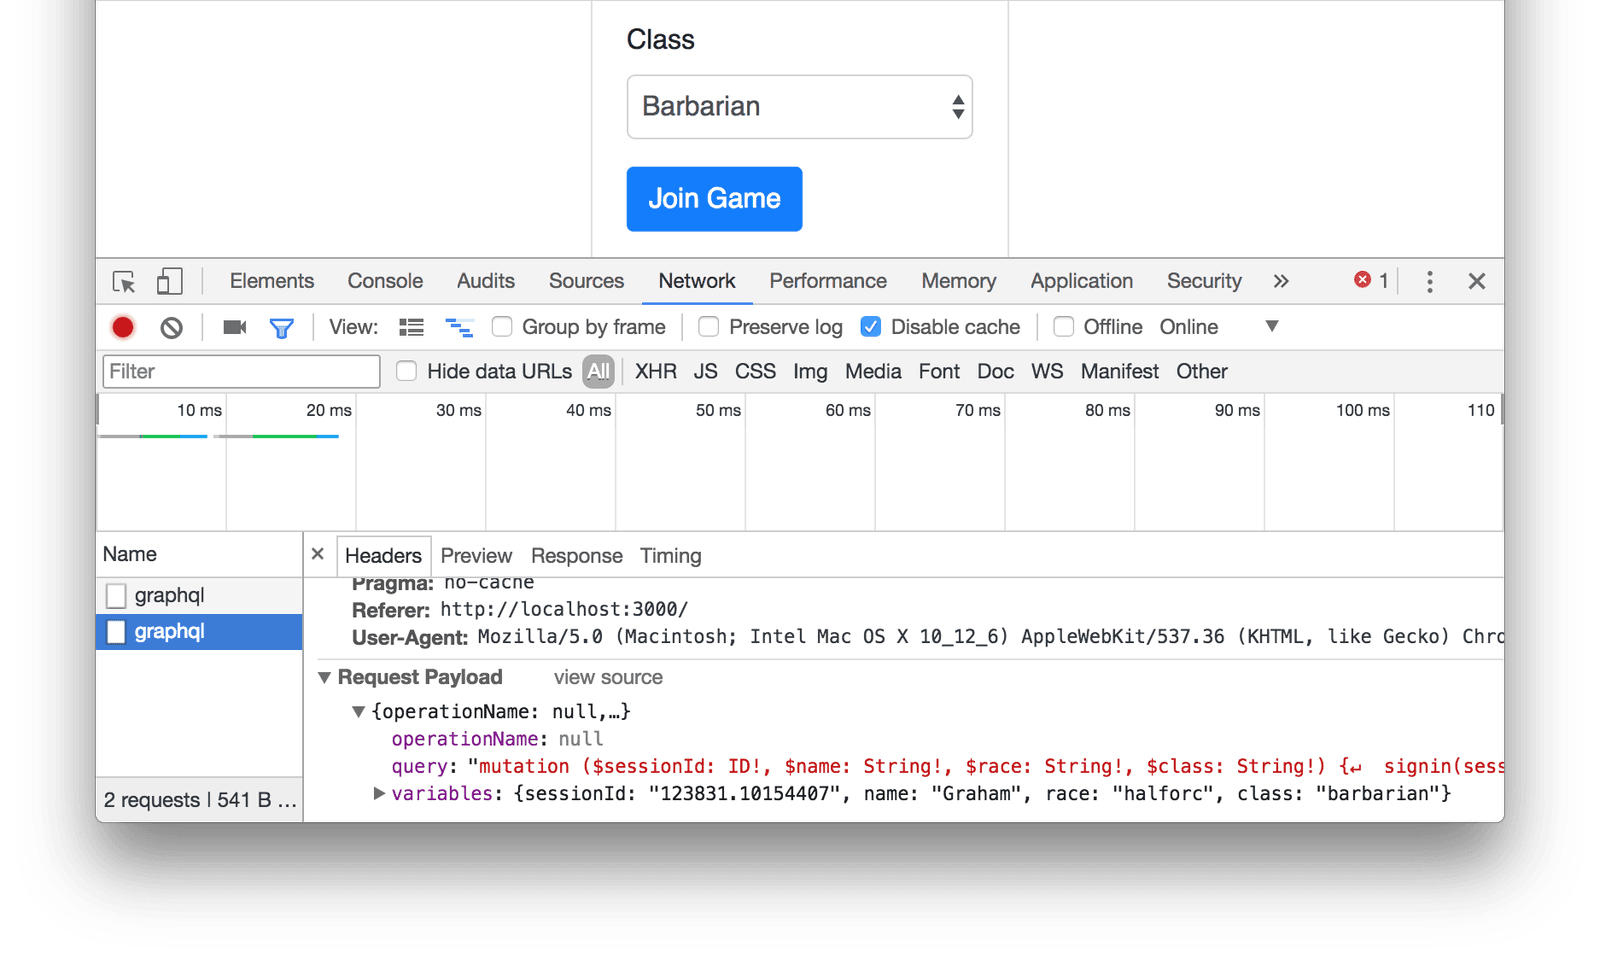
If we were to try this now, we would see network traffic making this GraphQL call:
Game Screen
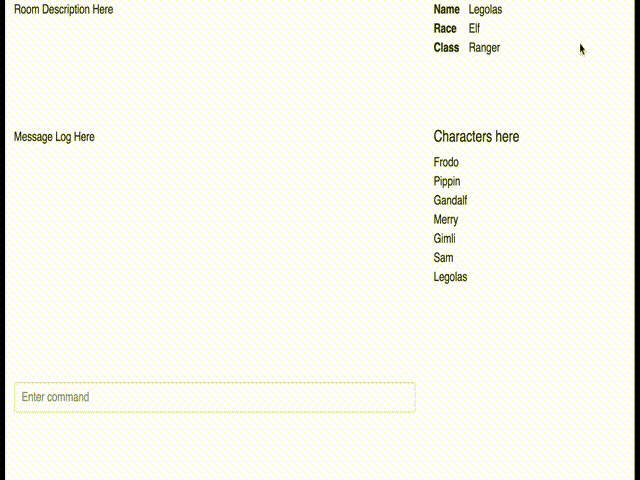
Now we’re able to create a character and sign in, we need to display the game to the player. Our game screen will be separated into 4 quadrants, displaying:
- A description of the current room.
- Details of the current player.
- A message log of events that have happened in the game.
- A list of characters in the current room.
To achieve this, we will have a new component for the game window, and render this once a character is selected.
Create a new file called src/Game.js as follows:
1import React, { Component } from 'react'; 2 import './Game.css'; 3 4 class Game extends Component { 5 render() { 6 return ( 7 <div className="row"> 8 <div className="col-8"> 9 <div className="game-roomDescription"> 10 Room Description Here 11 </div> 12 <div className="game-messageLog"> 13 Message Log Here 14 </div> 15 <div> 16 <input type="text" className="form-control" placeholder="Enter command" /> 17 </div> 18 </div> 19 <div className="col-4"> 20 <div className="game-characterDetails"> 21 Character Details Here 22 </div> 23 <div className="game-playerList"> 24 Player List Here 25 </div> 26 </div> 27 </div> 28 ); 29 } 30 } 31 32 export default Game;
Notice at the top that we are importing a file called Game.css. Create React App has set up WebPack so that CSS files can be distributed alongside components in this manner, and will be automatically pulled together. In this case, we are adding some CSS to our component to make sure that everything is in the correct position. This file is in src/Game.css and looks like this:
1.game-roomDescription { 2 min-height: 10em; 3 } 4 .game-messageLog { 5 min-height: 20em; 6 } 7 .game-characterDetails { 8 min-height: 10em; 9 } 10 .game-playerList { 11 }
Finally, we need to make it so that this component is rendered as needed. This is done in our main src/App.js file, by making the following changes.
First, we need to depend on our new component. Add the following to the top, with the other require statements:
1import Game from './Game';
Next, we need some default State for the component to render correctly. This doesn’t actually need to contain anything, but simply to exist. Add the following to the component constructor:
1this.state = {};
Finally, we need to update the render() method to render either our Login or Game component as appropriate:
1render() { 2 const { player } = this.state; 3 let appContents; 4 5 if (player) { 6 appContents = <Game player={ player } />; 7 } else { 8 appContents = <Login handleLogin={ this._handleLogin } />; 9 } 10 11 return ( 12 <div className="App container-fluid"> 13 { appContents } 14 </div> 15 ); 16 }
Note that we are rendering the Game component if, and only if, we have some player details, and when we do we pass these into the Game component for it to make use of.
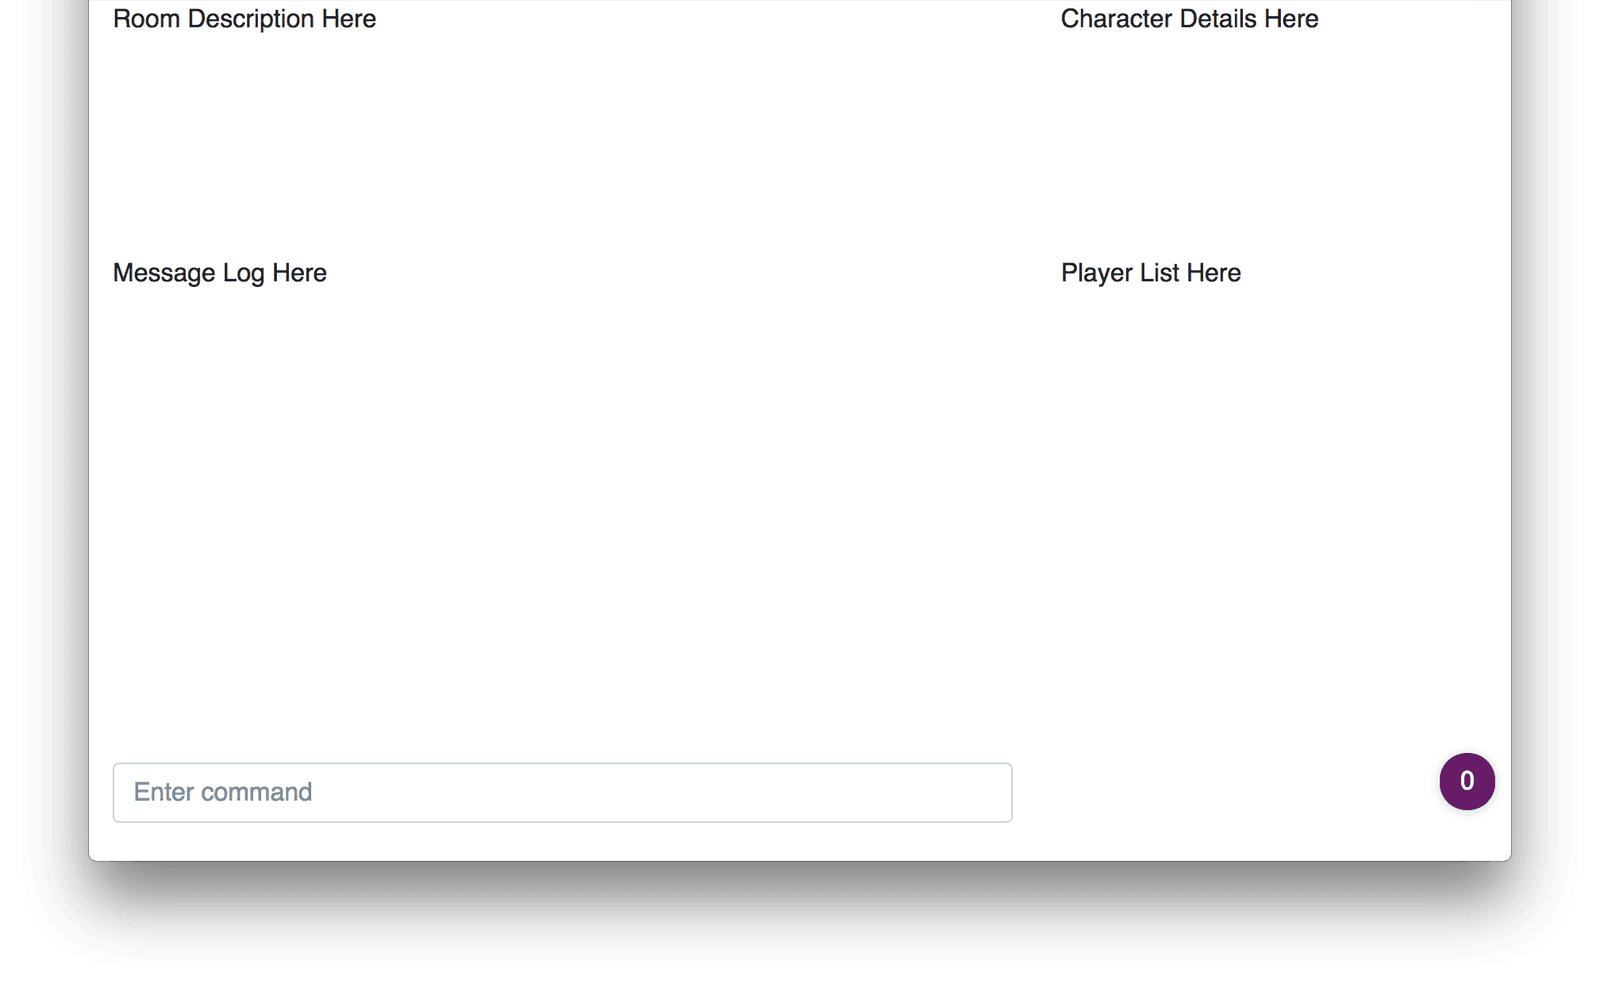
Once all of this is done, we can create a character and the game will now look like this:
Display Current Character Details
Now that we have a Game display, let’s remind the player which character they are playing as. This will go in the top-right corner, and will simply repeat back what was selected on the first screen.
Firstly, create a new file called src/CharacterDetails.js containing the following:
1import React, { Component } from 'react'; 2 import races from './races'; 3 import classes from './classes'; 4 5 class CharacterDetails extends Component { 6 render() { 7 const { player } = this.props; 8 const race = races.find((race) => race.id === player.race); 9 const cls = classes.find((cls) => cls.id === player.cls); 10 11 return ( 12 <div> 13 <div className="row"> 14 <div className="col-2"> 15 <b>Name</b> 16 </div> 17 <div className="col-10"> 18 { player.name } 19 </div> 20 </div> 21 <div className="row"> 22 <div className="col-2"> 23 <b>Race</b> 24 </div> 25 <div className="col-10"> 26 { race.name } 27 </div> 28 </div> 29 <div className="row"> 30 <div className="col-2"> 31 <b>Class</b> 32 </div> 33 <div className="col-10"> 34 { cls.name } 35 </div> 36 </div> 37 </div> 38 ); 39 } 40 } 41 42 export default CharacterDetails;
Then update src/Game.js as follows:
1// In the requires section at the top 2 import CharacterDetails from './CharacterDetails'; 3 4 // In the render method 5 <div className="game-characterDetails"> 6 <CharacterDetails player={ this.props.player } /> 7 </div>
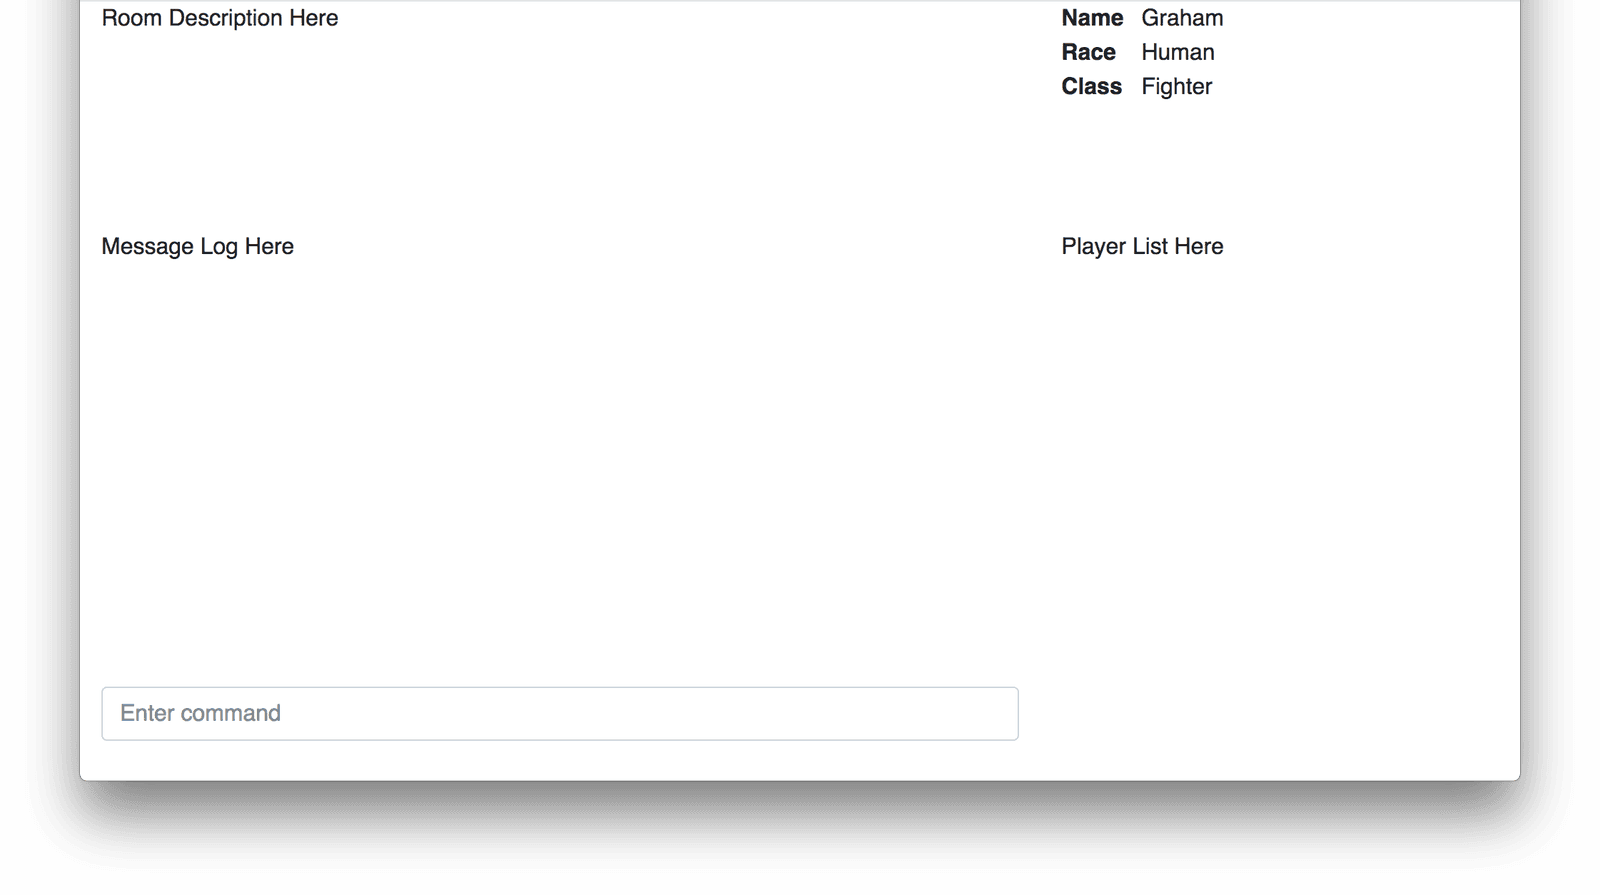
This simply causes us to render out the Name, Race and Class that was entered into the first screen, as follows:
Display Characters in Current Room
The final part that we want to achieve for now is to display a list of all the characters in the current room. This is directly derived from Pusher using the Presence Channel that we’ve previously discussed. To achieve this, every character will subscribe to the Presence Channel for the room they are currently in, and will use the data provided by the Presence Channel to list the other characters in the same room.
Again, this will require a new component that will render the characters present in the current room. It will also require us to subscribe to the appropriate Presence Channel on our Pusher connection and to manage some events from that channel to ensure that the list is kept correctly up-to-date.
Create a new file src/CharacterList.js containing the following:
1import React, { Component } from 'react'; 2 import pusher from './pusher'; 3 4 class CharacterList extends Component { 5 constructor(props) { 6 super(props); 7 8 this.state = { 9 players: [] 10 }; 11 } 12 13 componentDidMount() { 14 if (this.props.room) { 15 this._bindToChannel(); 16 } 17 } 18 19 _bindToChannel() { 20 const channel = pusher.channel(`presence-room-${this.props.room}`); 21 channel.bind('pusher:subscription_succeeded', function() { 22 channel.bind('pusher:member_added', function() { this._updateMembers(channel); }.bind(this)); 23 channel.bind('pusher:member_removed', function() { this._updateMembers(channel); }.bind(this)); 24 25 this._updateMembers(channel); 26 }.bind(this)); 27 } 28 29 _updateMembers(channel) { 30 this.setState({ 31 players: Object.keys(channel.members.members) 32 .map(id => channel.members.members[id]) 33 }); 34 } 35 36 render() { 37 const players = this.state.players 38 .map((player) => ( 39 <div>{ player.name }</div> 40 )); 41 42 return ( 43 <div> 44 <h5>Characters here</h5> 45 { players } 46 </div> 47 ); 48 } 49 } 50 51 export default CharacterList;
This is more complicated than our other components, in that it not only has stated but it has some React lifecycle hooks.
The initial state of the component is that there are zero players present. This will be changed whenever we handle a pusher:member_added or a pusher:member_removed event on our channel, indicating that a character has entered or left the room.
The lifecycle method componentDidMount is called when the Character List is first rendered and is where we will be binding to the appropriate events on our channel. We are retrieving the channel itself by name from the Pusher connection – assuming that we have already subscribed to it – and handling the previously mentioned events when the subscription is successful.
Every time the character list changes, we update the names that we store in the state and cause a re-render, displaying the list of characters to the player.
Next, we need to update src/Game.js to actually subscribe to the correct channel and display our new component:
1// At the top of the file with the other Require statements 2 import CharacterList from './CharacterList'; 3 4 // Add a constructor to manage the channel subscription 5 constructor(props) { 6 super(props); 7 8 this.state = { 9 room: 'start' 10 }; 11 12 pusher.subscribe('presence-room-start'); 13 } 14 15 // Update the render method to display our character list 16 <div className="game-playerList"> 17 <CharacterList room={ this.state.room } /> 18 </div>
The end result of this will be as follows:
Summary
Pusher Presence Channels are a fantastic way of keeping track of users that need to be grouped together – in this case in a virtual room in a virtual game world. They are very simple to use and give great flexibility in what you can do with them.
The full source code for this article is available from GitHub.
In the next article in this series, we will be expanding the game world to give it multiple rooms that can be visited, and allow the player to move between them and explore the world. As the player does this, the room description and the characters will dynamically update automatically, and the message log will show characters entering and leaving.
Go to Part 2:


© 2024 Pusher Ltd. All rights reserved.
Pusher Limited is a company registered in England and Wales (No. 07489873) whose registered office is at MessageBird UK Limited, 3 More London Riverside, 4th Floor, London, United Kingdom, SE1 2AQ.