- Products

- Developers
- User stories
- Blog
- Pricing

How to make your Angular 4 app SEO friendly

In this article, explore how to make your Angular 4 Single Page Application (SPA) SEO optimised by using Angular 4 Universal.
Introduction
Angular 4 applications load the first bare HTML content before pulling the HTML content for the page being loaded using XMLHttpRequest. Single Page Applications are awesome! They load fast and give you a lot of control over how you want your application to run. They are parsed by the browser and thus you have control of the DOM elements and all of that goodness.
However, SPA’s are not SEO friendly off the bat because they need to dynamically change the meta tags and the content using JavaScript and this change is not usually picked up by the search engine’s bot. Since some search bots cannot parse JavaScript when crawling the website, they will only see the first bare content every time.
Although Google says their bots are now capable of rendering JavaScript, it is still a vague area and erring on the side of caution would be a better way to go in this matter. Also, there are other search engines that do not handle JavaScript. This article will cover how to make your Angular 4 application SEO friendly and thus easier to consume by search engines bots.
⚠️ This is not an Angular 4 tutorial and we will not be covering specifics on the Angular 4 framework. We will simply be showing you how to use server-side rendering to serve a fully generated HTML page.
Getting started with making our Angular 4 app SEO friendly
Before we get started on the tutorial, let us build a simple application that we will be using to test our implementation. The application will be a page that lists a bunch of topics on the homepage. We will not be connecting to any data source but instead, we will be hard-coding the data into the component.
Setting up our Angular 4 test application
To set up our Angular application, we will be using ng-cli, and we will be calling the application Blogist.
Creating a new application using ng-cli
To set up we will use ng new command to create the Angular 4 application.
1$ ng new Blogist
⚠️ Note: You will need the latest version of Angular CLI for this application to function correctly. The latest version is 1.3.x as at the time of writing this article.
Next, we will just create a component where we can then add the logic of our code to. We will use the ng g component command for this:
1$ ng g component ./blog/posts
Adding mock data to our PostComponent
For the sake of brevity, we will not be connecting to an external API. Instead, we will just be creating some mock data and using that data in our application.
Open the ./src/app/blog/posts.component.ts file, we will add some logic to the code to make sure it works as we want it to. First, let’s hard code some data to the file. Add a new method called postsData to the component.
1private postsData() { 2 return [ 3 { 4 "title": "Making Angular.js realtime with Websockets by marble", 5 "pubDate": "2017-08-23 14:41:52", 6 "link": "https://blog.pusher.com/making-angular-js-realtime-with-pusher/#comment-10372", 7 "guid": "http://blog.pusher.com/?p=682#comment-10372", 8 "author": "marble", 9 "thumbnail": "", 10 "description": "always a big fan of linking to bloggers that I enjoy but dont get a great deal of link enjoy from", 11 "content": "<p>always a big fan of linking to bloggers that I enjoy but dont get a great deal of link enjoy from</p>", 12 "enclosure": [], 13 "categories": [] 14 }, 15 { 16 "title": "Making Angular.js realtime with Websockets by strapless strap on", 17 "pubDate": "2017-08-23 05:05:08", 18 "link": "https://blog.pusher.com/making-angular-js-realtime-with-pusher/#comment-10371", 19 "guid": "http://blog.pusher.com/?p=682#comment-10371", 20 "author": "strapless strap on", 21 "thumbnail": "", 22 "description": "very couple of internet websites that transpire to be detailed beneath, from our point of view are undoubtedly properly worth checking out", 23 "content": "<p>very couple of internet websites that transpire to be detailed beneath, from our point of view are undoubtedly properly worth checking out</p>", 24 "enclosure": [], 25 "categories": [] 26 }, 27 { 28 "title": "Making Angular.js realtime with Websockets by bondage restraints", 29 "pubDate": "2017-08-22 17:09:17", 30 "link": "https://blog.pusher.com/making-angular-js-realtime-with-pusher/#comment-10370", 31 "guid": "http://blog.pusher.com/?p=682#comment-10370", 32 "author": "bondage restraints", 33 "thumbnail": "", 34 "description": "very couple of web sites that occur to be in depth below, from our point of view are undoubtedly properly worth checking out", 35 "content": "<p>very couple of web sites that occur to be in depth below, from our point of view are undoubtedly properly worth checking out</p>", 36 "enclosure": [], 37 "categories": [] 38 } 39 ]; 40 }
To use our mock data created above, replace the constructor method of the PostsComponent class with the code below:
1public posts; 2 3 constructor() { 4 this.posts = this.postsData(); 5 }
In the code above we have simply assigned the posts property to the postsData return value, which is our simulated API call response.
Creating a View for our PostsComponent
Now that we have our mock posts data. We will create a view that will display all the posts from our mock data.
Open your view ./app/blog/posts.component.html and enter the code below:
1<div class="jumbotron"> 2 <h1>Blogist</h1> 3 <p>This is the best resource for the best web development posts.</p> 4 </div> 5 <div class="row"> 6 <div class="col-xs-12 col-md-12"> 7 <ul class="list-group"> 8 <li class="list-group-item" *ngFor="let post of posts"> 9 <h4>{{post.title}}</h4> 10 </li> 11 </ul> 12 </div> 13 </div>
The code above just takes the posts data and loops through it; each time displaying the title of the post.
Next, open the index.html file and in the <head> replace the contents with the following code. It basically uses Bootstrap and adds a dummy navigation bar:
1<!doctype html> 2 <html lang="en"> 3 <head> 4 <meta charset="utf-8"> 5 <title>Blogist</title> 6 <base href="/"> 7 <meta name="viewport" content="width=device-width, initial-scale=1"> 8 <link rel="icon" type="image/x-icon" href="favicon.ico"> 9 <link rel="stylesheet" href="https://cdnjs.cloudflare.com/ajax/libs/twitter-bootstrap/3.3.7/css/bootstrap.min.css"> 10 </head> 11 <body> 12 <nav class="navbar navbar-default"> 13 <div class="container-fluid"> 14 <div class="navbar-header"> 15 <a class="navbar-brand" href="#">Blogist</a> 16 </div> 17 <ul class="nav navbar-nav"> 18 <li class="active"><a href="#">Posts</a></li> 19 <li><a href="#">Web Development</a></li> 20 <li><a href="#">Graphic Design</a></li> 21 </ul> 22 </div> 23 </nav> 24 <div class="container"> 25 <app-root>Loading...</app-root> 26 </div> 27 </body> 28 </html>
Registering the PostsComponent with our application module
The next thing we will do is register the PostsComponent with our application module.
? Note using the
**ng g component**command will automatically register the component in your application module. So you might not need to do it again. If it has been done for you, you can skip this step.
If it has not been registered automatically, open the ./src/app/app.module.ts file and import the PostsComponent:
1import { PostsComponent } from './blog/posts.component';
Then in the NgModule declarations array, add the PostsComponent to the list:
1@NgModule({ 2 declarations: [ 3 ... 4 PostsComponent, 5 ], 6 ... 7 })
Displaying your Angular application
After registering our Posts component, we will then include it in our ./src/app/app.component.html file so the posts component will be displayed. Open the ./src/app/app.component.html file and add the following code inside it:
1<app-posts></app-posts>
Thats all!
Now when you run ng serve and go to the URL provided to you on your terminal. You should be able to see the page with our posts:
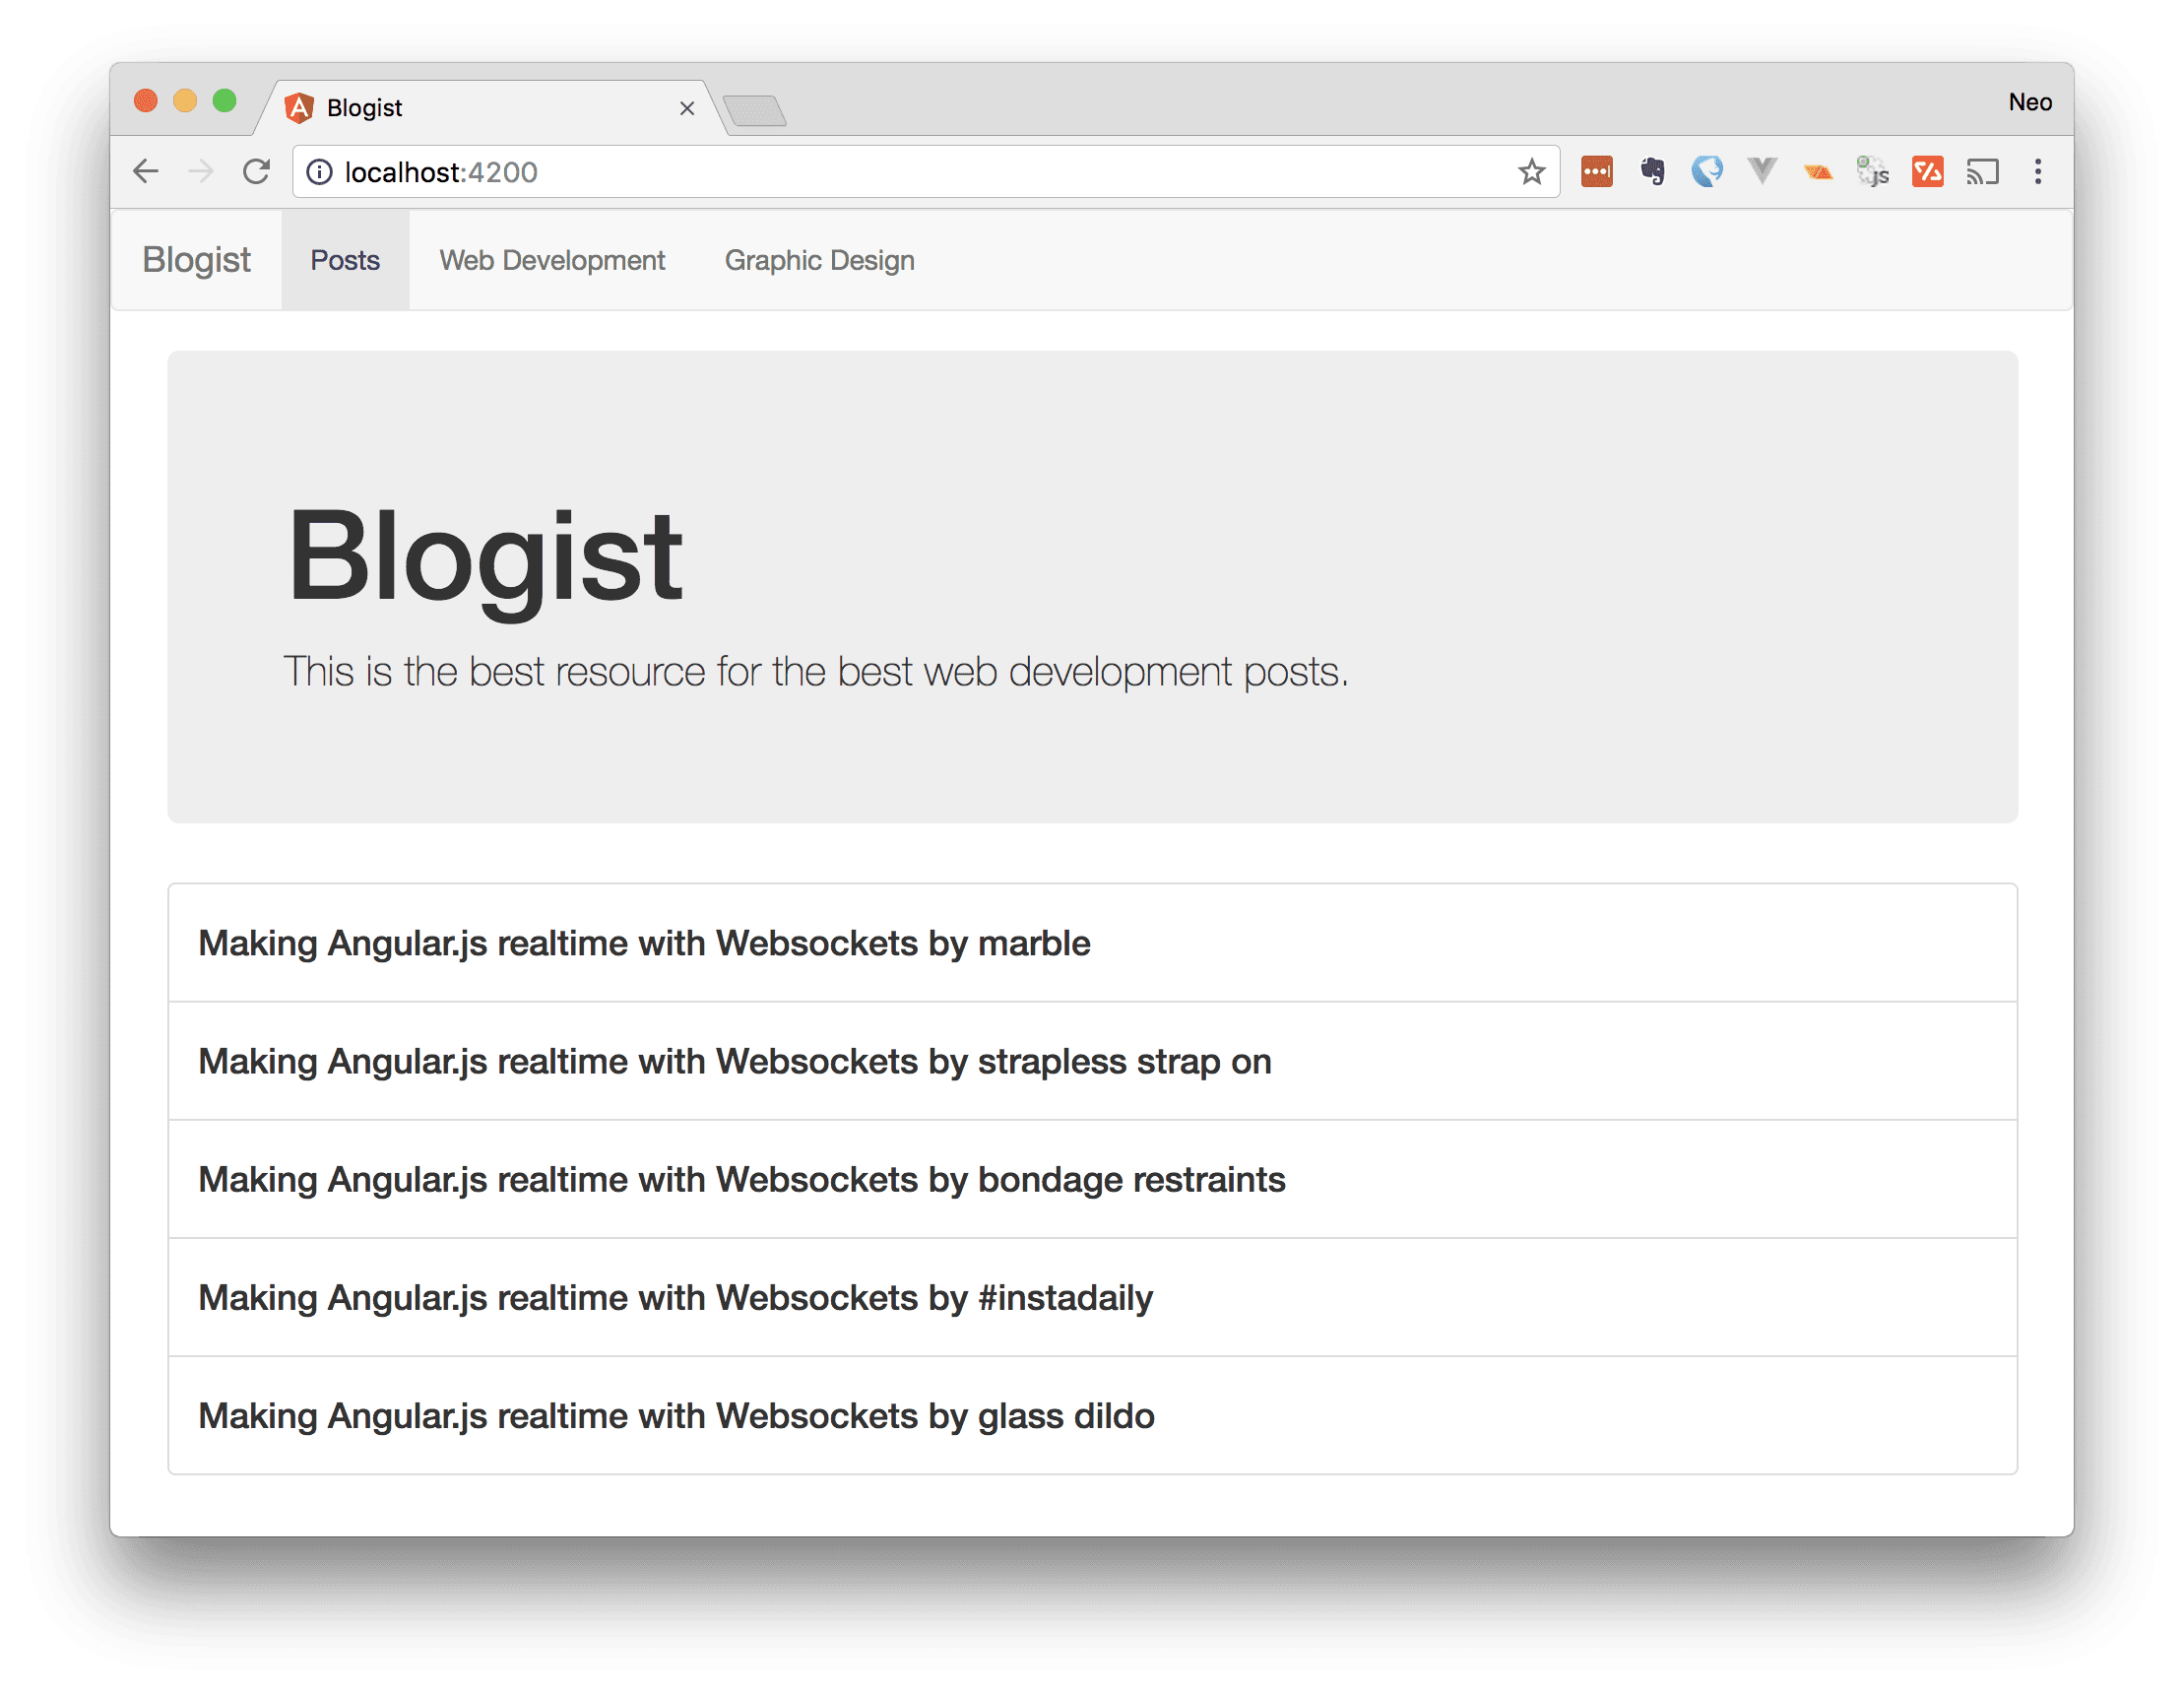
Great, that is exactly what we expected. However, when you view the URL’s source, you will notice that the entire body of the page is missing and just the <app-root>loading…</app-root> part is visible.
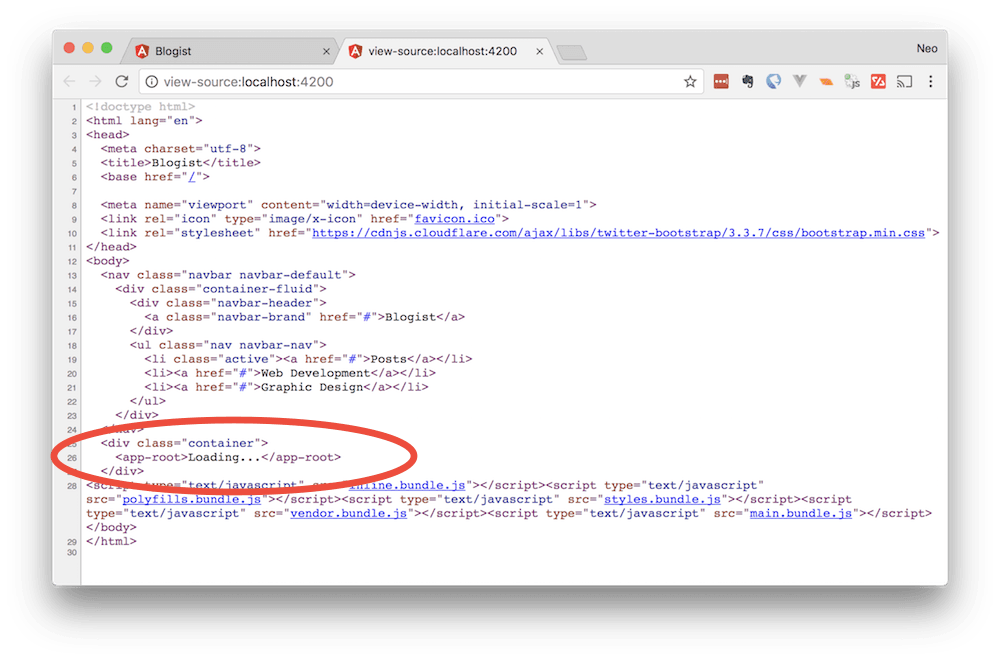
This is because of the way Angular works. It would load the parent template first, then after that load itself.
It will then start the DOM manipulation process that will insert the content of each subsequent page in the <app-root> tag.
Hence, when the search engine bot requests this page, it gets the HTML <app-root>Loading…</app-root> above and the content of the page which should have contributed to SEO is now unknown to the engine.
Making the Angular 4 application SEO friendly
Now that we have built the sample application, we can see right off the bat it is is not SEO friendly. So we will be using the Angular universal platform server to pre-render the templates server-side and serve that when the page is loaded.
? The Angular Universal project consists of the base platform API and the surrounding tools that enable developers do server-side rendering (or pre-rendering) of Angular applications.
To start, we will be installing the angular/platform-server package and the angular/animations package. Both are required for the platform server to function correctly. The platform server will be the one to provide the server-side rendering.
Run the command below in your terminal to install the dependencies required for server-side rendering of your Angular application:
1$ npm install --save @angular/platform-server @angular/animations
Once the packages have been installed successfully using NPM, open the ./src/app.modules.ts and make the following modification to the BrowserModule declaration:
1@NgModule({ 2 ... 3 imports: [ 4 BrowserModule.withServerTransition({appId: 'blogist'}) 5 ], 6 ... 7 })
In the above code, we added the withServerTransition method to the BrowserModule and in there we passed the appId that is equal to the name of the application blogist. This addition ‘configures a browser-based application to transition from a server-rendered app, if one is present on the page’.
The next thing we will do is create an application server module. Create a new file ./src/app/app-server.module.ts
1import { NgModule } from '@angular/core'; 2 import { AppModule } from './app.module'; 3 import { AppComponent } from './app.component'; 4 import { ServerModule } from '@angular/platform-server'; 5 6 @NgModule({ 7 imports: [ 8 ServerModule, 9 AppModule, 10 ], 11 bootstrap: [ 12 AppComponent 13 ] 14 }) 15 export class AppServerModule { }
This is a basic Angular module that will act as our server module. The biggest thing to note in the above is that we import our AppModule into the server module so it will now be a part of the AppServerModule. This module will be where we will bootstrap our application from the server.
Adding title and meta tags to our Angular application
One last thing we will add to the application is support for Meta tags and Title on each page. With Angular universal, doing this is very easy.
Open the ./src/app/blog/posts.component.ts file and inside do the following:
Import Meta and Title from the @angular/platform-browser package:
1import { Meta, Title } from '@angular/platform-browser';
Now in the constructor method, add the following lines of code to it:
1constructor(meta: Meta, title: Title) { 2 this.posts = this.postsData(); 3 4 // Sets the <title></title> 5 title.setTitle('Blogist'); 6 7 // Sets the <meta> tag for the page 8 meta.addTags([ 9 { name: 'author', content: 'Blogist' }, 10 { name: 'description', content: 'This is a description.' }, 11 ]); 12 }
The code above allows you to set the title for each of the pages you create and they will be pre-rendered using Angular Universal. This allows you finer control over the meta and title of the various pages.
Creating an Express server to make your Angular app SEO friendly
Let’s create an Express server. This will basically allow server-side rendering of the page.
Create a new file in ./src/server.ts and then add the contents below:
1import 'reflect-metadata'; 2 import 'zone.js/dist/zone-node'; 3 import { renderModuleFactory } from '@angular/platform-server' 4 import { enableProdMode } from '@angular/core' 5 import * as express from 'express'; 6 import { join } from 'path'; 7 import { readFileSync } from 'fs'; 8 import { AppServerModuleNgFactory } from '../dist/ngfactory/src/app/app-server.module.ngfactory' 9 10 enableProdMode() 11 12 const PORT = process.env.PORT || 4000 13 const DIST_DIR = join(__dirname, '..', 'dist') 14 const app = express(); 15 const template = readFileSync(join(DIST_DIR, 'index.html')).toString() 16 17 app.engine('html', (_, options, callback) => { 18 const newOptions = { document: template, url: options.req.url }; 19 20 renderModuleFactory(AppServerModuleNgFactory, newOptions) 21 .then(html => callback(null, html)) 22 }) 23 24 app.set('views', 'src') 25 app.set('view engine', 'html') 26 27 app.get('*.*', express.static(DIST_DIR)) 28 app.get('*', (req, res) => { 29 res.render('index', { req }) 30 }) 31 32 app.listen(PORT, () => { 33 console.log(`App listening on http://localhost:${PORT}!`) 34 });
In this file, we have imported all of the packages we need to run our Express server. Particularly, we import AppServerModuleNgFactory, a file that does not yet exist but will be generated during our build process.
Next, we enableProdMode() which simply enables production mode on our application. We also use [renderModuleFactory](https://angular.io/api/platform-server/renderModuleFactory) to parse the HTML and render the page that was being loaded server-side. Every thing else in the code has to do with Express.
The next thing we want to do now is open our ./src/tsconfig.app.json file and add server.ts to the exclude section of the file.
1"exclude": [ 2 "server.ts", 3 ... 4 ]
? The
excludeproperty specifies a list of files to be excluded from compilation.
Also open the ./tsconfig.json file and add the snippet below to the file in the root of the project right below the compilerOptions property:
1... 2 "lib": [ 3 "es2016", 4 "dom" 5 ] 6 }, 7 "angularCompilerOptions": { 8 "genDir": "./dist/ngfactory", 9 "entryModule": "./src/app/app.module#AppModule" 10 } 11 }
? The
genDiris where everything generated will mostly go. TheentryModuleaccepts the path of our main bootstrapped module. The#AppModuleat the end of the path is the name of the exported class.
The final step to take is updating the scripts property on our ./package.json file. You should either replace or append this to the keys already in the scripts property:
1{ 2 ... 3 "scripts": { 4 "prestart": "ng build --prod && ./node_modules/.bin/ngc", 5 "start": "ts-node src/server.ts" 6 }, 7 ... 8 }
We have commands registered to the start and prestart scripts on the ./package.json file. Because we added a pre to the name start, it will run automatically before the start script is called.
Testing our SEO friendly Angular 4 application
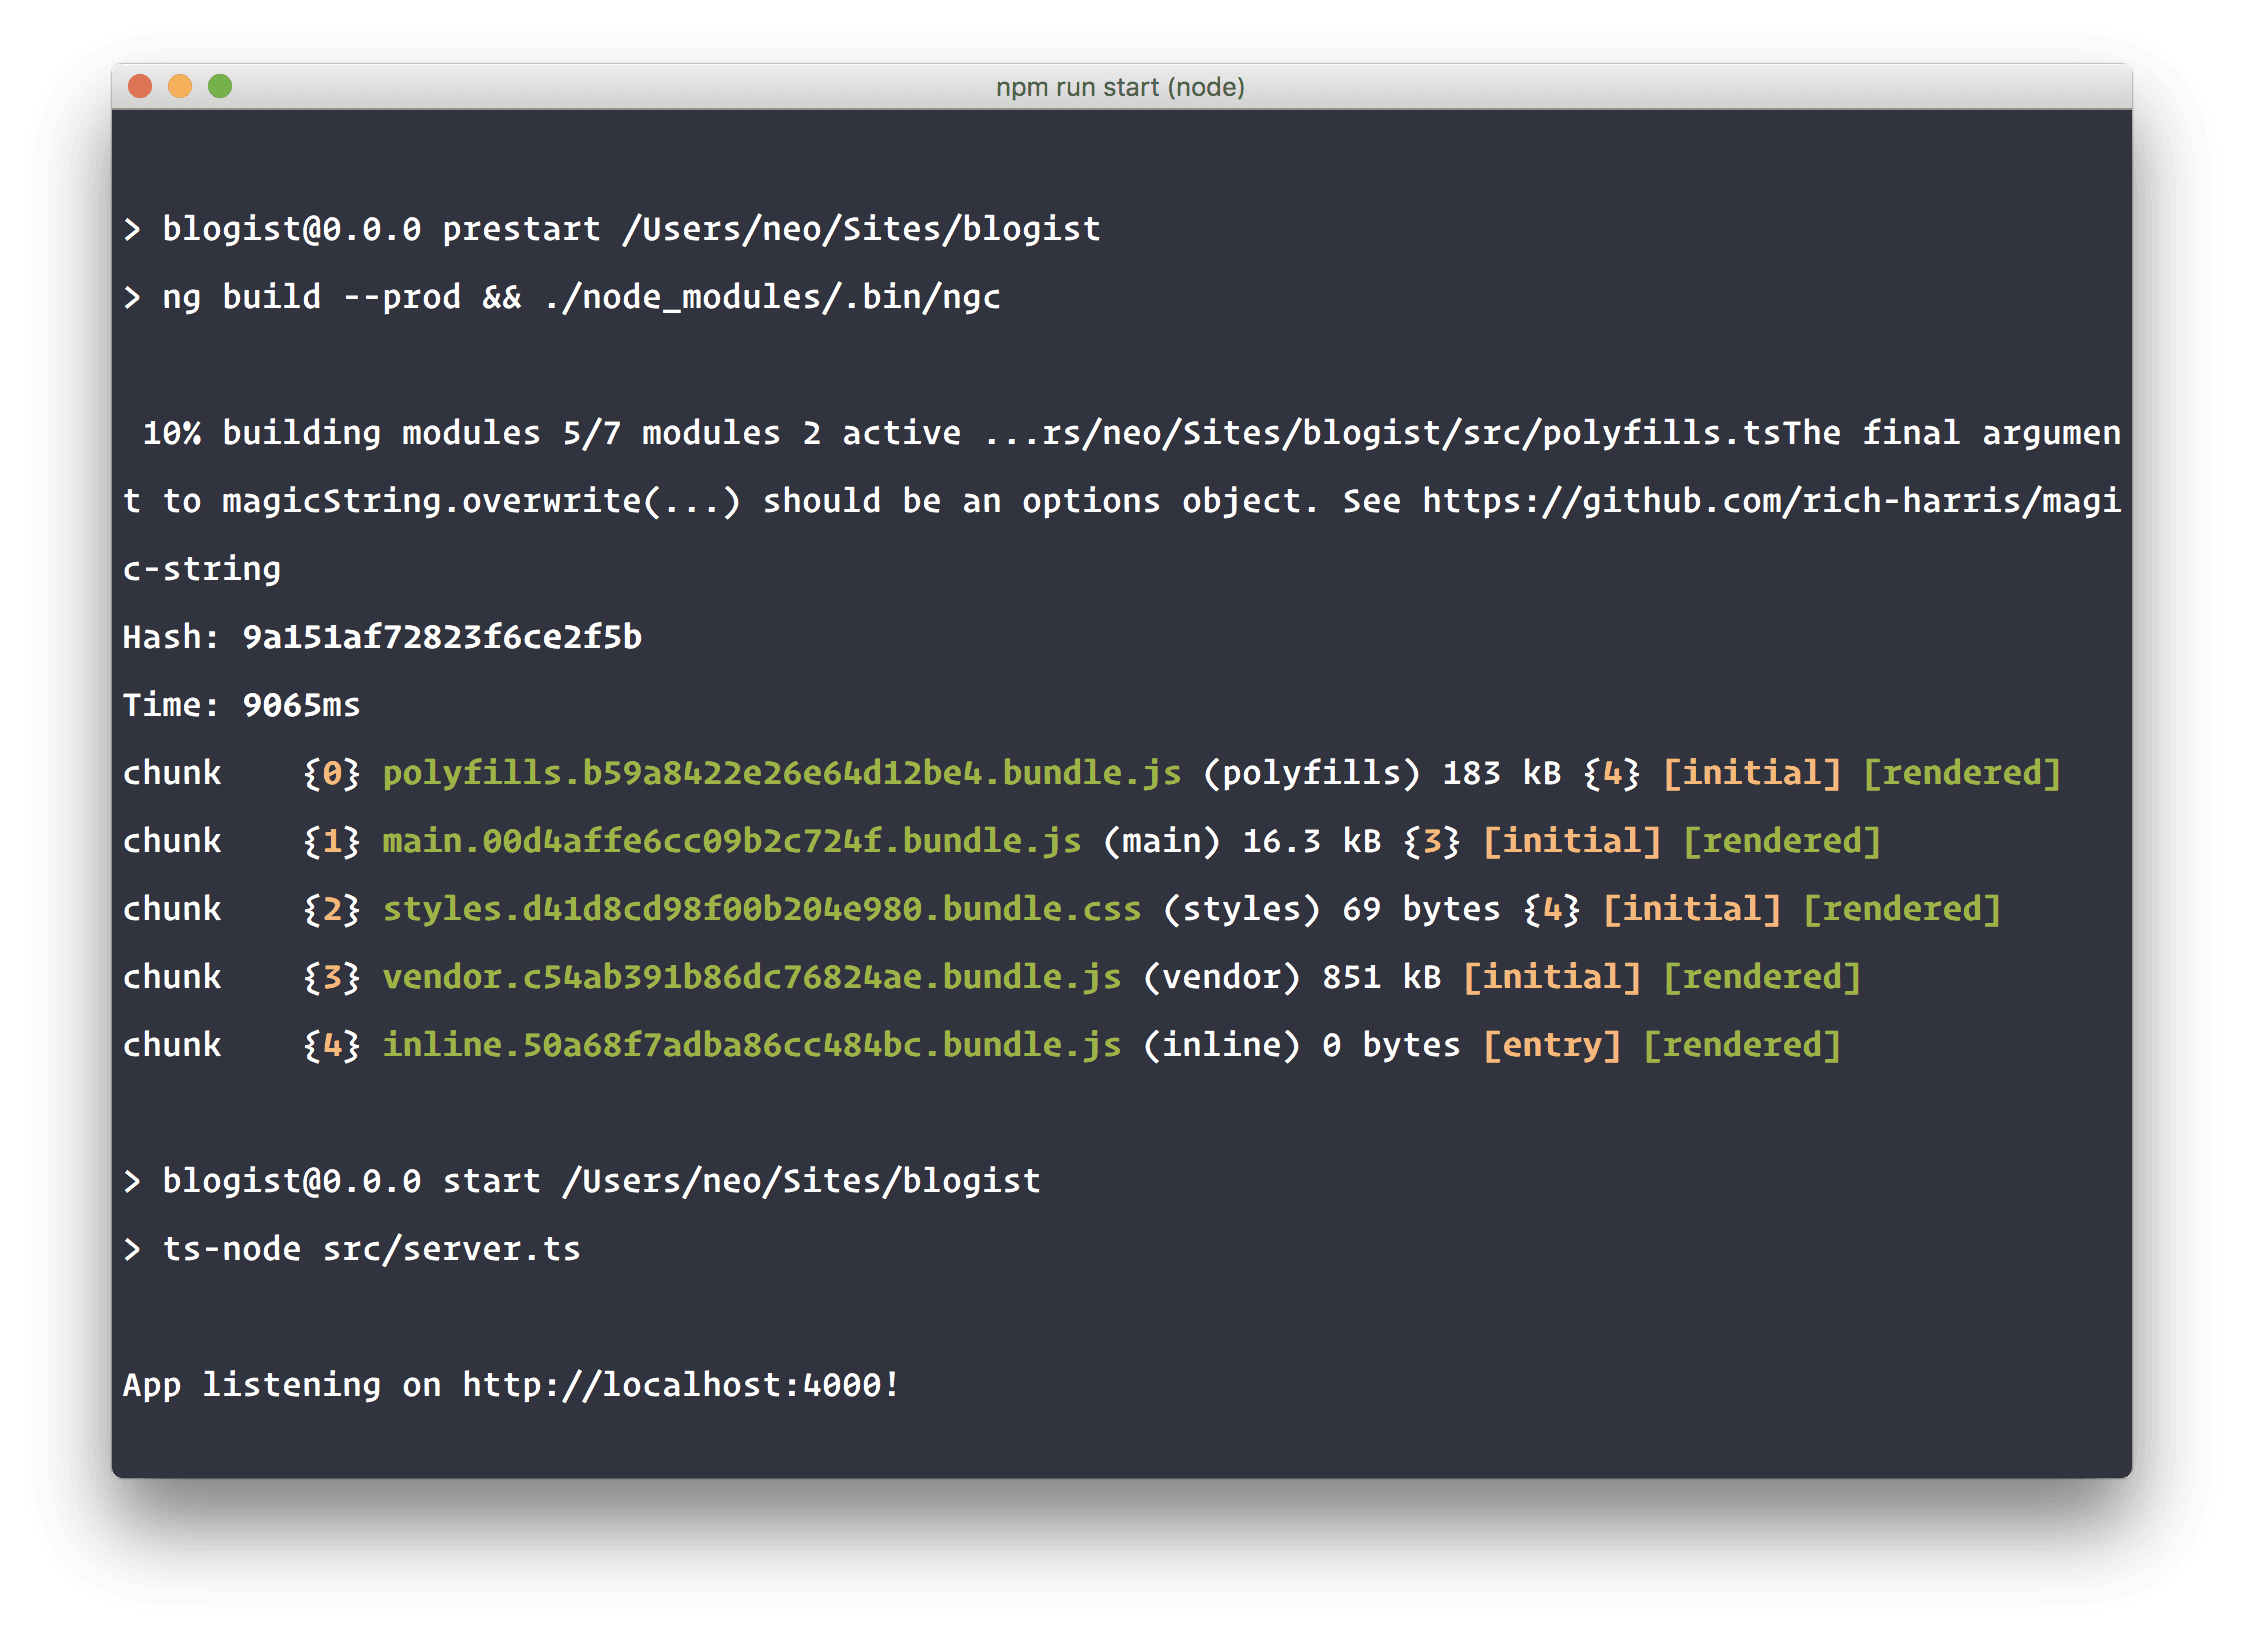
Once you have finished making these changes to the application, go to the terminal and run the following command:
1$ npm run start
This will run the prestart script which contains the commands ng build --prod && ./node_modules/.bin/ngc and then run the script start which contains the command ts-node src/server.ts. Once the commands are completed, you should see an output close to this on your terminal:
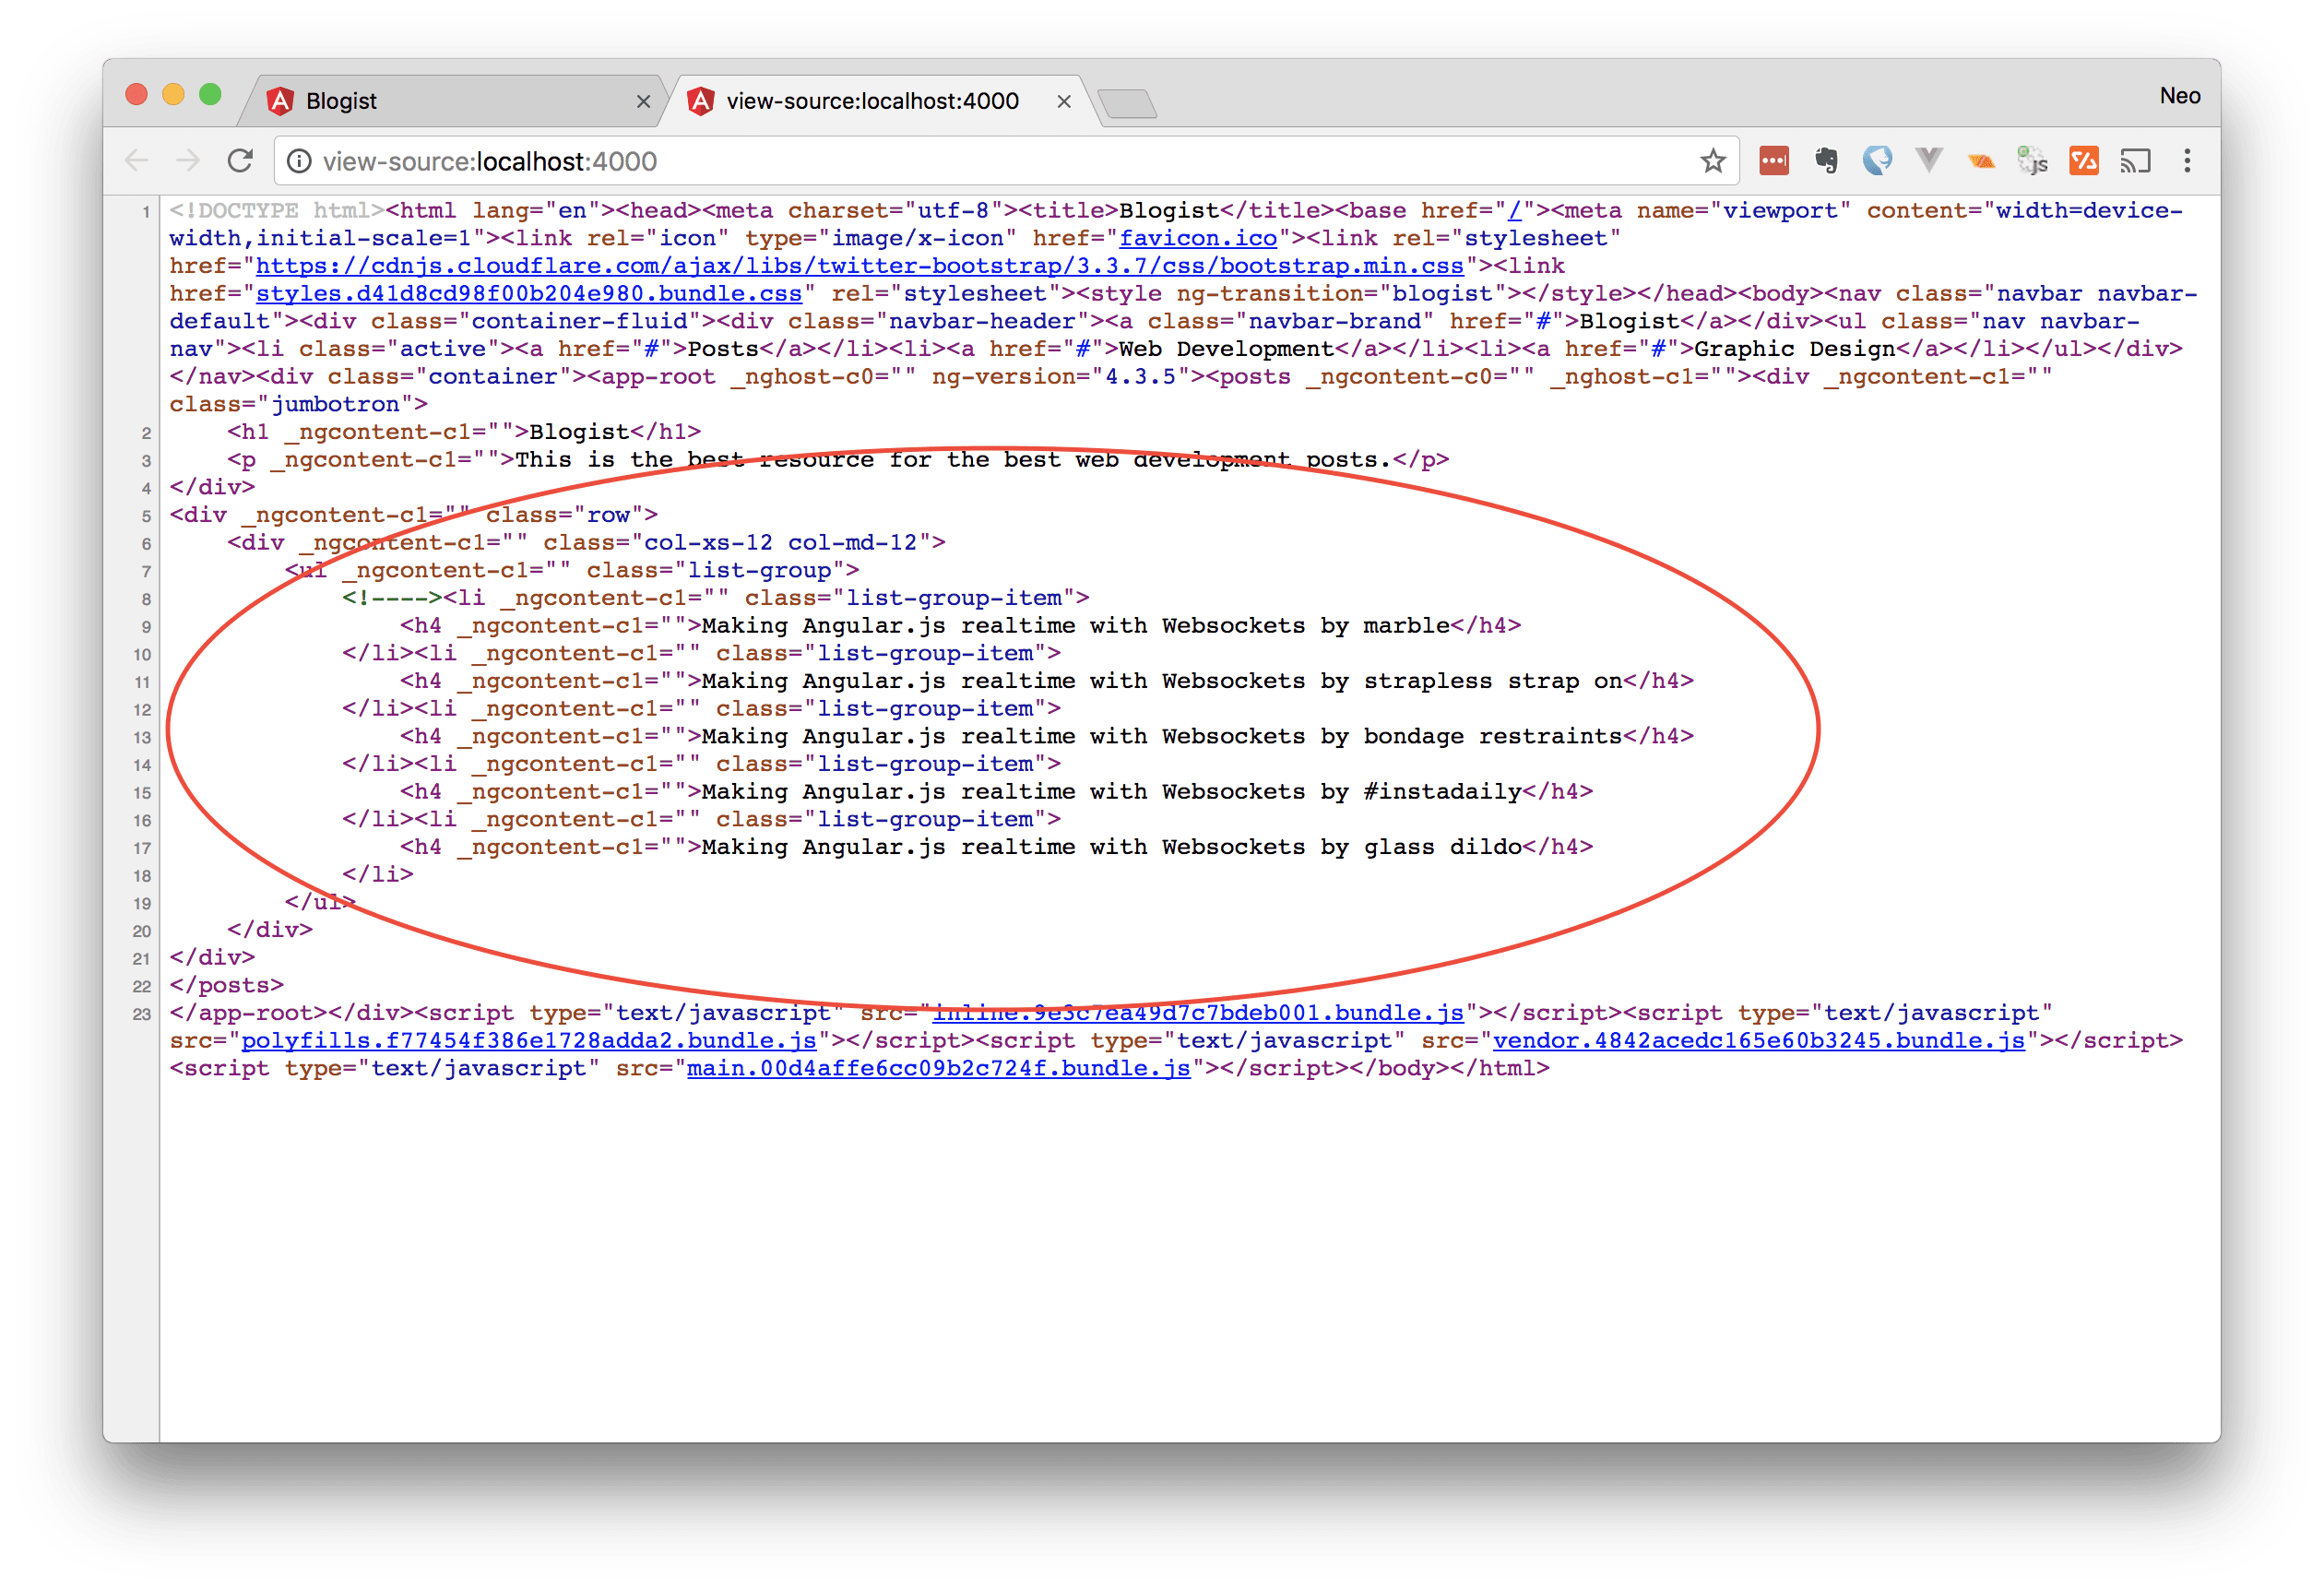
When you visit the page now you should still see the same output as you saw before. However, when you view the source, you should see the fully rendered HTML. This would be how the search engine bots will see the page.
Conclusion
In this article, we have explored how to make your Angular 4 Single Page Application (SPA) SEO friendly by using Angular 4 Universal. Hopefully, you have learnt a thing or two and the fear of bad SEO optimisation will not stop you from using Angular 4 for your applications any more.
The source code to this application can be found on GitHub. Star and leave feedback, issues or comments. If you also have any questions, feel free to leave them below.


© 2024 Pusher Ltd. All rights reserved.
Pusher Limited is a company registered in England and Wales (No. 07489873) whose registered office is at MessageBird UK Limited, 3 More London Riverside, 4th Floor, London, United Kingdom, SE1 2AQ.