- Products

- Developers
- User stories
- Blog
- Pricing

Create a to-do iOS and Android app with Ionic & Angular

This tutorial will teach you how to build a fully functional mobile application using HTML, CSS and Javascript. We will be using the Ionic framework, which is built on the back of Angular 2, to develop a mobile application which can then be deployed to an iPhone or an Android phone.
Introduction
If you have ever wanted to build applications for Android and iOS and you have no knowledge of Java, Swift or Objective-C, well you still can. This tutorial will teach you how to build a fully functional mobile application using HTML, CSS and Javascript. We will be using the Ionic framework, which is built on the back of Angular 2, to develop a mobile application which can then be deployed to an iPhone or an Android phone.
What we will be building
In this tutorial we will be building a to-do application. It will be a simple application where you can add items to a list and then cross them off when you have completed the task. Of course, it will be basic, because the main goal of the tutorial is to teach you how to develop mobile apps using Ionic 2.
Pre-requisites
To follow along on this tutorial, you need to:
- Have knowledge of HTML and CSS
- Have NPM (Node Package Manager) installed on your development machine
- Know Javascript (TypeScript) and Angular 2
- Know how to read documentation, as the Ionic documentation has a lot of information that could be useful.
How the app will look and work
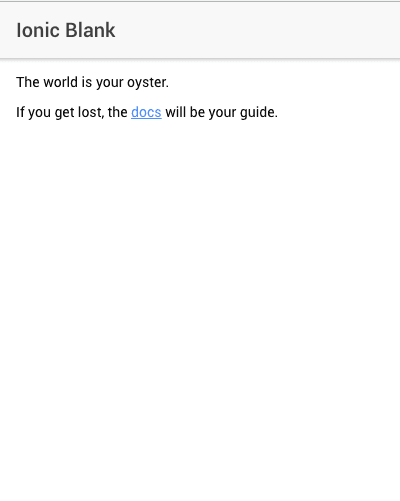
You can see below in the screenshot how the application will look and function. This will be the final product and how it will look after being deployed on your mobile phone.
Setting up
To set up you will need a few things in place. You will need to install Ionic on your development machine so we can use the Ionic CLI.
To install Ionic run the following command on your favorite terminal:
1$ npm install -g ionic cordova
This should install Ionic and Cordova globally on your machine.
Now that we have Ionic installed, let’s create a new Ionic application using the Ionic CLI. cd to the directory where you want to store the source code to your application and run the command below to create a blank Ionic application:
1$ ionic start yourappname blank
This should take a few minutes. Once it is done, we can now get to creating your Ionic application. Open your project directory in your favorite text editor. (I use Sublime Text 3 with the TypeScript package installed using package control, but Visual Studio Code has built-in support for TypeScript.)
File structure
When you open the project in your editor, you should see a file structure similar to this:
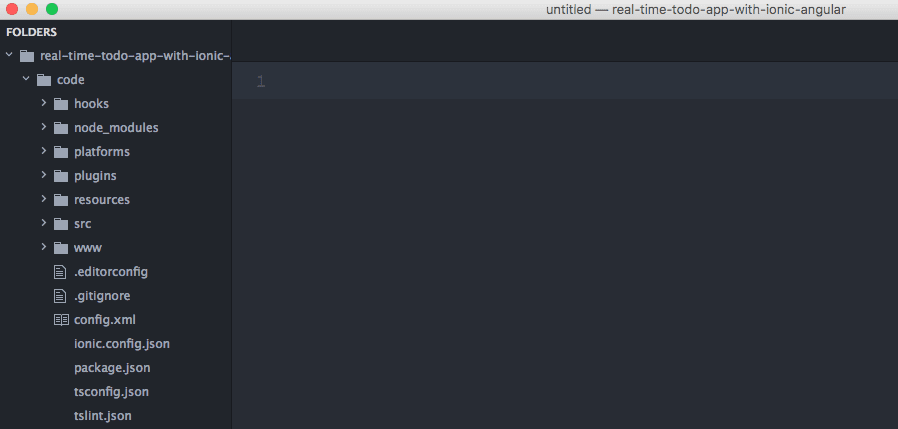
Right now, we are going to focus on the src directory. That is where all the changes we will make will be done and processed from. Expanding the src directory we see other subdirectories, you can explore each one to see what they contain. For this tutorial, I will only cover the most important ones.
app/app.component.ts
This is where the application component is created. The application component loads all other sub-components as child components. You can also use the constructor of this component to do some configurations that you want the application to have. An example is already in the constructor for the splash screen and the status bar.
1import { Component } from '@angular/core'; 2import { Platform } from 'ionic-angular'; 3import { StatusBar } from '@ionic-native/status-bar'; 4import { SplashScreen } from '@ionic-native/splash-screen'; 5 6import { HomePage } from '../pages/home/home'; 7@Component({ 8 templateUrl: 'app.html' 9}) 10export class MyApp { 11 rootPage:any = HomePage; 12 13 constructor(platform: Platform, statusBar: StatusBar, splashScreen: SplashScreen) { 14 platform.ready().then(() => { 15 statusBar.styleDefault(); 16 splashScreen.hide(); 17 }); 18 } 19}
app/app.html
This is basically the html file that is loaded by the application component. It is defined in the @Component block in the app/app.component.ts file. In Angular 2, components can have their very own HTML file or raw HTML code attached to them.
app/app.module.ts
This is where the application module is defined. The application module can also import other modules.
app/app.scss
Each module can also have its own specific scss file registered to it. This is the one registered to the application module but it also cascades down to all submodules. Since this is the mother of all modules, this scss file is a global scss.
Creating our Ionic application
Now that we have gone through the application source, let’s dig in and start creating our application. To start our Ionic application, cd to the root of the project and then run the command below:
1$ ionic serve
This will start a local server with live reload and change detection. This means that the Ionic CLI tool will automatically compile our code when changes are made and then reload to show the changes. It should also automatically launch your browser and display the welcome page.
Creating your first component
As you may have guessed, the pages/home is where all the code that controls the home page lies. I usually like to start by designing the services required for a Component to work before creating the actual component itself, but feel free to work in whatever order you like.
Creating the Home component
Let us create the home component. The home component should be able to display a list of all the to-dos with a checklist by the side where users can check off items that have been completed and see those that have not been checked off.
Let’s update the contents of the page/home/home.ts file:
1import { Component } from '@angular/core'; 2import { Todo, TodoService } from '../../app/services/todo/todo'; 3import { ToastController, AlertController, Loading, LoadingController } from 'ionic-angular'; 4 5@Component({ 6 selector: 'page-home', 7 templateUrl: 'home.html' 8}) 9export class HomePage { 10 loader: Loading; 11 todos: Todo[]; 12 13 constructor( 14 private todoService: TodoService, 15 private alertCtrl: AlertController, 16 private toastCtrl: ToastController, 17 public loadingCtrl: LoadingController) { 18 } 19 20 ngOnInit() { 21 this.initLoader(); 22 this.loadTodos(); 23 } 24 25 showInputAlert() { 26 let prompt = this.alertCtrl.create({ 27 title: 'Add New Item', 28 message: "Add a new item to the todo list.", 29 inputs: [{ name: 'title', placeholder: 'e.g Buy groceries' }], 30 buttons: [ 31 { text: 'Cancel' }, 32 { 33 text: 'Add', 34 handler: data => { 35 this.todoService.add(data.title, []).subscribe( 36 response => { 37 let todo: Todo = { 38 name: data.title, 39 done: false, 40 tags: [] 41 }; 42 this.todos.unshift(todo) 43 } 44 ); 45 } 46 } 47 ] 48 }); 49 prompt.present(); 50 } 51 52 updateItemState(evt:any, todo: Todo) { 53 if (evt) { 54 let index: number = this.todos.indexOf(todo); 55 56 if (~index) { 57 if (todo.done == true) { 58 todo = this.todos[index] 59 this.todos.splice(index, 1); 60 this.todos.push(todo) 61 } 62 this.todoService.saveAll(this.todos).subscribe( 63 done => { 64 this.presentToast( 65 "Item marked as " + (todo.done ? "completed" : "not completed") 66 ) 67 } 68 ); 69 } 70 } 71 } 72 73 private presentToast(message: string) { 74 this.toastCtrl.create({message: message, duration: 2000}).present(); 75 } 76 77 private initLoader() { 78 this.loader = this.loadingCtrl.create({ 79 content: "Loading items..." 80 }); 81 } 82 83 private loadTodos() { 84 this.loader.present().then(() => { 85 this.todoService.fetch().subscribe( 86 data => { 87 this.todos = data; 88 this.loader.dismiss(); 89 } 90 ); 91 }) 92 } 93}
So what is going on here? Well, we started by importing some classes and components that we expect to use
1import { Todo, TodoService } from '../../app/services/todo/todo'; 2import { ToastController, AlertController, Loading, LoadingController } from 'ionic-angular';
We imported the Todo and TodoService. The Todo will be an interface that will define how we want all our Todo objects to be structured. The TodoService will be the way our application connects to a service that will manage the todos.
We have also imported ToastController, AlertController, Loading, LoadingController which are all part of Ionic core. They can be used to display toast messages, alert boxes, and loading indicator respectively. You can read up about them in the documentation.
The ngOnInit loads on initialization, and it calls the initLoader and loadTodos method.
If you save the file now you will get many errors, mostly because the Todo services we imported earlier do not yet exist. Let us create them.
Create a directory in app/services/todo and add a todo.ts class. This will be some sort of index where we can import all our individual todo classes from.
1export * from "./todo.interface" 2export * from "./todo.localstorage" 3export * from "./todo.service"
Lets start creating each file, first the todo.interface.ts class
1export interface Todo { 2 name: string; 3 done: boolean; 4 tags: string[]; 5}
Next we will create the todo.localstorage.ts file. This file will contain an implementation for the todo.service.ts file. It will act like a driver.
1import { Injectable } from "@angular/core"; 2import { Observable } from "rxjs/rx" 3import { Todo } from "../todo/todo" 4 5@Injectable() 6export class TodoLocalStorageService { 7 storageKey: string = "todos"; 8 9 fetch() : Observable<Todo[]> { 10 return Observable.of(this.fetchRaw()); 11 } 12 13 add(title: string, tags: string[]): Observable<boolean> { 14 let data: Todo = { 15 name: title, 16 tags: tags, 17 done: false, 18 }; 19 20 let todos: Todo[] = this.fetchRaw(); 21 todos.unshift(data); 22 23 return Observable.of(this.saveTodos(todos)); 24 } 25 26 saveAll(todos: Todo[]): Observable<boolean> { 27 let saved: boolean = this.saveTodos(todos); 28 29 return Observable.of(saved); 30 } 31 32 private fetchRaw(): Todo[] { 33 let todos: any = localStorage.getItem('todos'); 34 let items: Todo[] = todos ? JSON.parse(todos) : []; 35 36 return items; 37 } 38 39 private saveTodos(todos: Todo[]): boolean { 40 if ( ! todos || todos.length <= 0) { 41 return false; 42 } 43 44 localStorage.setItem(this.storageKey, JSON.stringify(todos)); 45 return true; 46 } 47}
Now let’s create the todo.service.ts file which will just act as a proxy calling the driver (which defaults to localstorage). With this method we can have different drivers. Say for instance, we do not want to store with localstorage, we can just create a new api driver, register it in the app/app.module.ts file and then swap it in the todo.service.ts and we would be done.
1import { Injectable } from "@angular/core" 2import { Observable } from "rxjs/rx" 3import { Todo, TodoLocalStorageService } from "../todo/todo" 4 5@Injectable() 6export class TodoService { 7 constructor(private driver: TodoLocalStorageService) { 8 } 9 10 fetch(): Observable<Todo[]> { 11 return this.driver.fetch() 12 } 13 14 add(title: string, tags: string[]): Observable<boolean> { 15 return this.driver.add(title, tags); 16 } 17 18 saveAll(todos: Todo[]): Observable<boolean> { 19 return this.driver.saveAll(todos); 20 } 21}
At this point, all the dependencies the home component needs to function have been created, however, we need to register these components with the application module so the app knows they exist.
In your app/app.module.ts file, import the new classes, and register them in the providers section of @NgModule . This should now look like this:
1import { BrowserModule } from '@angular/platform-browser'; 2import { ErrorHandler, NgModule } from '@angular/core'; 3import { IonicApp, IonicErrorHandler, IonicModule } from 'ionic-angular'; 4import { SplashScreen } from '@ionic-native/splash-screen'; 5import { StatusBar } from '@ionic-native/status-bar'; 6 7import { MyApp } from './app.component'; 8import { HomePage } from '../pages/home/home'; 9 10// !!! Import the todo service and its driver 11import { TodoService, TodoLocalStorageService } from "./services/todo/todo"; 12 13@NgModule({ 14 declarations: [ 15 MyApp, 16 HomePage 17 ], 18 imports: [ 19 BrowserModule, 20 IonicModule.forRoot(MyApp) 21 ], 22 bootstrap: [IonicApp], 23 entryComponents: [ 24 MyApp, 25 HomePage 26 ], 27 providers: [ 28 StatusBar, 29 SplashScreen, 30 31 // !!! Register them as providers 32 TodoService, 33 TodoLocalStorageService, 34 35 {provide: ErrorHandler, useClass: IonicErrorHandler} 36 ] 37}) 38export class AppModule {}
If we look at the preview now, it should still show the initial template that it showed before we had done anything. This is because we have not yet updated the HTML to display the to-dos.
Update the page/home/home.html file to contain the new HTML:
1<ion-header> 2 <ion-navbar> 3 <ion-title>TODO</ion-title> 4 </ion-navbar> 5</ion-header> 6 7<ion-content padding text-center class="vertical-align-content" [hidden]="todos && todos.length > 0"> 8 <ion-grid> 9 <ion-row> 10 <ion-col class="readjust"> 11 No item has been added. Use the "+" button below to add a new item. 12 </ion-col> 13 </ion-row> 14 </ion-grid> 15</ion-content> 16 17<ion-content padding [hidden]="!todos || todos.length <= 0"> 18 <ion-item *ngFor="let todo of todos"> 19 <ion-label [ngClass]="{stricken:todo.done}">{{ todo.name }}</ion-label> 20 <ion-checkbox color="dark" [(ngModel)]="todo.done" (click)="updateItemState($event, todo)"></ion-checkbox> 21 </ion-item> 22</ion-content> 23 24<ion-fab right bottom> 25 <button ion-fab color="primary" (click)="showInputAlert()"><ion-icon name="add"></ion-icon></button> 26</ion-fab>
Finally we would like to add some styling to the page. Update the page/home/home.scss file:
1page-home { 2 .vertical-align-content > * { 3 display: flex!important; 4 align-content: center!important; 5 align-items: center!important; 6 .readjust { 7 margin-top: -60px; 8 font-size: 20px; 9 font-weight: 400; 10 line-height: 1.5em; 11 color: #676767; 12 } 13 } 14 .stricken { 15 text-decoration: line-through; 16 } 17}
Note: We are wrapping the style around a
page-homeselector because thats the name we gave it in the@Componentblock ofpage/home/home.ts.
Now we can see our application from the preview now that it works. We can add new items and check them off as completed. For an assignment, see if you can add a delete todo feature to the current application.
Deploying your application to a mobile device
Now that you have created the mobile application how can you deploy it? Well that is out of the scope of this tutorial but I would suggest you read the deployment section of the Ionic documentation. This will give you a better understanding on how you can deploy your application to your device.
Conclusion
We have been able to create a simple to-do list application using Ionic and Angular 2. Of course, we can always add additional functionality to the application, like adding real-time updates so it is updated accros devices that are viewing it at the moment. We can also add the API functionality so it talks to an external service like Firebase. For your assignment, see if you can add a delete feature to the application.
Have any questions, feedback or suggestions, feel free to ask below in the comments section.


© 2024 Pusher Ltd. All rights reserved.
Pusher Limited is a company registered in England and Wales (No. 07489873) whose registered office is at MessageBird UK Limited, 3 More London Riverside, 4th Floor, London, United Kingdom, SE1 2AQ.