- Products

- Developers
- User stories
- Blog
- Pricing

Building an AR app with ARKit and Scenekit

In this tutorial, we will learn how you can create an AR app with 3D content using ARKit and Scenekit.
Introduction
This article is part of ARKit course.
In the last tutorial, we used SpriteKit to create an augmented reality (AR) game with ARKit. Today, it’s the turn of Scenekit.
Remember that SpriteKit works with 2D content while SceneKit works with 3D content. However, this brings its own problems.
- How do I get a 3D model into Xcode?
- What format do I use for the model?
- How does touch handling work in a 3D space?
This tutorial will answer those questions and show you how to use ARKit with SceneKit by building the following app:
Every time you tap on the screen, a 3D model of a cherub will be added to the scene, facing towards you. Tap anywhere on the model to remove it. It’s a simple app, but I’ll explain every concept needed to create it and show you how to prepare a 3D model to use it in Xcode.
You’ll need:
- A device with an A9 or later processor (iPhone 6s or better, iPhone SE, any iPad Pro, or the 2017 iPad)
- iOS 11
- Blender
The entire Xcode project is on GitHub for reference.
Let’s get started.
Creating the project
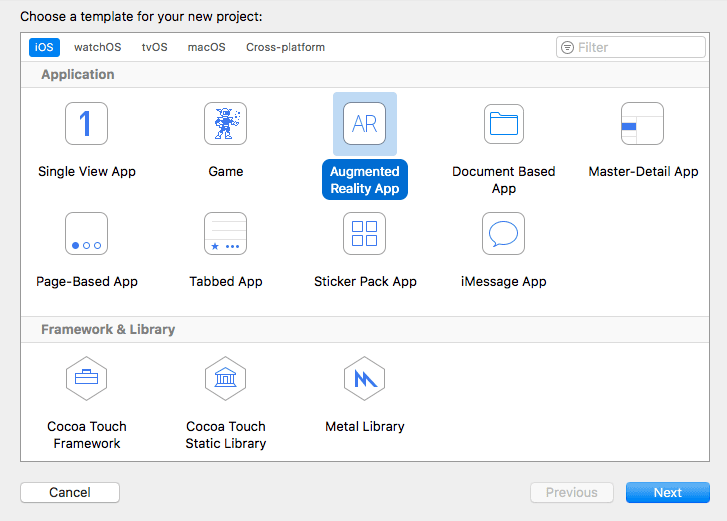
Open Xcode 9 and create a new AR app:
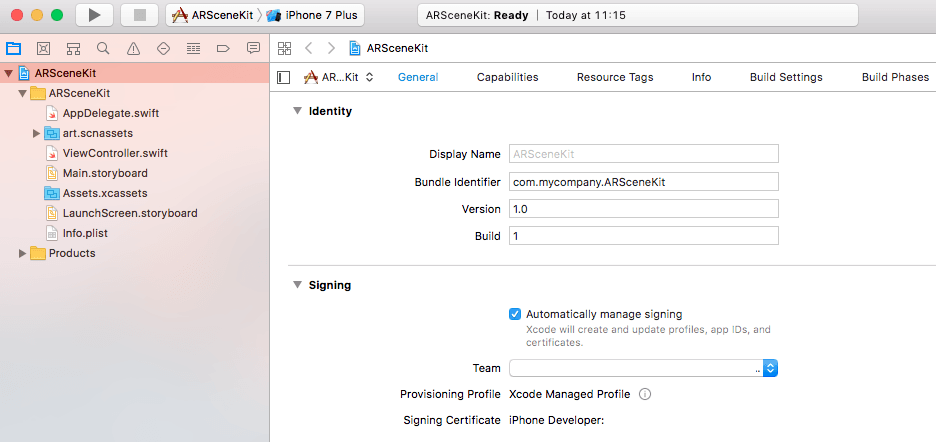
Enter the project information, choosing Swift as the language and SceneKit as the content technology and create the project:

At this time, AR cannot be tested on an iOS simulator, so we’ll need to test on a real device. For this, we’ll need to sign our app with our developer account. If you haven’t already, add your developer account to Xcode and choose your team to sign your app:
If you don’t have a paid developer account, you’ll have some limitations, like the fact that you can only create up to 10 App IDs every 7 days and that you can only have up to 3 apps installed in your device.
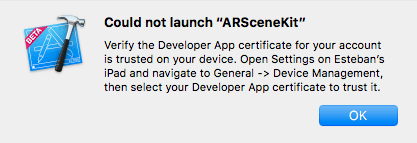
The first time you install the app on your device, probably you’ll be asked to trust the certificate in the device, just follow the instructions:
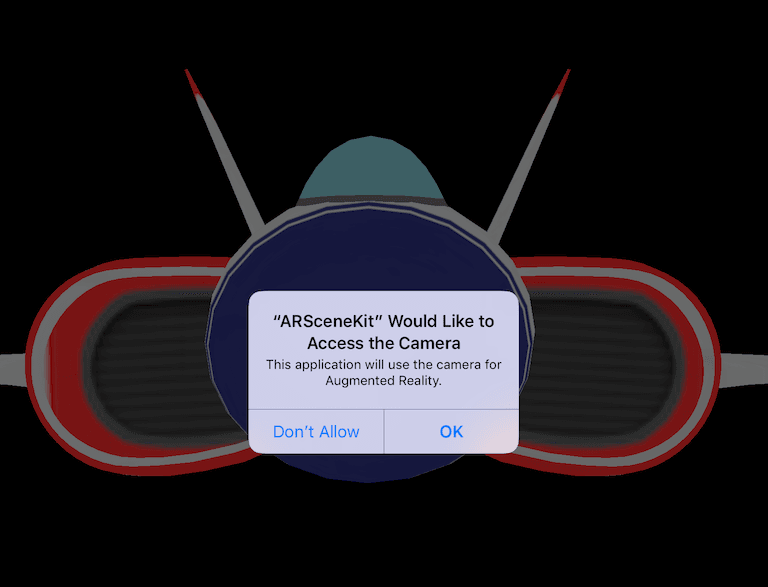
This way, when the app is run, you’ll be asked to give permissions to the camera:
After that, a model of a ship will be added to the coordinates (0, 0, 0) of the scene:
Now that we have set up the project, let’s understand how the scene is composed.
Understanding an AR scene
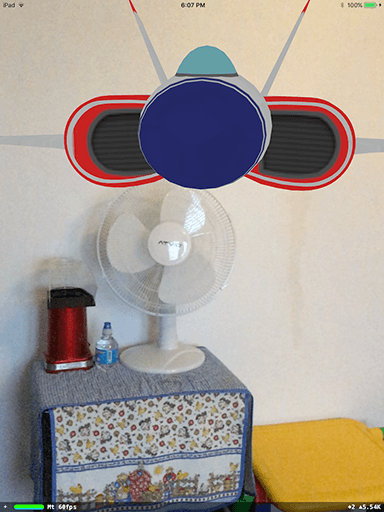
In addition to SceneKit’s statistics panel:
There are other options for debugging. Add the following line below sceneView.showsStatistics, in the viewDidLoad method:
1override func viewDidLoad() {
2 ...
3 sceneView.debugOptions = ARSCNDebugOptions.showWorldOrigin
4 ...
5 }
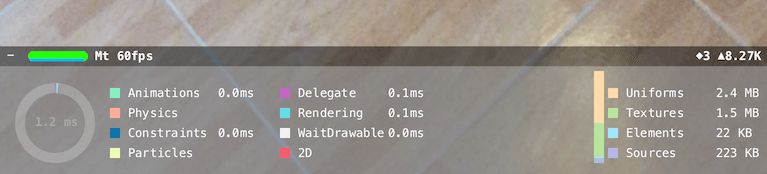
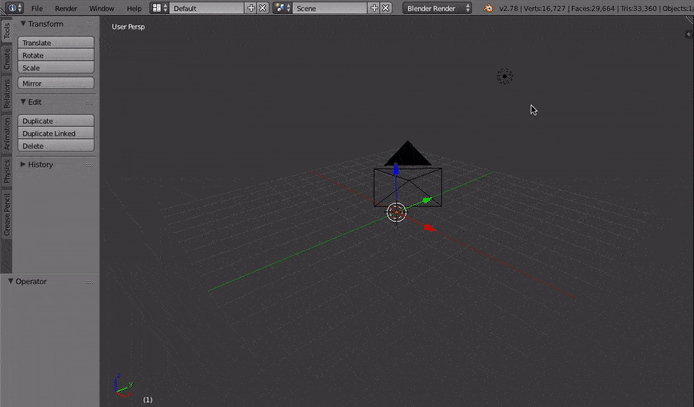
ARSCNDebugOptions.showWorldOrigin displays a coordinate axis indicating the position and orientation of the AR world coordinate system:
- The green axis represents Y (take a mental note, Y points up)
- The red axis represents X
- The blue axis represents Z
If you run the app and take a step back you should see the axis coordinate on your device screen:
There’s another debug option from ARSCNDebugOptions, showFeaturePoints. You can substitute or add it to the previous option using an array:
1override func viewDidLoad() {
2 ...
3 // Show statistics such as fps and timing information
4 sceneView.showsStatistics = true
5 sceneView.debugOptions = ARSCNDebugOptions.showFeaturePoints
6 // sceneView.debugOptions =
7 // [ARSCNDebugOptions.showFeaturePoints, ARSCNDebugOptions.showWorldOrigin]
8 ...
9 }
If you run the app, after some seconds you should see a lot of yellow marks appearing on the scene. These are feature points:
ARKit processes each video frame to extract features of the image that can be uniquely identified and tracked. As you move around, more features are detected and ARkit can better estimate properties like the orientation and position of physical objects.
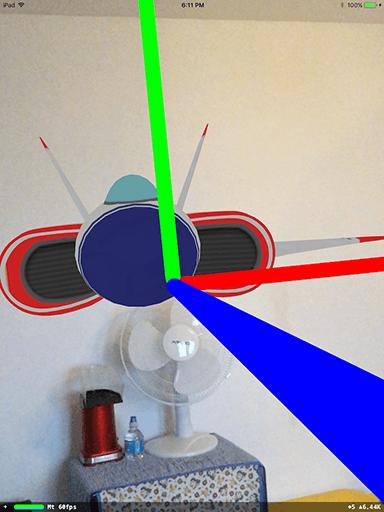
However, if you point to a white wall, for example, you won’t be able to see a lot of yellow marks (if any):
Things that could cause poor feature extraction are:
- Poor lighting
- Lack of texture
- Fast movement
You can attach an anchor to a feature point. This anchor is represented by the class ARAnchor, which holds a real-world position and orientation that can be used for placing objects in an AR scene.
When a surface, or a plane, is detected, the class ARPlaneAnchor, which is derived from ARAnchor, stores its alignment, center, and other properties.
Yo can tell ARKit to detect horizontal planes (the only option available right now) by setting the planeDetection property on the session configuration object:
1override func viewWillAppear(_ animated: Bool) {
2 ...
3 // Create a session configuration
4 let configuration = ARWorldTrackingConfiguration()
5 ...
6 }
If you want to get callbacks when a plan is detected or updated you have to implement the following methods of the ARSCNViewDelegate protocol:
1/* 2 Called when a SceneKit node corresponding to a 3 new AR anchor has been added to the scene. 4 */ 5 func renderer(_ renderer: SCNSceneRenderer, 6 didAdd node: SCNNode, for anchor: ARAnchor) { 7 // ... 8 } 9 10 /* 11 Called when a SceneKit node's properties have been 12 updated to match the current state of its corresponding anchor. 13 */ 14 func renderer(_ renderer: SCNSceneRenderer, 15 didUpdate node: SCNNode, for anchor: ARAnchor) { 16 // ... 17 } 18 19 /* 20 Called when SceneKit node corresponding to a removed 21 AR anchor has been removed from the scene. 22 */ 23 func renderer(_ renderer: SCNSceneRenderer, 24 didRemove node: SCNNode, for anchor: ARAnchor) { 25 // ... 26 }
Notice that these methods receive an ARAnchor object as a parameter. When a new anchor is created (either manually or by a detected plane), you can implement the following method:
1func renderer(_ renderer: SCNSceneRenderer, 2 nodeFor anchor: ARAnchor) -> SCNNode? { 3 }
It provides a SceneKit node corresponding to a newly added anchor. If this method returns nil no node is added to the scene. If you do not implement this method, ARKit creates an empty node, and you can implement the renderer(_:didAdd:for:) method instead to provide visual content by attaching it to that node.
This way, if you want to know if this anchor belongs to a plane, just perform the following check:
1if anchor.isKind(of: ARPlaneAnchor.self) { 2 // ... 3 }
If you want to know more about plane detection, here’s a project by Mark Dawson (and a series of articles, totally recommended) that allows you to visualize the detected planes:
Now that the basic concepts are explained, let’s build our app, starting with preparing the 3D model.
Preparing a 3D model for Xcode
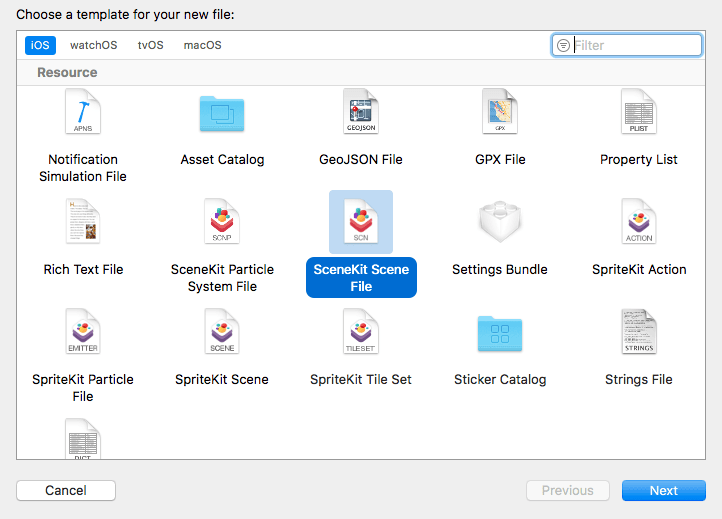
The preferred way to load 3D stuff to a scene is using a SceneKit scene file with a .scn extension. You can create a file of this type by choosing the menu File → New → File and then SceneKit scene file under the Resource section:
Or by converting your model if it’s in one of the supported formats by selecting it and choosing the menu Editor → Convert to SceneKit scene file format (.scn):
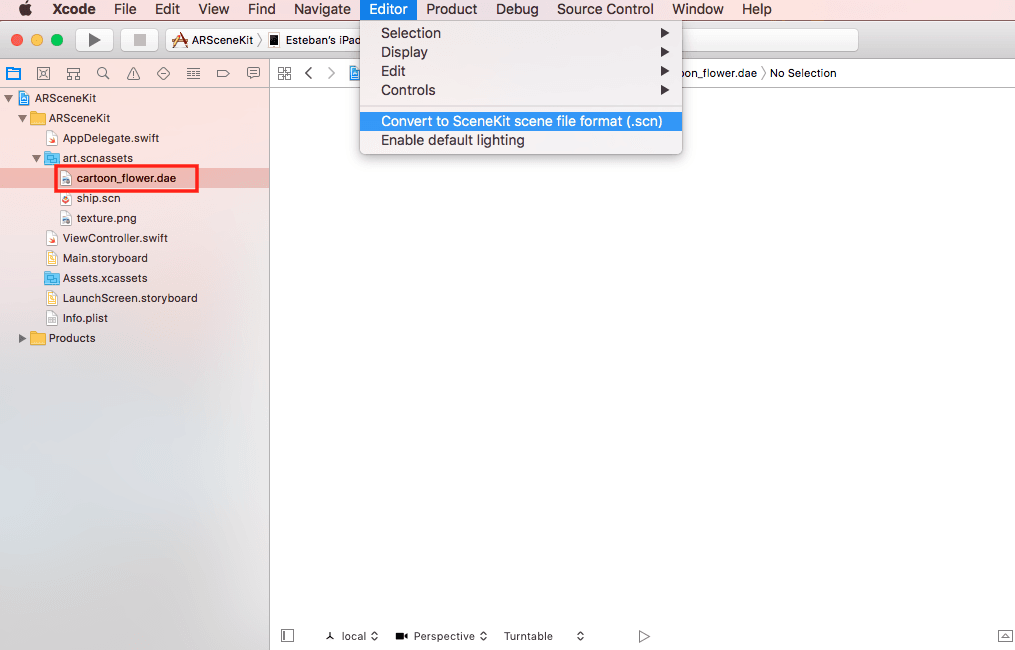
Supported formats include COLLADA (COLLAborative Design Activity), identified with a .dae extension (digital asset exchange), and Alembic, identified with a .abc extension.
However, most of the time, the conversion is not necessary. According to the SCNSceneSource documentation, when you include a model in DAE or Alembic format in your project, Xcode automatically converts the file to SceneKit’s scene format for use in the app, retaining its original .dae or .abc extension.
The problem is that sometimes it’s difficult to find a quality model and in the format required, especially if you are on a budget and don’t have the skills to create your own 3D models.
For this demo, I choose this cherub vase model, because although it is a nice model, it has some common issues that you may encounter when looking for a model for your app.
First, this is not a model you’d normally want to use in your apps, because of the number of polygons in its mesh. In general, the more polygons (in most cases, triangles) in a mesh, the more detailed the object is, and the more computationally intensive it is to display.
The recommendation is to use low poly models, of course, that is a relative term, because computer power is always changing, but we can say that low poly is everything that can be displayed on target hardware in real-time (if you want me to say a number, all right, let’s say around 10k polygons).
When you download and uncompress the file, you’ll notice that it comes in OBJ format. It also comes with an MTL file, which describes how the texture is used, and the actual texture in JPG format.
Copy the three files in one directory. Now, double click on the OBJ file. You’ll see there’s a problem:
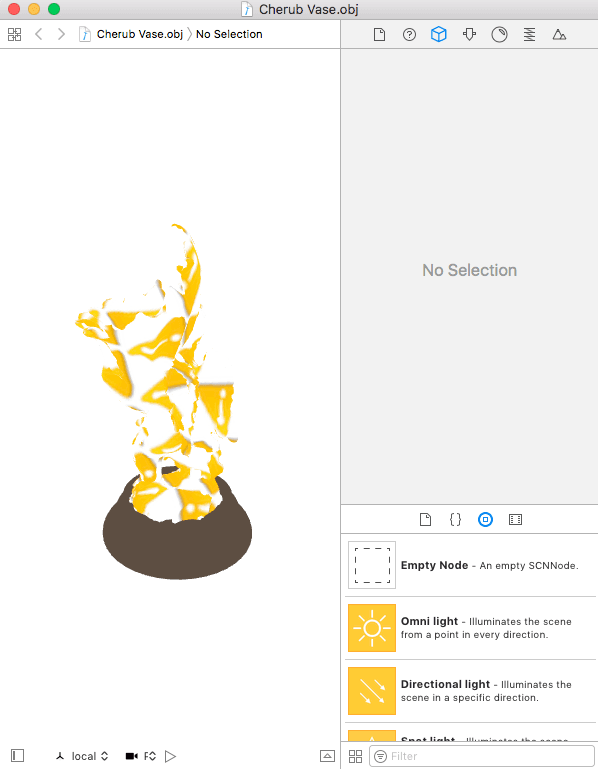
The texture of the vase is not shown, and its base just has a solid brown color.
Actually, this is easy to solve. The OBJ and MTL files are just text files that describe the model, you can open them with any text editor and modify them. As the texture is not shown, the problem lies in the MTL file. If you open it, you’ll find the following:
1newmtl Cherub_Vase 2 Kd 0.800000 0.800000 0.800000 3 Ks 1.000000 1.000000 1.000000 4 illum 2 5 Ns 50.781250 6 map_Kd Cherub Vase TEX.jpg 7 8 newmtl Base 9 Kd 0.364706 0.305882 0.258824 10 Ks 1.000000 1.000000 1.000000 11 illum 2 12 Ns 50.781250
We can see there are two materials defined with newmtl.
In the first case, it defines some material color and illumination statements (Kd, Ks, illum, and Ns) and a texture map statement at the end (map_Kd). If you look closely, you’ll notice the problem is that the JPG file reference has an incorrect name, it doesn’t have underscores as the name of the file that comes with the model. So we just have to fix this:
1newmtl Cherub_Vase
2 Kd 0.800000 0.800000 0.800000
3 Ks 1.000000 1.000000 1.000000
4 illum 2
5 Ns 50.781250
6 map_Kd Cherub_Vase_TEX.jpg
7
8 ...
In the second case, there’s no reference to a texture image, so probably there was an error when exporting the model, or it just relies on the scene lighting to provide the effect shown on the preview image.
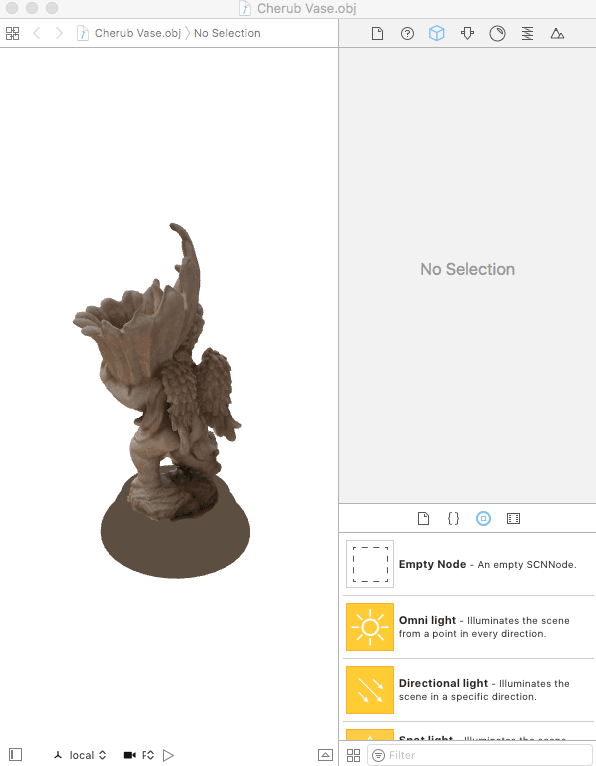
Anyway, if you save the change and reload the OBJ file, you’ll see that the issue is fixed now:
This is a common issue, sometimes the path of the texture file is wrong or the OBJ file doesn’t come with the texture or even the MTL file.
Now open the OBJ file with a text editor and search for a line with a mtllib statement:
1mtllib Cherub_Vase.mtl
2 v 6.87975 73.0276 98.9623
3 ...
This statement references the MTL file so you have to make sure it has the correct filename. In this case, it is correct so we’re good to go.
OBJ files are one of the most common formats for 3D models, and even when you can load this format into a SceneKit scene, the preferred format for external models is DAE.
So let’s use Blender, a free modeling tool, to perform this conversion. Open it. The following screen will be presented:
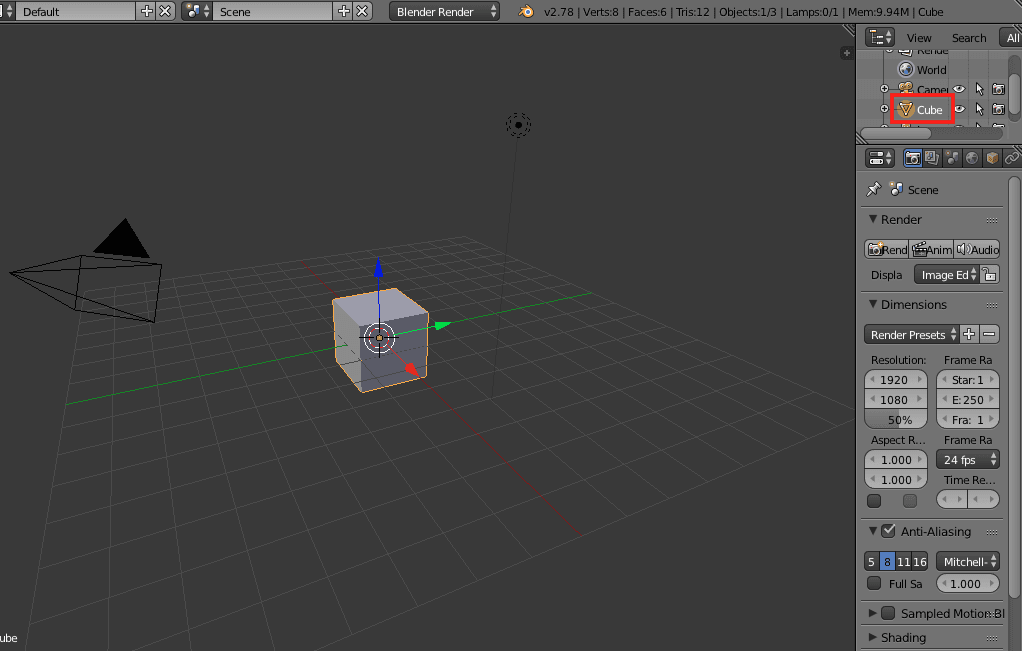
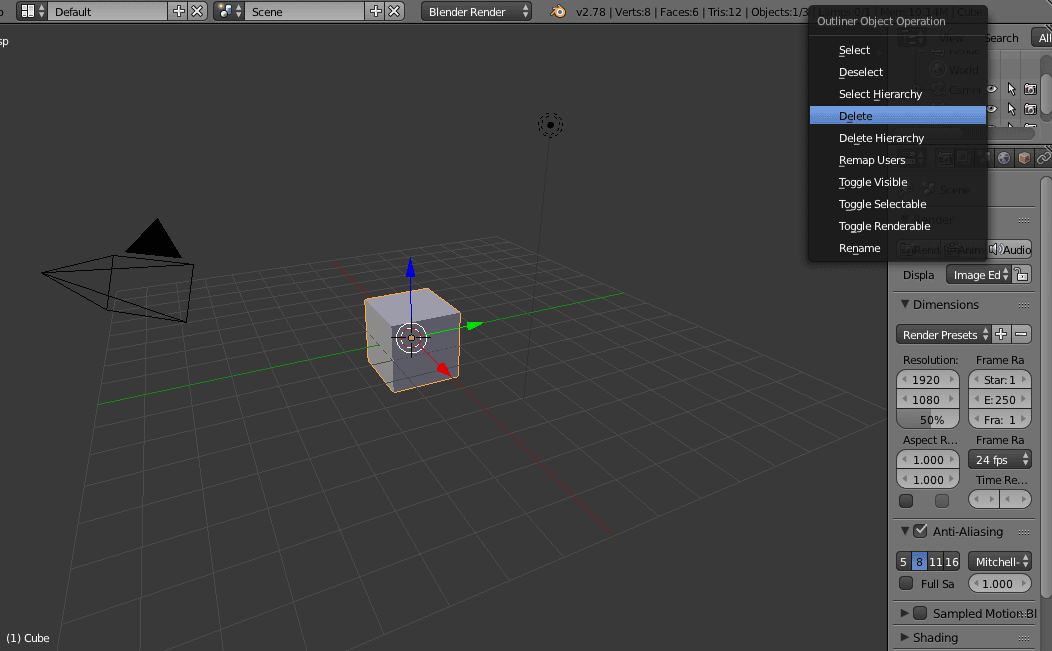
We don’t need the cube that is automatically added. In the top-right panel, look for the Cube element, select it and delete it:
Next, go to the File → Import menu, you’ll have the option to choose among many formats:
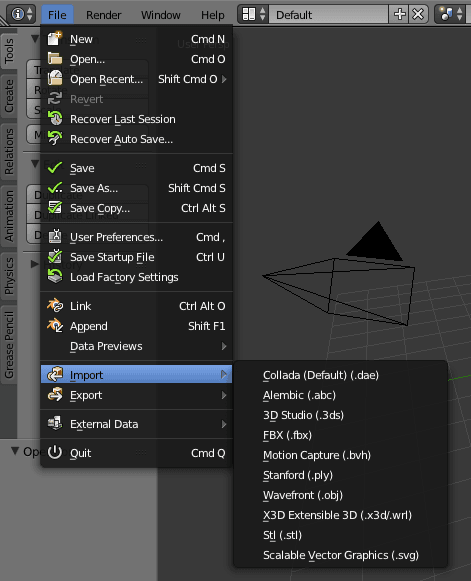
In this case, we have a Wavefront OBJ file so select this option and import the model.
And now we have another problem. The imported model is not showing up.
Actually, the model was imported correctly, the problem is that it is not centered at the origin. If you look around, you’ll find the model:
We need to center the model, otherwise, it will be difficult to position it correctly in our SceneKit scene. So select the Cherub model in the top-right panel, when the Set Origin menu appears on the left, choose the option Geometry to Origin:
The model is big and now the origin is at the center of it, that’s why is shown that way. We could change the scale or other properties, but there’s no need as we can change those properties from Xcode.
Go to the File → Export menu, and choose the Collada format. In the next window, choose the texture options Include UV Textures and Include Material Textures:
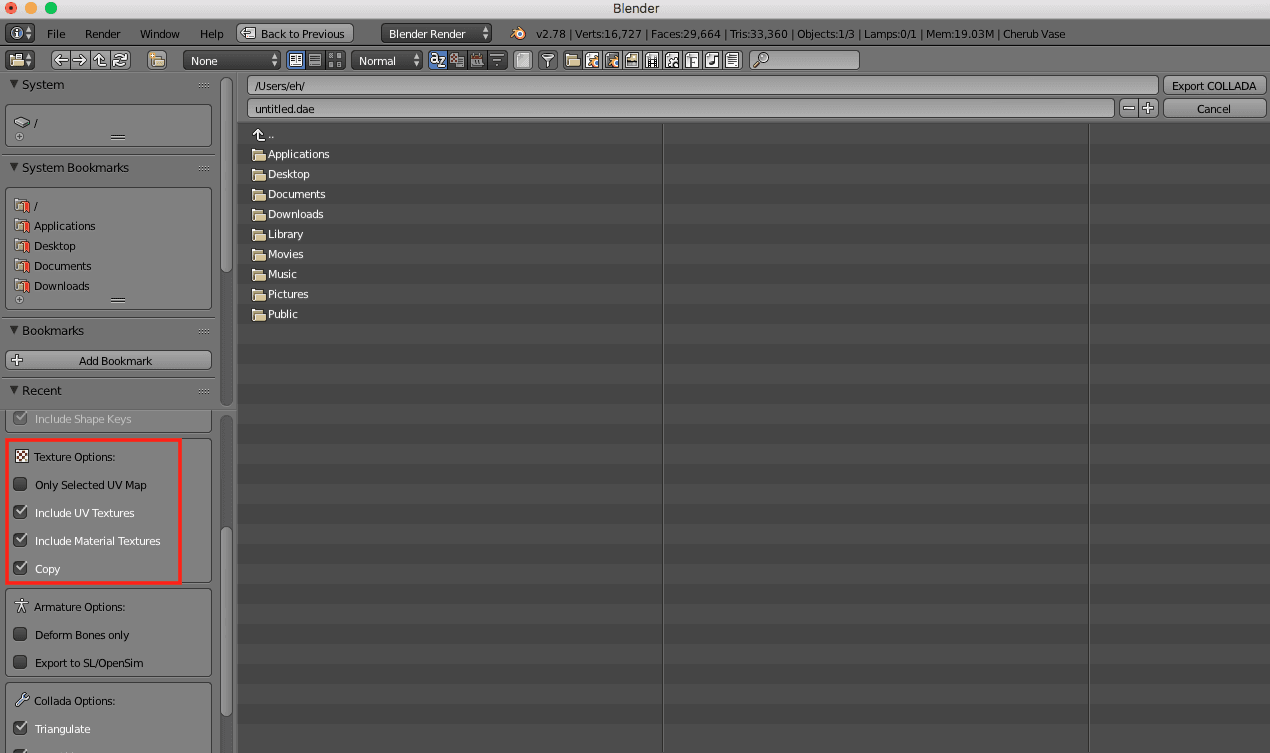
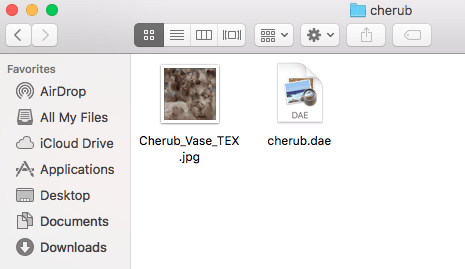
Choose a new directory and export your model there. You’ll see two files, the model in DAE format and the texture:
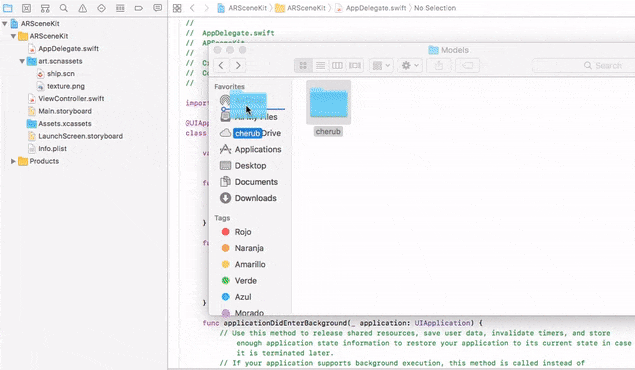
Now drag the directory to Xcode’s art.scnassets and select the file:
Next, open the Scene Graph View with the icon on the bottom-left section and expand the nodes of the model. You should see something like this:
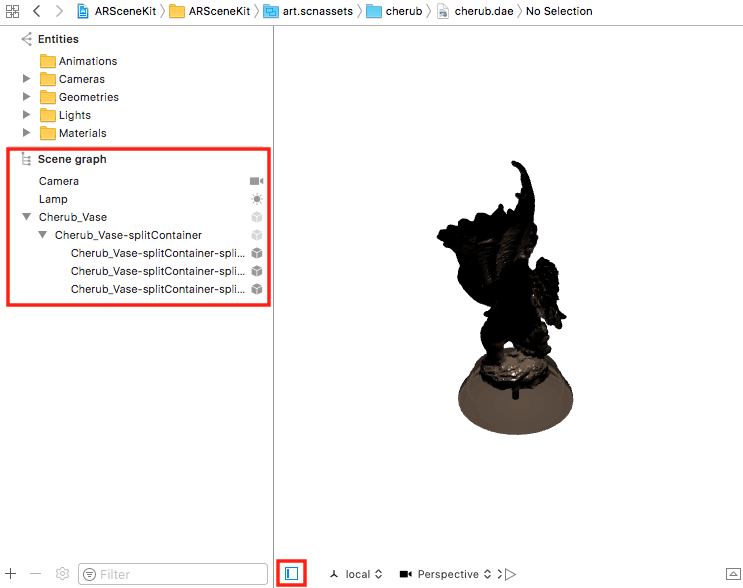
Generally, the models you import will need some cleanup. This means removing unused nodes, have only one parent node, and changing some properties, like position and scale.
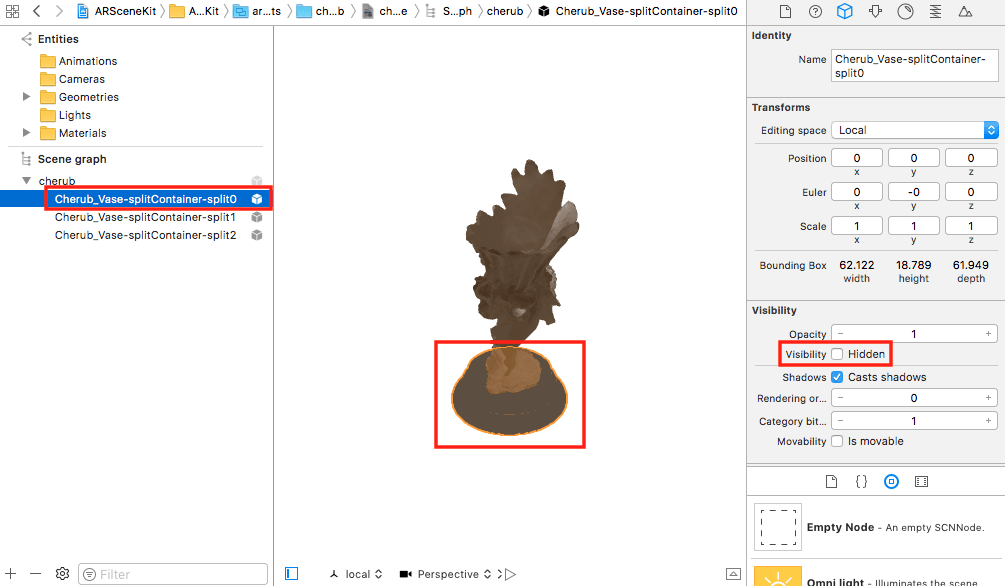
Let’s delete the Camera and Lamp nodes since we won’t use them, rename the node Cherub_Vase-splitContainer to cherub and make it the root node, removing Cherub_Vase:
Also, let’s hide the node representing the base of the cherub (or you can delete it if you want) since it doesn’t look very good (and fixing this is out of the scope of this tutorial). Select the node Cherub_Vase-splitContainer-split0 and check the Hidden option:
Finally, let’s not forget the model is too big, we have to scale down. Select the cherub node and change the scale on x, y and z to 0.01. Also, change the Z Euler angle to 70:
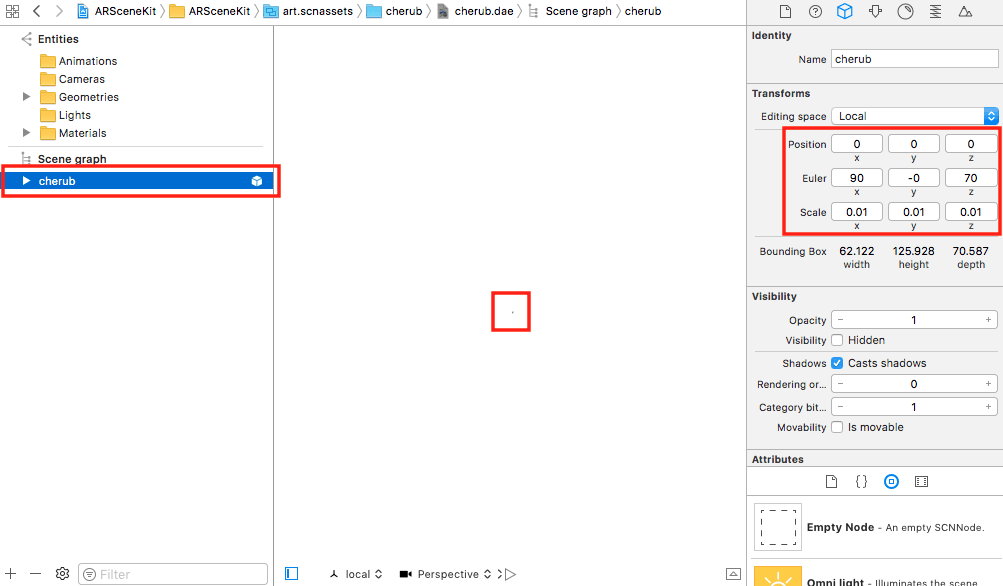
After that, the model will be barely visible in the editor, but in your app, it will have a good size and it will face towards you.
I wish I could say there’s some kind of formula or formal procedure to get those numbers and other properties you may want to change for your model, but I can only say that you’ll get the right numbers by trial and error and they will be different for each model, or even formats, if you convert this model to an SCN file, you’ll need different Euler angles because Blender uses a different coordinate system (in Blender, Z is up, not Y).
Anyway, now we are ready to add the 3D model to the scene.
Adding the 3D model
In ViewController.swift, add one property to hold the model’s root node and another with its name:
1class ViewController: UIViewController, ARSCNViewDelegate {
2
3 @IBOutlet var sceneView: ARSCNView!
4
5 var nodeModel:SCNNode!
6 let nodeName = "cherub" // Same name we set for the node on SceneKit's editor
7
8 ...
9 }
Now let’s activate anti-aliasing, which smooths edges in a rendered scene using a technique called multisampling. Also, you can turn off the scene’s debugging options if you want:
1override func viewDidLoad() {
2 ...
3
4 // Show statistics such as fps and timing information
5 sceneView.showsStatistics = true
6 //sceneView.debugOptions = [ARSCNDebugOptions.showFeaturePoints, ARSCNDebugOptions.showWorldOrigin]
7 sceneView.antialiasingMode = .multisampling4X
8
9 ...
10 }
Next, set the scene of the ARSCNView as an empty scene (instead of the ship scene), and load the model as a scene, saving the cherub node in the property previously created:
1override func viewDidLoad() {
2 ...
3
4 // Create a new scene
5 let scene = SCNScene()
6
7 // Set the scene to the view
8 sceneView.scene = scene
9
10 let modelScene = SCNScene(named:
11 "art.scnassets/cherub2/cherub2.dae")!
12
13 nodeModel = modelScene.rootNode.childNode(
14 withName: nodeName, recursively: true)
15 }
To find this node, we use the function childNode(withName:, recursively: ), passing its name and telling to search recursively (although it is not necessary in this case).
Now, we need to add a copy of the model when we tap on the screen and remove it when we tap on it. For this, we need to implement the method touchesBegan:
1override func touchesBegan(_ touches: Set<UITouch>, with event: UIEvent?) { 2 3 }
First, we need to get the location of the touch relative to the scene:
1override func touchesBegan(_ touches: Set<UITouch>, with event: UIEvent?) {
2 let location = touches.first!.location(in: sceneView)
3
4 }
Then, we need to test if an object was touched with the following code:
1override func touchesBegan(_ touches: Set<UITouch>, with event: UIEvent?) {
2 ...
3 var hitTestOptions = [SCNHitTestOption: Any]()
4 hitTestOptions[SCNHitTestOption.boundingBoxOnly] = true
5 let hitResults: [SCNHitTestResult] =
6 sceneView.hitTest(location, options: hitTestOptions)
7
8 }
If an object was touched, we can get the node that was actually touched, however, this may not be the root node, the one we need to remove so the entire object is removed from the scene. The function getParent searches recursively for that node (named cherub):
1override func touchesBegan(_ touches: Set<UITouch>, with event: UIEvent?) {
2 ...
3 if let hit = hitResults.first {
4 if let node = getParent(hit.node) {
5 node.removeFromParentNode()
6 return
7 }
8 }
9
10 }
11
12 func getParent(_ nodeFound: SCNNode?) -> SCNNode? {
13 if let node = nodeFound {
14 if node.name == nodeName {
15 return node
16 } else if let parent = node.parent {
17 return getParent(parent)
18 }
19 }
20 return nil
21 }
If this code is not executed, it means that the user didn’t touch a model and maybe he wants to add one. The easiest way to add an object to the scene is to find a feature point, add an anchor to it, and then add the object to the node contained by the anchor.
Here’s the code to find a feature point at the touch location and add an ARAnchor to it:
1override func touchesBegan(_ touches: Set<UITouch>, with event: UIEvent?) {
2 ...
3 let hitResultsFeaturePoints: [ARHitTestResult] =
4 sceneView.hitTest(location, types: .featurePoint)
5 if let hit = hitResultsFeaturePoints.first {
6 sceneView.session.add(anchor: ARAnchor(transform: hit.worldTransform))
7 }
8 }
The property hit.worldTransform is a 4×4 matrix that represents the combined position, rotation or orientation, and scale of an object in three-dimensional space.
As said in the tutorial about SpriteKit, in the 3D programming world, matrices are used to represent graphical transformations like translation, scaling, rotation, and projection. Through matrix multiplication, multiple transformations can be concatenated into a single transformation matrix.
Here’s a sample matrix:
10 1 2 3 // Column number
2 1.0 0.0 0.0 0.053269 // This row represents X
3 0.0 1.0 0.0 -0.00135 // This row represents Y
4 0.0 0.0 1.0 -1.08324 // This row represents Z
5 0.0 0.0 0.0 1.0 // This row represents W
If you’re wondering what is W:
If w == 1, then the vector (x, y, z, 1) is a position in space.
If w == 0, then the vector (x, y, z, 0) is a direction.
http://www.opengl-tutorial.org/beginners-tutorials/tutorial-3-matrices/
Finally, we add the model only if the anchor doesn’t belong to an ARPlaneAnchor, cloning the root node in an asynchronous way, locking its position at (0, 0, 0) relative to its parent, and adding it as a child of the node that was automatically added to the anchor:
1func renderer(_ renderer: SCNSceneRenderer, didAdd node: SCNNode, for anchor: ARAnchor) {
2 if !anchor.isKind(of: ARPlaneAnchor.self) {
3 DispatchQueue.main.async {
4 let modelClone = self.nodeModel.clone()
5 modelClone.position = SCNVector3Zero
6
7 // Add model as a child of the node
8 node.addChildNode(modelClone)
9 }
10 }
11 }
And that’s all we need. When we test the app, we’ll get this:
As you can see, the model is always facing to the same point, no matter the place where we add it. I mean, the position is fine, we only need to rotate the model on the Y-axis (remember that Y is the up axis) so it always faces toward us.
The camera gives us the perspective of the user so we can use its Euler angle (in radian units) on the Y-axis to create a rotation matrix, and combine it with the transformation matrix of the feature point by multiplying both matrices:
1override func touchesBegan(_ touches: Set<UITouch>, with event: UIEvent?) {
2 ...
3 let hitResultsFeaturePoints: [ARHitTestResult] =
4 sceneView.hitTest(location, types: .featurePoint)
5 if let hit = hitResultsFeaturePoints.first {
6 // Get a transformation matrix with the euler angle of the camera
7 let rotate = simd_float4x4(SCNMatrix4MakeRotation(sceneView.session.currentFrame!.camera.eulerAngles.y, 0, 1, 0))
8
9 // Combine both transformation matrices
10 let finalTransform = simd_mul(hit.worldTransform, rotate)
11
12 // Use the resulting matrix to position the anchor
13 sceneView.session.add(anchor: ARAnchor(transform: finalTransform))
14 // sceneView.session.add(anchor: ARAnchor(transform: hit.worldTransform))
15 }
16 }
If you make this change and run the app again, the model will always face towards you:
Conclusion
This tutorial has shown you how to build a simple app with ARKit and SceneKit, however, it has reviewed and explained many concepts that will help you build more complicated apps.
For example, instead of touching, you could use Pusher to control from another device when the models appear and disappear, in realtime.
If you want to see a more complex app, and learn more techniques (for example, how to place objects on a detected plane) download the official demo app Placing Objects in Augmented Reality.
Remember that you can find the project of this tutorial on GitHub.


© 2024 Pusher Ltd. All rights reserved.
Pusher Limited is a company registered in England and Wales (No. 07489873) whose registered office is at MessageBird UK Limited, 3 More London Riverside, 4th Floor, London, United Kingdom, SE1 2AQ.