- Products

- Developers
- User stories
- Blog
- Pricing

Building a 3D Multiplayer Game with Pusher
Learn how to use Pusher for adding realtime functionality into a 3D multiplayer JavaScript game.
Introduction
This is a guest post by Charlie Walter, as part of our ‘Building Realtime Applications’ series of tutorials. We noticed Charlie was creating an awesome multiplayer game using Pusher and couldn’t resist getting him to share what he’s learnt building it. Enjoy!
In his own words…
I am a web app developer specialising in JavaScript/Coffeescript and other front end languages and frameworks. I have a strong passion for Web app and Game Development. I spend a lot of time working on personal projects. Follow me @cjonasw.

In this tutorial I will explain how I created a 3D multiplayer game using Pusher for real time communication. While I was learning how to create this I bumped into some hurdles I needed to learn how to jump over.
I’ve created a demo for you to try out the game for yourself.
Event-driven communication
One of the problems I encountered initially while creating a 2D version of the game (a simple proof of concept consisting of squares moving around a canvas) was that performing Pusher calls in the game loop was massively inefficient for such a simple point and click game, causing player movement to become laggy.
What’s the game loop?
In a nutshell, this is the function that updates game logic, such as player movement and collision, it then clears and redraws the game to reflect those changes.
Instead, I chose to make the game more event driven (how real time web apps should be) by making calls only when needed. This way, instead of constant laggy player updates, the player movement appears smooth and any lag that may occur will only happen when the events are received. Once a player clicks on the screen, all the other players are then informed of that particular player’s current state, where it is now going and how it will get there, therefore no more information is needed; leaving each player’s client to take care of any visual movement.
ID named events
Another issue I had was targeting specific clients connected to the game. One way would be setting up private channels per member, however I didn’t feel this was necessary as I only needed one event to happen at this time.
I figured out that ID named events was a way around it which then allowed me to give new members the information of each player existing in the game without disturbing anyone else already in the game.
Presence Channel types
I began creating the game using only a public channel, however this didn’t offer me the ability to access information about other members of the channel. Presence Channels offer exactly this; as soon as a member connects, they have access to an array of already connected members, it even has events for when members are added and removed.
Getting started with Pusher
- Create an account
- Create a new app with client events enabled to allow our client connections to communicate with each other
- Copy the contents of the front end code that you are presented with and change the
test-channelto something likemy-game-channel, save it asindex.htmland open this up in a tab; it should be blank but in the console it should have something like this:
1Pusher: State changed : connecting -> connected
- Drag this tab out into another window so you can see it, go back to the Debug console tab on the Pusher website and submit the form like so:
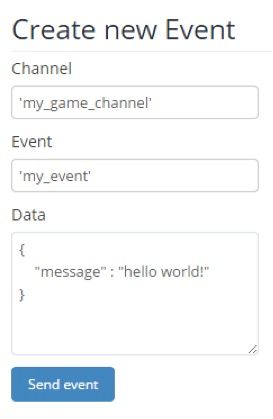
- Your newly created html file should now have an alert matching the
messageproperty in the Data you just sent (this form sends a server side event to the channel) - Congrats! Your first Pusher application
Getting the simple 3D game in place
So for the game we will be using Three.js from @mrdoob (Ricardo Cabello). I recommend following this simple introduction from Ricardo himself.
We need to create our scene, so at the bottom of our document inside <script> tags, set up our Three.js scene, camera and renderer. A <body> tag also needs to be in the document before this script runs, so an empty body tag between the head and the new script like so:
1<body></body> 2 3<script src="//threejs.org/build/three.min.js"></script> 4 5<script> 6 var scene = new THREE.Scene(); 7 var camera = new THREE.PerspectiveCamera( 75, window.innerWidth / window.innerHeight, 0.1, 1000 ); 8 var renderer = new THREE.WebGLRenderer(); 9 renderer.setSize( window.innerWidth, window.innerHeight ); 10 11 document.body.appendChild( renderer.domElement ); 12 13 function render() { 14 requestAnimationFrame(render); 15 renderer.render(scene, camera); 16 } 17 18 render(); 19</script>
Go refresh that! It should just be a black box!
We have some margin problems around it, we can fix that by putting somewhere in the <head>:
1<style> 2body{ 3 margin: 0; 4} 5</style>
So now lets give some life to it, just before we declare the render function add this:
1camera.position.z = 5; 2camera.position.y = 1.5;
This moves the camera back on the z axis by 5 and up on the y axis by 1.5, otherwise we won’t see any objects that are at 0,0,0 as the camera will be inside of it.
1var plane = new THREE.Mesh( 2 new THREE.PlaneBufferGeometry(20, 20), 3 new THREE.MeshLambertMaterial({color: 'seagreen'}) 4); 5 6plane.rotation.x = -1.57079633; // Radians 7 8scene.add(plane);
It then creates a mesh with plane geometry (flat) with a LambertMaterial (A non-shiny/matte material) coloured green, this will be our floor, as planes are defaulted to vertically rotated, we need to rotate it on its x axis by 90 degrees (1.57 radians).
1var ambient = new THREE.AmbientLight(0x000044); 2scene.add(ambient); 3 4var directional = new THREE.DirectionalLight(0xffffff); 5directional.position.set(1, 1, 1).normalize(); 6 7scene.add(directional);
Finally, we need some light so that we can see our meshes.
Go refresh that.

Play around with the colour and the numbers to really understand which parameter does what, try changing the colour to another html colour or hex colour (0xff0000) or the plane rotation or scale.
Now change it all back! :)
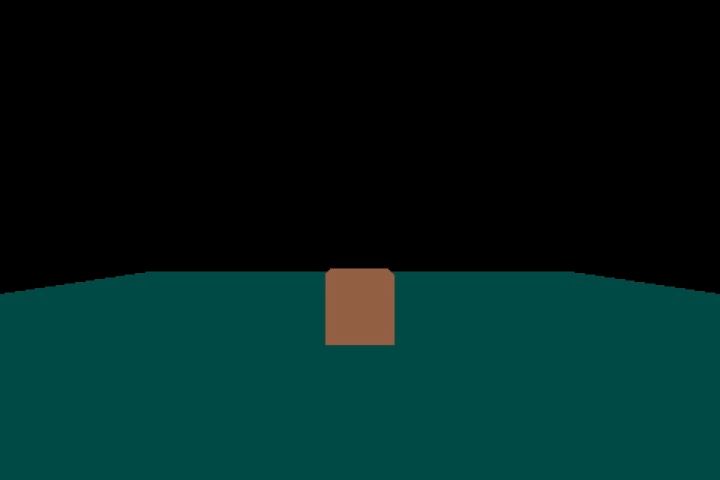
We now need to add our box that we will be using as our player.
1var cube = new THREE.Mesh( 2 new THREE.BoxGeometry(1,1,1), 3 new THREE.MeshLambertMaterial({color: 'orange'}) 4); 5 6cube.position.y = 0.5; 7scene.add(cube);
This creates a cube mesh and assigns it to a variable called cube. It then moves cube up by half of its scale. This is because the mesh’s axis is the geometric centre.
We now have a floor and a player to play with.
Try adding cube.rotation.y += 0.01; to the game loop (render function), it should animate the cube.
Player input
A point and click game is what we are intending to create, so we need a way of getting the coordinates of the cursor on the plane. The way we will do this is by using raycasters.
Raycasting?
Raycasting is a technique of firing a “ray” in a particular direction and retrieving information about the object it intersects with. Raycasting was invented by John Carmack for the game Wolfenstein 3D in 1992.
1var raycaster = new THREE.Raycaster(); 2var mouse = new THREE.Vector2(); 3 4document.onclick=function(event){ 5 6 mouse.x = ( event.clientX / window.innerWidth ) * 2 - 1; 7 mouse.y = - ( event.clientY / window.innerHeight ) * 2 + 1; 8 9 raycaster.setFromCamera( mouse, camera ) 10 11 var intersects = raycaster.intersectObject(plane); 12 13 if (intersects.length > 0) { 14 var intersection = intersects[0].point; 15 16 cube.position.x = intersection.x; 17 cube.position.z = intersection.z; 18 } 19};
This moves the cube to where the player clicks, using the camera’s position and the mouse position to determine the position and direction of the raycaster.
It first creates a new Three.js Raycaster object and a Vector2 which will contain the mouse x and y. This is done before the click event as they only need to be created once.
It then attaches a click event to the document, receiving the event object so the mouse position is accessible and with this data we can calculate mouse position in normalised device coordinates, with x and y ranging between -1 and 1.
e.g. Top left = (-1,-1), bottom right will be (1,1) and the centre will be (0,0)
This is then used, with the camera, to set the raycaster.
The new raycaster’s intersectObject is then called which returns an array of all the intersections that occur with the plane. Each intersection is a vector containing x, y and z properties.
If there is an intersection in the array, it then repositions the cube to where the collision occurred.
Refresh that and you should see the cube instantly moving to where you click.
Multiplayer with Pusher
Now that we have a very simple 3D game in place, it’s time for the multiplayer aspect, i.e. getting another browser tab to act as an additional player.
Before, we were using a public channel type, but for this we will be using a presence channel. See Pusher’s page on different channel types for more info on the different channel types.
Presence channels should have a “presence-” prefix. They let you register user information on subscription, and let other members of the channel know who’s online.
This is what we need! So, with these types of channels, there is a level of authentication needed; I will be using PHP to perform this. By default, Pusher looks in the /pusher/auth directory but I am going to set it to the same directory. Put this line at the top of the first <script> tag:
1Pusher.channel_auth_endpoint = "pusher_auth.php";
Now go create that file in the same directory as your html file and use this code, replacing the app key, secret and ID with yours.
1<?php 2 3include_once 'Pusher.php'; 4 5$pusher = new Pusher( 6 'xxxxxxxxxxxxxx', // APP KEY 7 'yyyyyyyyyyyyyy', // APP SECRET 8 'zzzzzzzzzzzzzz' // APP ID 9); 10 11$id = time(); 12 13$presence_data = array( 14 'id' => $id 15); 16 17echo $pusher->presence_auth( 18 $_POST['channel_name'], 19 $_POST['socket_id'], 20 $id, 21 $presence_data 22); 23 24exit(); 25 26?>
You will also need to download the Pusher.php from this PHP library.
In a real life situation, instead of having the ID as a timestamp (which would cause conflict when the game gets more traffic), you would do a database lookup to verify that the user has access etc.
Now the final thing to do is to actually turn your Pusher channel into a presence channel, to do this, you must subscribe to a channel with a name prefixed with presence-:
1var channel = pusher.subscribe('presence-my_game_channel');
You should now be seeing a successful connection in the console. To verify this, go add an event listener which will log the members in the channel when the pusher subscription is successful, after all, this is what presence channels allow you to have access to.
1channel.bind('pusher:subscription_succeeded', function(members) { 2 console.log(members); 3});
Now refresh and look in the console, you should now have access to a member count and an ID for each. Open another tab, and then read the console of that tab; it should have a member count of 2. If this is not working and you are seeing a 404 error, make sure the pusher_auth.php is accessible and the directory reference is assigned to Pusher.channel_auth_endpoint is valid.
Seeing player two
So, with presence channels we have access to the extra events pusher:member_added and pusher:member_removed. With these events we can add and remove players accordingly. In order to access all of the players’ associated 3D objects, we need to be able to use what these Pusher events provide us with; which is their ID.
Associative Arrays would be the best option for this.
These are the 4 things we need to do:
- When a member subscribes to the channel, create a cube for everyone who is already in the channel
- When a member is added, create a cube for that new member of the channel
- When a member is removed, remove their specific cube
- Sync the player positions
a) When a member is added, notify the new member of the me position
b) When a member moves, tell everyone in the channel that this has happened and update the game accordingly
When a member subscribes to the channel, create a cube for everyone who is already in the channel
1var players = []; 2 3channel.bind('pusher:subscription_succeeded', function(members) { 4 members.each(function(member){ 5 players[member.id] = new THREE.Mesh( 6 new THREE.BoxGeometry(1,1,1), 7 new THREE.MeshLambertMaterial({color: 'orange'}) 8 ); 9 10 players[member.id].position.y = 0.5; 11 12 scene.add(players[member.id]); 13 }); 14});
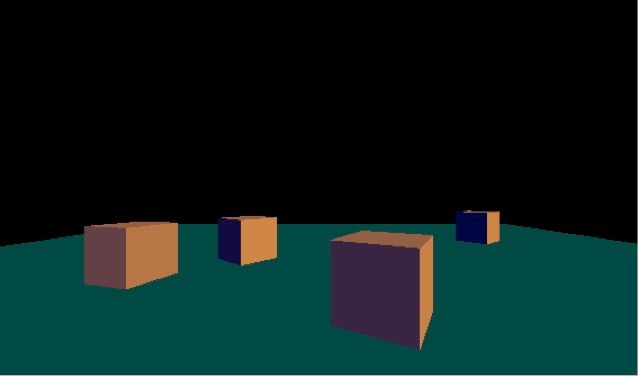
Now it will create a new cube for each member including me. You can see this by opening up only one tab and moving your cube; there should still be one at the starting position.
This can now be deleted, it is not needed anymore:
1var cube = new THREE.Mesh( 2 new THREE.BoxGeometry(1,1,1), 3 new THREE.MeshLambertMaterial({color: 'orange'}) 4); 5 6cube.position.y = 0.5; 7 8scene.add(cube);
However, now we need to change every reference of cube to the user’s player in the players array which is players[me.id]. Put this line just under where you declare the empty player array:
1var me = null;
And assign members.me to it in pusher:subscription_succeeded:
1me = members.me;
Now that we can access the me.id outside of the pusher:subscription_succeeded event listener, we can change every reference of cube to players[me.id], if you haven’t already, delete this line:
1cube.rotation.y += 0.01;
When a member is added, create a cube for that new member of the channel
1channel.bind('pusher:member_added', function(member) { 2 players[member.id] = new THREE.Mesh( 3 new THREE.BoxGeometry(1,1,1), 4 new THREE.MeshLambertMaterial({color: 'orange'}) 5 ); 6 7 players[member.id].position.y = 0.5; 8 9 scene.add(players[member.id]); 10});
This creates an array item using the member ID as the associative name, assigning a new Three.js cube mesh (same as the cube we created earlier on) when a new member is added.
Refresh that, you will now have a cube appear in the middle, you may want to move your player to see the new player entering.
When a member is removed, remove their specific cube
1channel.bind('pusher:member_removed', function(member) { 2 scene.remove(players[member.id]); 3 delete players[member.id]; 4});
This removes the player’s cube mesh from the scene and then deletes the correlating array item in players. Now you will see that the player is now removed when a tab is closed.
Sync the player positions
There are two parts to this step, you will see why.
a) When a member is added, notify the new member of the me position
When the player joins the already populated channel, each member already in the channel then sends their position specifically to the new player and there are many ways we could do this, for example:
- Using private channels per members
- Telling everyone in the channel where you are
- Giving each member their own event, using each member ID to make the event name unique
I choose 3! In the pusher:subscription_succeeded event binding add this:
1channel.bind('client-' + members.me.id + '_update_player', function(player){ 2 players[player.id].position.set( 3 player.position.x, 4 player.position.y, 5 player.position.z 6 ); 7});
This adds an event listener, which is named something like client-123456789_update_player, this expects an object which contains the player’s ID and the player’s position. Using this, it then targets the relative player mesh in the players array and sets its position to the new position. Each member now has their own specific event binding.
Add this in the pusher:member_added function:
1channel.trigger('client-' + member.id + '_update_player', { id : me.id, position : players[me.id].position });
This then, using the new member’s id, triggers their specific event and sends, using the me object, the existing player’s id and position.
Now open up a new set of tabs, moving the first tab’s cube somewhere else before opening up tab 2. Tab 2 should now know where tab 1 is.
b) When a member moves, tell everyone in the channel that this has happened and update the game accordingly
Now we need to tell everyone in the room when me changes position. We can use something very similar. Add this under the pusher:member_removed event binding:
1channel.bind('client-update_player', function(player){ 2 players[player.id].position.set( 3 player.position.x, 4 player.position.y, 5 player.position.z 6 ); 7});
This creates an event binding that is not specific to this player so that when this event is triggered, all members will listen for it, it does the same thing as the specific event listener. Feel free to tidy this up by putting the duplicate code into a function.
Now we want to trigger this event when the player moves. Add this after the section where we set the new position for the me player:
1channel.trigger('client-update_player', { id : me.id, position : players[me.id].position });
Open up a new set of tabs; all player positions should now be synced up.

Smooth movement
Before we start, we need to allow for other properties to be passed around in the player object with the cube mesh being a property on its own, this will not take long. Replace:
1players[member.id] = new THREE.Mesh( 2 new THREE.BoxGeometry(1,1,1), 3 new THREE.MeshLambertMaterial({color: 'orange'}) 4);
With:
1players[member.id] = { 2 mesh : new THREE.Mesh( 3 new THREE.BoxGeometry(1,1,1), 4 new THREE.MeshLambertMaterial({color: 'orange'}) 5 ) 6};
Bear in mind, it is inside both pusher:subscription_succeeded and pusher:member_added, feel free to clean is up by moving the duplicate code into a function that returns the new THREE mesh.
Now, go and amend all references to players array items to be referencing its mesh property, except for the code we’ve just added and delete players[member.id];. Doing a search for “players[” and manually appending .mesh onto the end of the reference (rather than using ‘Replace all’) will save you a few problems.
Why?
The reason we need to do this is because we are going to have to store variables about the player’s movement, such as direction and distance. If we were to turn this into a larger game, the player object could also contain other public player information, like the player’s health, level or currently equipped items.
Go and test that the game is still working as before.
Rotating the cube
When the player clicks, calculate using trigonometry, the angle difference to be applied to the cube’s mesh in order for it to be facing the destination. Then, using this angle, gradually rotate it until it has applied the amount of rotation needed. If the calculated angle is more than 180 degrees or less than -180 degrees, rotate in the opposite direction instead. The direction of the rotation is then stored.
We then need to have a variable to log whether the cube is facing the destination, this will be used to detect when the cube is ready to move forward to the destination.
Remove the position setting:
1players[me.id].position.x = intersection.x; 2players[me.id].position.z = intersection.z;
Replace with:
1var opp = players[me.id].mesh.position.z - intersection.z, 2adj = intersection.x - players[me.id].mesh.position.x, 3hyp = Math.sqrt((opp*opp) + (adj*adj)); 4 5players[me.id].angle_diff = ( ( Math.asin(opp/hyp) - 1.57079633 ) * ( adj <= 0 ? -1 : 1) ) - players[me.id].mesh.rotation.y; 6 7if (Math.abs(players[me.id].angle_diff) / 6.28318531 > 1){ 8 players[me.id].angle_diff -= Math.floor(players[me.id].angle_diff / 6.28318531) * 6.28318531; 9} 10 11if (Math.abs(players[me.id].angle_diff) > 3.14159265){ 12 players[me.id].angle_diff += 6.28318531 * (players[me.id].angle_diff > 0 ? -1 : 1 ); 13} 14 15players[me.id].direction = players[me.id].angle_diff > 0 ? 1 : -1; 16 17players[me.id].facing_destination = false;
This uses the intersection position and the player’s cube mesh position to calculate the opposite, adjacent and hypotenuse. Using these, it then calculates the angle in radians and then subtracts the current mesh rotation value from it, this is to calculate the angle difference.
Three.js allows you to apply angles that are over 360 degrees and due to us rotating the mesh depending on difference, it is possible that the cube’s rotation value could be greater than 360, this would affect our calculated angle difference resulting in the cube rotating multiple times until it stops. We can fix this by checking if the value (disregarding whether it’s negative) is greater than 360, then seeing how many whole divisions of 360 there are in it and subtracting the sum of them, resulting in a sensible value smaller than 360.
It then checks whether the value (disregarding whether it’s negative) is greater than 180 degrees (3.14159265 in radians). It then adds or subtracts 360 degrees (6.28318531 radians) depending on whether the angle is positive or negative, the result of this (disregarding whether it’s negative) will be smaller than the original value and will also be the opposite (in terms of negative and positive) to its original value, making the player rotate the shorter way round.
The direction of the turn is then stored as 1 or -1 and this depends on the angle difference being positive or negative.
Now put this in the game loop render function:
1for(var player_id in players){ 2 if(players[player_id].angle_diff){ 3 players[player_id].mesh.rotation.y += players[player_id].direction * 0.05; 4 5 players[player_id].angle_diff += players[player_id].direction * -0.05; 6 7 if( players[player_id].direction == 1 && 8 players[player_id].angle_diff < 0 || 9 players[player_id].direction == -1 && 10 players[player_id].angle_diff > 0 ){ 11 players[player_id].facing_destination = true; 12 players[player_id].mesh.rotation.y += players[player_id].angle_diff; 13 players[player_id].angle_diff = undefined; 14 } 15 } 16}
This goes through each player in the players collection. If the player’s .angle_diff is set, it applies 0.05 or -0.05 to the player’s mesh rotation. This is then deducted from the .angle_diff. It then checks whether the .angle_diff has fallen below 0 (if the direction of the turn is positive) or gone above 0 (if the direction of the turn is negative). If so, make the .facing_destination true, rotate the mesh in the opposite direction to the amount it has gone over by, as the cube would have turned too much. Then make the .angle_diff undefined to stop it from going back into this logic on the next game loop.
Go refresh that!
Now when you click, you should be seeing the cube rotating to face the point where you’ve clicked, but it doesn’t move just yet. Let’s fix that by adding this in the click event:
1players[me.id].distance = hyp;
Then add this inside the player for loop which is in the game loop render function:
1if(players[player_id].facing_destination && 2 players[player_id].distance > 0){ 3 players[player_id].mesh.translateZ(-0.1); 4 players[player_id].distance-=0.1; 5}
This makes the player move once facing its destination, translating the player cube by -0.1 and deducting this from the player’s .distance.
Go refresh! See what it does.
Now, all we need to do to make this work with other players, is send around the new movement variables. Replace the object we send in the two trigger calls, client-update_player and client-xxxxxx_update_player, with this:
1{ 2 id : me.id, 3 position : players[me.id].mesh.position, 4 rotation : players[me.id].mesh.rotation.y, 5 angle_diff : players[me.id].angle_diff, 6 direction : players[me.id].direction, 7 distance : players[me.id].distance, 8 facing_destination : players[me.id].facing_destination 9}
In the two event bindings, client-update_player and client-xxxxxx_update_player, add this:
1players[player.id].mesh.position.set( 2 player.position.x, 3 player.position.y, 4 player.position.z 5); 6 7players[player.id].mesh.rotation.y = player.rotation; 8 9players[player.id].angle_diff = player.angle_diff; 10players[player.id].direction = player.direction; 11players[player.id].distance = player.distance; 12 13players[player.id].facing_destination = player.facing_destination;
Go open two tabs next to each other and they should be doing the same thing.
Summary
In this tutorial, we covered how to build a simple 3D multiplayer game, using Three.js to create and display the 3D graphics and Pusher to create the multiplayer aspect.
I’d love to hear about what you have created out of it.
For more about building realtime applications, check out our


© 2024 Pusher Ltd. All rights reserved.
Pusher Limited is a company registered in England and Wales (No. 07489873) whose registered office is at MessageBird UK Limited, 3 More London Riverside, 4th Floor, London, United Kingdom, SE1 2AQ.