- Products

- Developers
- User stories
- Blog
- Pricing

How to build a photo feed using Django
In this tutorial, learn how you can build a basic Instagram photo feed that updates in realtime using Pusher, Django and jQuery.
Introduction
Today, we will make a real-time message delivery status framework utilizing Django and Pusher. This is like a mini Instagram, but without the comments and filter functionality. A basic understanding of Django and jQuery is needed to follow this tutorial.
Setting up Django
First, we need to install the Django library if we don’t already have it.
To install Django, we run:
1pip install django
After installing Django, it’s time to create our project.
Open up a terminal and create a new project using the following command:
1django-admin startproject photofeed
In the above command, we created a new project called photofeed. The next step will be to create an app inside our new project. To do that, let’s run the following commands:
1//change directory into the pusher_message directory 2 cd photofeed 3 //create a new app where all our logic would live 4 django-admin startapp feed
Once we’re done setting up the new app, Django needs to know about our new application.
To do this, we will go into our feed\settings.py and add the message app to our installed apps as seen below:
1INSTALLED_APPS = [ 2 'django.contrib.admin', 3 'django.contrib.auth', 4 'django.contrib.contenttypes', 5 'django.contrib.sessions', 6 'django.contrib.messages', 7 'django.contrib.staticfiles', 8 'feed' 9 ]
After doing the above, it’s time to run the application and see if all went well.
In our terminal shell, we run:
1python manage.py runserver
If we navigate our browser to http://localhost:8000, we should see the following:

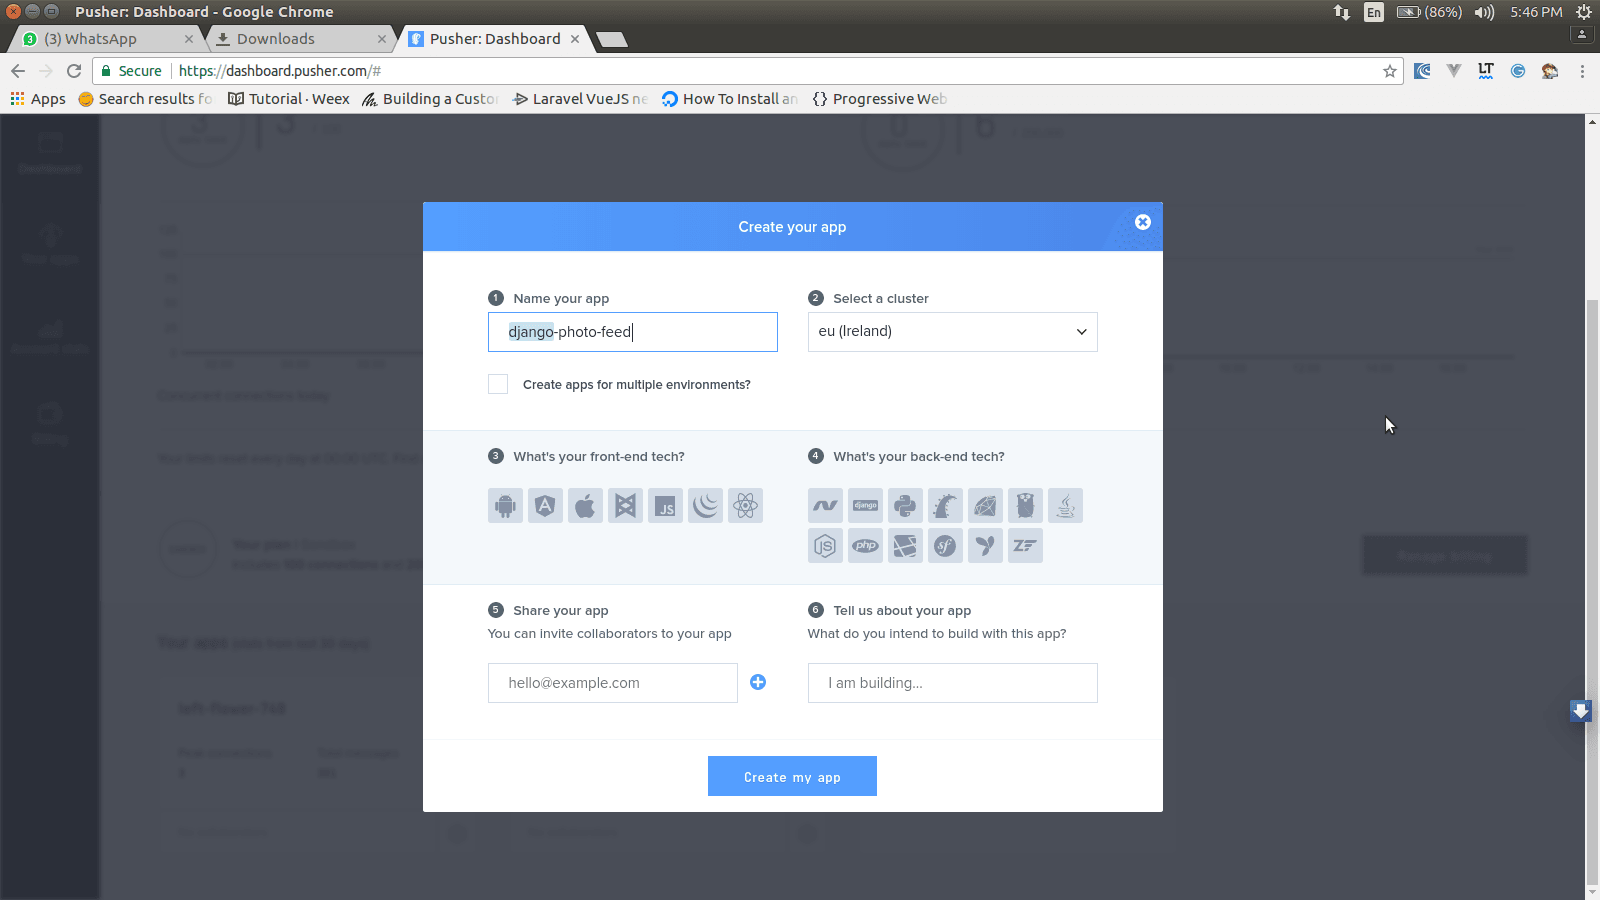
Set up an App on Pusher
At this point, Django is ready and set up. We need to set up Pusher next, as well as grab our app credentials.
If you haven’t already, sign up to a free Pusher account and create a new app, then copy your secret, application key and application id.
The next step is to install the required libraries:
1pip install pusher
In the above bash command, we installed one package, Pusher.
– Pusher: This is the official Pusher library for Python. We will be using this library to trigger and send our messages to the Pusher HTTP API
Creating Our Application
First, let us create a model class, which will generate our database structure.
Let’s open up feed\models.py and replace with the following:
1from django.db import models 2 3 # Create your models here. 4 class Feed(models.Model): 5 description = models.CharField(max_length=255, blank=True) 6 document = models.FileField(upload_to='static/documents/')
In the above block of code, we defined a model called Feed. The Feed table will consist of the following fields:
- A field to store the description of the photo
- A field to store the photo
In the above code, while declaring our document field, we have included an upload_to attribute, which we set to static/documents. Please note that this path is relative to the path of the DJANGO MEDIA ROOT, which we will set now.
While in this article, we will be setting the MEDIA_ROOT to the static folder in our feed app, so it can get served as a static file. To do that, let us move to our photofeed/settings.py and add the code below to our file, immediately after the STATIC_URL declaration.
1MEDIA_ROOT = os.path.join(BASE_DIR, 'feed/')
Running Migrations
We need to make migrations and run them, so our database table can get created. To do that, let us run the following in our terminal:
1python manage.py makemigrations 2 3 python manage.py migrate
Creating Our Views
Our views refer to the file/files that hold up the logic behind the application, often referred to as the Controller.
Let us open up our views.py in our feed folder and replace with the following:
1from django.shortcuts import render, HttpResponse 2 from django.http import JsonResponse 3 from .forms import * 4 from pusher import Pusher 5 import json 6 7 #instantiate pusher 8 pusher = Pusher(app_id=u'XXX_APP_ID', key=u'XXX_APP_KEY', secret=u'XXX_APP_SECRET', cluster=u'XXX_APP_CLUSTER') 9 # Create your views here. 10 # function that serves the welcome page 11 def index(request): 12 # get all current photos ordered by the latest 13 all_documents = Feed.objects.all().order_by('-id') 14 # return the index.html template, passing in all the feeds 15 return render(request, 'index.html', {'all_documents': all_documents}) 16 17 #function that authenticates the private channel 18 def pusher_authentication(request): 19 channel = request.GET.get('channel_name', None) 20 socket_id = request.GET.get('socket_id', None) 21 auth = pusher.authenticate( 22 channel = channel, 23 socket_id = socket_id 24 ) 25 26 return JsonResponse(json.dumps(auth), safe=False) 27 #function that triggers the pusher request 28 def push_feed(request): 29 # check if the method is post 30 if request.method == 'POST': 31 # try form validation 32 form = DocumentForm(request.POST, request.FILES) 33 if form.is_valid(): 34 f = form.save() 35 # trigger a pusher request after saving the new feed element 36 pusher.trigger(u'a_channel', u'an_event', {u'description': f.description, u'document': f.document.url}) 37 return HttpResponse('ok') 38 else: 39 # return a form not valid error 40 return HttpResponse('form not valid') 41 else: 42 # return error, type isnt post 43 return HttpResponse('error, please try again')
In the code above, we have defined two main functions which are:
- index
- pusher_authentication_
- push_feed
In the index function, we fetch all the available photos in the database. The photos are then rendered in the view. This enables a new user to see all previous feeds that are available.
In the pusher_authentication function, we verify that the current user can access our private channel.
In the push_feed function, we check if it is a POST request, then we try validating our form before saving it into the database. (The form used in this method named DocumentForm is not available yet. We will be creating it soon.) After the form validation, we then place our call to the Pusher library for real-time interaction.
Creating The Form Class
A Django Form handles taking user input, validating it, and turning it into Python objects. They also have some handy rendering methods.
Let us create a file called forms.py in our feed folder and add the following content to it:
1from django import forms 2 from .models import Feed 3 4 class DocumentForm(forms.ModelForm): 5 class Meta: 6 model = Feed 7 fields = ('description', 'document', )
In the above code block, we have imported our Feed model and used it to create a form. This form will now handle the validation and upload of images to the right folder.
Populating The URL’s.py
Let us open up our photofeed\urls.py file and replace with the following:
1"""photofeed URL Configuration 2 3 The `urlpatterns` list routes URLs to views. For more information please see: 4 https://docs.djangoproject.com/en/1.11/topics/http/urls/ 5 Examples: 6 Function views 7 1. Add an import: from my_app import views 8 2. Add a URL to urlpatterns: url(r'^$', views.home, name='home') 9 Class-based views 10 1. Add an import: from other_app.views import Home 11 2. Add a URL to urlpatterns: url(r'^$', Home.as_view(), name='home') 12 Including another URLconf 13 1. Import the include() function: from django.conf.urls import url, include 14 2. Add a URL to urlpatterns: url(r'^blog/', include('blog.urls')) 15 """ 16 from django.conf.urls import url 17 from django.contrib import admin 18 from feed.views import * 19 20 urlpatterns = [ 21 url(r'^$', index), 22 url(r'^push_feed$', push_feed), 23 url(r'^pusher_authentication', pusher_authentication), 24 url(r'^admin/', admin.site.urls), 25 ]
What has changed in this file? We have added 2 new routes to the file.
We have defined the entry point, and have assigned it to our index function. We also defined the push_feed URL and assigned it to our push_feed function. This will be responsible for pushing updates to Pusher in real-time. Finally, the pusher_authentication endpoint, which handles the authentication of our private channel.
Creating the HTML Files
Now we need to create the index.html file which we have referenced as the template for our index function.
- index.html
Let us create a new folder in our feed folder called templates.
Next, we create a file called index.html in our templates folder and replace it with the code below:
1<html> 2 <head> 3 <title>Django Photo feed</title> 4 <link href="https://maxcdn.bootstrapcdn.com/bootstrap/3.3.7/css/bootstrap.min.css" rel="stylesheet" integrity="sha384-BVYiiSIFeK1dGmJRAkycuHAHRg32OmUcww7on3RYdg4Va+PmSTsz/K68vbdEjh4u" crossorigin="anonymous"> 5 <script src="https://cdnjs.cloudflare.com/ajax/libs/jquery/3.2.1/jquery.js"></script> 6 <script src="//js.pusher.com/4.0/pusher.min.js"></script> 7 </head> 8 <body> 9 10 <div class="container"> 11 <form method="post" enctype="multipart/form-data" action="/push_feed" onsubmit="return feed_it()"> 12 <input type="hidden" id="csrf" name="csrf" value="{{ csrf_token }}"/> 13 <div class="form-group"> 14 <label for="usr">Image:</label> 15 <input type="file" id="document" name="document" class="form-control" required> 16 </div> 17 <div class="form-group"> 18 <label for="pwd">comment:</label> 19 <input type="text" id="description" name="description" class="form-control" required> 20 </div> 21 <div class="form-group"> 22 <button type="submit" class="btn btn-success">Feed it</button> 23 </div> 24 </form> 25 <div class="row" id="feeds"> 26 {% for doc in all_documents %} 27 <span> 28 <h2>{{doc.description}}</h2> 29 <img src="{{doc.document}}"> 30 </span> 31 {% endfor %} 32 </div> 33 </div> 34 </body> 35 </html>
In this HTML snippet, note that we have included some required libraries such as:
- Bootstrap CSS
- jQuery JavaScript library
- Pusher JavaScript library
Pusher Bindings And jQuery Snippet
That’s it! Now, once a photo gets uploaded, it also gets broadcast and we can listen using our channel to update the feed in real-time.
Below is our example jQuery snippet used to handle the file upload as well as Pusher’s real-time updates.
1<script> 2 var files; 3 4 // Add events 5 $(document).ready(function() { 6 $('input[type=file]').on('change', prepareUpload); 7 }) 8 9 10 // Grab the files and set them to our variable 11 function prepareUpload(event) { 12 files = event.target.files; 13 } 14 15 function feed_it() { 16 var data = new FormData(); 17 $.each(files, function(key, value) { 18 data.append('document', value); 19 }); 20 data.append('description', document.getElementById('description').value); 21 22 data.append('csrfmiddlewaretoken', document.getElementById('csrf').value); 23 $.post({ 24 url: '/push_feed', 25 data: data, 26 processData: false, // Don't process the files 27 contentType: false, // Set content type to false as jQuery will tell the server it's a query string request 28 success: function(data) { 29 if (data == "ok") { 30 alert('done'); 31 document.getElementById('description').value = ''; 32 } 33 }, 34 error: function(error) { 35 alert('an error occured, please try again later') 36 } 37 }); 38 return false; 39 } 40 var pusher = new Pusher('XXX_APP_KEY', { 41 encrypted: true, 42 cluster: 'XXX_APP_CLUSTER', 43 authTransport: 'jsonp', 44 authEndpoint: '/pusher_authentication' 45 }); 46 var my_channel = pusher.subscribe('private-a_channel'); 47 my_channel.bind("an_event", function(doc) { 48 alert("message"); 49 var new_message = `<span> 50 <h2>` + doc.description + `</h2> 51 <img src="` + doc.document + `"> 52 </span>`; 53 $('#feeds').prepend(new_message); 54 }); 55 </script>
Below is an image of what we have built:
Conclusion
In this article, we have covered how to create a real-time photo feed using Django and Pusher as well as passing CSRF tokens in AJAX request using Django.
The code base to this tutorial is available in a public Github repository. You can download it for educational purposes.
Have a better way we could have built our application, reservations or comments, let us know in the comments. Remember sharing is learning.


© 2024 Pusher Ltd. All rights reserved.
Pusher Limited is a company registered in England and Wales (No. 07489873) whose registered office is at MessageBird UK Limited, 3 More London Riverside, 4th Floor, London, United Kingdom, SE1 2AQ.