- Products

- Developers
- User stories
- Blog
- Pricing

Add a realtime chat to your Gatsby blog using Pusher
In this tutorial, we’re going to take a look at how we can add a realtime chat feature to a Gatsby blog using Pusher, assuming you are familiar with React.
Introduction
Gatsby is a static-site generator which uses modern web technologies such as React and Webpack. It can generate blazing-fast static sites from Markdown, JSON, APIs, and CMSs like WordPress and Drupal.
In this tutorial, we’re going to take a look at how we can add a realtime chat feature to a Gatsby blog using Pusher. This tutorial assumes that you’re new to Gatsby but have a little bit of knowledge on React.
What You’ll Create
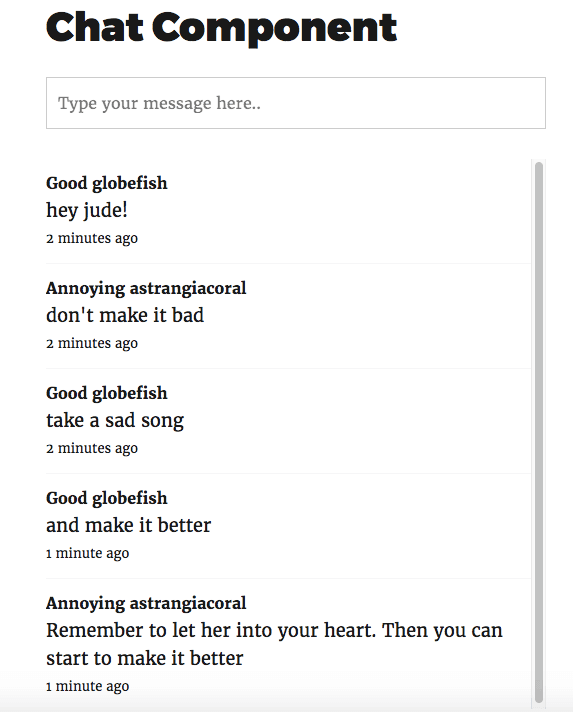
You’ll be creating a realtime chat component using React and Pusher. This allows visitors of your blog to chat with each other. Each blog post will serve as a unique chat room. This means that messages sent from “blog post A” will only be viewable from that page. Here’s what the final output will look like:
You can find the source code for this tutorial on this Github repo.
Install Gatsby
The first thing that you need to do is to install the Gatsby command line tool:
1npm install -g gatsby-cli
This allows you to create a Gatsby site from the command line.
The gatsby-cli comes with a default template for starting out a Gatsby site, but we’re going to use the Gatsby starter blog instead. This is because the default template doesn’t really come with the plugins that will allow us to build a blog from markdown files. We’re using Markdown since it is the most common format for building static sites.
Here’s how you can tell Gatsby to use the “Gatsby starter blog” as the template:
1gatsby new gatsby-blog https://github.com/gatsbyjs/gatsby-starter-blog
Once that’s done, you can now start developing using the develop command:
1gatsby develop
This spins up a local server which you can access at http://localhost:8000 from your browser. This automatically reloads as you make changes to the files in the src directory or the config file (gatsby-config.js).
Create a Pusher App
In order to use Pusher, you first need to create a new Pusher app. Select React as the front-end tech and Node.js as the back-end tech.
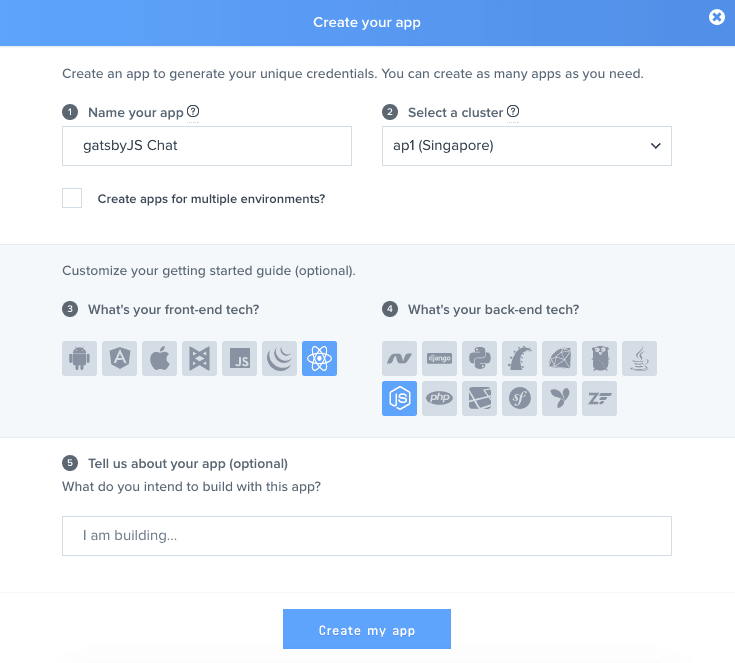
If you don’t have a Pusher account yet, you can sign up here. Pusher’s sandbox plan is free and is very generous when it comes to the number of messages you can send.
Once created, go to the app settings page and enable client events:
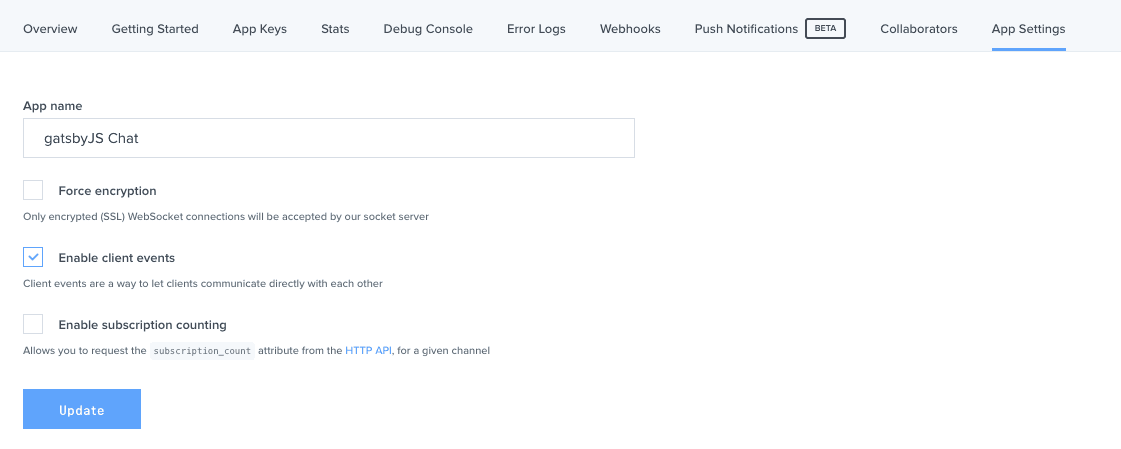
This allows us to directly send messages from the client-side without server intervention, though Pusher requires an authentication server before client events can be sent. This is a security feature in order to ensure that the users who are sending messages are really genuine users of the app. In the next section, you’ll learn how to create the server.
Create the Auth Server
To create an auth server, start by creating a new folder outside of your Gatsby blog. Once created, navigate inside that directory and install the following packages:
1npm install express body-parser pusher
Next, create a server.js file and import the packages you just installed:
1var express = require('express'); 2 var bodyParser = require('body-parser'); 3 var Pusher = require('pusher'); 4 5 var app = express(); 6 app.use(bodyParser.json()); 7 app.use(bodyParser.urlencoded({ extended: false }));
Since the blog will be on a different domain from the auth server, we need to enable CORS so that it can accept connection from any domain:
1// enable cross-origin resource sharing 2 app.use(function(req, res, next) { 3 res.header("Access-Control-Allow-Origin", "*"); 4 res.header("Access-Control-Allow-Headers", "Origin, X-Requested-With, Content-Type, Accept"); 5 next(); 6 });
Next, add the code for connecting to Pusher. I’ll explain later how the values for the configuration options are supplied. For now, just know that they’re being loaded as environment variables:
1var pusher = new Pusher({ // connect to pusher 2 appId: process.env.APP_ID, 3 key: process.env.APP_KEY, 4 secret: process.env.APP_SECRET, 5 cluster: process.env.APP_CLUSTER, 6 });
Next, add a route for checking if the server is running:
1app.get('/', function(req, res){ // to test if the server is running 2 res.send('all green'); 3 });
Lastly, add the routes for authenticating users. Later on, the Chat component will hit this route every time a visitor views a blog post:
1// to authenticate users 2 app.post('/pusher/auth', function(req, res) { 3 var socketId = req.body.socket_id; 4 var channel = req.body.channel_name; 5 var auth = pusher.authenticate(socketId, channel); 6 res.send(auth); 7 }); 8 9 var port = process.env.PORT || 5000; 10 app.listen(port);
As you have seen, there’s really no authentication going on. This exposes your Pusher app to potential misuse because anyone can just use your Pusher App ID and it won’t be verified that the request came from your blog. Here’s some code that will allow you to verify where the request originated from. Add this to your Pusher auth handler, right before the pusher.authenticate call to check if the request is valid or not.
1var origin = req.get('origin'); 2 if(origin == 'YOUR BLOG DOMAIN NAME OR IP'){ 3 // authenticate the request 4 }
Deploy the Auth Server
We’ll be using Now to deploy the auth server. You can install it with the following command:
1npm install -g now
Navigate to the folder where you have the server.js file and execute now. This will ask you to enter and verify your email.
Once verified, you can add the Pusher app config to now’s secrets. Be sure to replace the values on the right side with the actual Pusher app config.
1now secret add gatsby_app_id YOUR_PUSHER_APP_ID 2 now secret add gatsby_app_key YOUR_PUSHER_APP_KEY 3 now secret add gatsby_app_secret YOUR_PUSHER_APP_SECRET 4 now secret add gatsby_app_cluster YOUR_PUSHER_APP_CLUSTER
After that, you can already deploy the auth server:
1now -e APP_ID=@gatsby_app_id -e APP_KEY=@gatsby_app_key -e APP_SECRET=@gatsby_app_secret APP_CLUSTER=@gatsby_app_cluster
The values on the left side (e.g. APP_ID) are the names for the environment variable and the values on the right side are the names you gave to the secret (e.g gatsby_app_id) earlier. This allows the auth server to access it via process.env.APP_ID.
Once deployed, you should be able to access the URL returned by now.
Create the Chat Component
Now you’re ready to work with the Chat component. First, navigate inside the Gatsby blog folder and install the dependencies:
1npm install --save pusher-js slugify random-animal-name-generator react-timeago
Here’s a summary of what each one does:
pusher-js– for communicating with Pusher.slugify– for creating a machine-friendly channel name for Pusher.random-animal-name-generator– for generating a random animal username for each user in the chat room.react-timeago– for creating human-friendly timestamps (e.g 3 minutes ago).
Once everything is installed, create an index.js file in the src/components/Chat directory. This will serve as the main file for the Chat component.
Start by importing the packages you just installed, as well as the MessageList component which we’ll be creating later:
1import React from 'react'; 2 import PropTypes from 'prop-types'; 3 4 import Pusher from 'pusher-js'; 5 import slugify from 'slugify'; 6 import randomAnimal from 'random-animal-name-generator'; 7 8 import MessageList from './MessageList'; // the component for listing messages 9 import './style.css';
Next, create the Chat component:
1class Chat extends React.Component { 2 3 constructor(props) { 4 super(props); 5 this.handleChange = this.handleChange.bind(this); // for updating the message being typed by the user 6 this.onSubmit = this.onSubmit.bind(this); 7 this.state = { 8 message: '', // the message being typed by the user 9 messages: [] // the messages that will be displayed by the MessageList component 10 } 11 12 this.user = randomAnimal(); // generate random animal name 13 } 14 // next: add code for componentWillMount() 15 }
Just before the component mounts, connect to Pusher and subscribe to the channel for the current blog post in which the component is used. Later on, we’ll be importing this component in the template used for rendering blog posts. It will then use the title of the blog post as the channel name, which means that each blog post will be a separate chat room. Only those who are currently accessing a specific blog post can send and receive messages on it.
1componentWillMount() { 2 this.pusher = new Pusher('YOUR-PUSHER-APP-ID', { 3 authEndpoint: 'https://YOUR-AUTH-SERVER-ENDPOINT', 4 cluster: 'YOUR APP CLUSTER', 5 encrypted: true // whether the connection is encrypted or not 6 }); 7 8 // subscribe to the channel for this specific blog post 9 var channel = 'private-' + slugify(this.props.title); 10 this.post_channel = this.pusher.subscribe(channel); 11 } 12 // next: add componentDidMount
Once the component is mounted, we want to listen for when a message is sent to the channel we just subscribed to. The function specified as the second argument gets executed every time someone viewing the same blog post sends a message. When this happens, we update the state so the UI is updated.
1componentDidMount() { 2 this.post_channel.bind('client-on-message', (message) => { 3 message.time = new Date(message.time); // convert to a date object since its converted to a string when sending the message 4 // update the state to include the new message 5 this.setState({ 6 messages: this.state.messages.concat(message) 7 }); 8 }); 9 } 10 // next: add render()
Next, render the actual component:
1render() { 2 return ( 3 <div className="chatbox"> 4 <div className="post-single"> 5 6 <div className="post-single__inner"> 7 <h1>Chat Component</h1> 8 <form onSubmit={this.onSubmit}> 9 <input type="text" className="text-input" placeholder="Type your message here.." 10 value={this.state.message} 11 onChange={this.handleChange} /> 12 </form> 13 { 14 this.state.messages && 15 <MessageList messages={this.state.messages} /> 16 } 17 </div> 18 </div> 19 </div> 20 ); 21 } 22 23 // next: add handleChange() function
Update the state when the value of the text field for entering the message changes:
1handleChange(e) { 2 var message = e.target.value; 3 this.setState({ 4 message: message 5 }); 6 }
When the user presses the enter key, get the current value of the text field then create an object containing the name of the user, the message and the time it was sent. Once created, send it using the trigger function. This will then cause the event listeners on any other browser tab with the same blog post open to be triggered.
1onSubmit(e) { 2 e.preventDefault(); 3 let text = this.state.message; 4 let message = { 5 by: this.user, 6 body: text, 7 time: new Date() 8 }; 9 10 this.post_channel.trigger('client-on-message', message); 11 this.setState({ 12 message: '', 13 messages: this.state.messages.concat(message) 14 }); 15 } 16 17 // next: add prop types
Don’t forget to specify the required props for this component:
1Chat.propTypes = { 2 title: PropTypes.string.isRequired 3 }; 4 5 export default Chat;
Next, create the MessageList component. This displays the list of messages sent by the users within a specific blog post:
1import React from 'react'; 2 import ReactDOM from 'react-dom'; // for working with the DOM 3 import PropTypes from 'prop-types'; 4 import TimeAgo from 'react-timeago'; // for displaying human-friendly time 5 6 class MessageList extends React.Component { 7 8 constructor(props) { 9 super(props); 10 this.renderMessages = this.renderMessages.bind(this); 11 } 12 // next: add the render() method 13 }
The render() method calls the method for rendering the messages. Below it is a div which acts as the anchor for scrolling to the bottom of the chat component. We’re setting its ref to this.messagesEnd so we can refer to this particular div whenever we need to scroll to the bottom of the component.
1render() { 2 3 return ( 4 <div className="messages"> 5 { this.renderMessages() } 6 <div ref={(el) => { this.messagesEnd = el; }}></div> 7 </div> 8 ); 9 10 } 11 // next: add the renderMessages() function
The renderMessages() function loops through the array of messages and displays them one by one:
1renderMessages(){ 2 return this.props.messages.map((msg, index) => { 3 return ( 4 <div className="msg" key={index}> 5 <div className="msg-from">{msg.by}</div> 6 <div className="msg-body">{msg.body}</div> 7 <div className="msg-time"> 8 <TimeAgo date={msg.time} minPeriod={60} /> 9 </div> 10 </div> 11 ); 12 }); 13 } 14 // next: add the scrollToBottom() function
The scrollToBottom() function selects the div at the bottom of the Chat component and scrolls down to it:
1scrollToBottom() { 2 const node = ReactDOM.findDOMNode(this.messagesEnd); 3 node.scrollIntoView({ behavior: "smooth" }); 4 }
Everytime the component is updated, we want to scroll to the bottom of it. This way the latest message is always visible:
1componentDidUpdate() { 2 this.scrollToBottom(); 3 } 4 // next: add prop types
Again, don’t forget to include the prop types:
1MessageList.propTypes = { 2 messages: PropTypes.arrayOf( 3 React.PropTypes.shape({ 4 by: PropTypes.string.isRequired, 5 body: PropTypes.string.isRequired, 6 time: PropTypes.instanceOf(Date).isRequired 7 }) 8 ) 9 }; 10 11 export default MessageList;
Lastly, create a style.css file and add the following:
1.chatbox { 2 width: 500px; 3 padding-bottom: 50px; 4 margin: 0 auto; 5 } 6 7 .text-input { 8 padding: 10px; 9 width: 100%; 10 } 11 12 .msg { 13 padding: 10px 0; 14 border-bottom: 1px solid #f7f7f7; 15 } 16 17 .msg-from { 18 font-weight: bold; 19 } 20 21 .msg-time { 22 font-size: 13px; 23 } 24 25 .msg-body { 26 font-size: 18px; 27 } 28 29 .messages { 30 min-height: 0; 31 max-height: 400px; 32 margin-top: 30px; 33 overflow: auto; 34 }
Add the Chat Component to Blog Posts
Now you’re ready to actually add the component to the blog post page. For this particular starter theme, the file you need to edit is src/templates/blog-post.js.
At the top of the file, include the Chat component:
1import Chat from '../components/Chat';
Then render it right after the Bio component, passing in the title of the blog post as a prop:
1<Chat title={post.frontmatter.title} />
Deploying the Blog
The Gatsby documentation shows you how to deploy your Gatsby blog to Amazon S3/Cloudfront or on Github Pages. Both solutions are great for hosting static sites, but they both require an account to be created and also a bit of tinkering around.
We’re going to use surge.sh instead. Surge is a service specifically created for hosting static websites for free. All you have to do is install the Surge command line tool:
1npm install -g surge
Next, tell Gatsby to build the static site:
1gatsby build
Once it’s done building the site, you can now deploy it using surge:
1surge public your-blogs-name.surge.sh
The surge command accepts the name of the folder in which the static files are stored, and the domain name as its options. Note that by default you’re stuck in the surge.sh subdomain.
If you want to use a custom domain, you can simply add a CNAME file which contains the custom domain name inside the public directory.
Once it’s done uploading, you may now access the site on the URL that you specified.
Conclusion
That’s it! In this tutorial you’ve learned how to create a realtime chat component for your Gatsby blog. As you have seen, adding realtime features to your Gatsby blog is really made simple by using Pusher.


© 2024 Pusher Ltd. All rights reserved.
Pusher Limited is a company registered in England and Wales (No. 07489873) whose registered office is at MessageBird UK Limited, 3 More London Riverside, 4th Floor, London, United Kingdom, SE1 2AQ.