- Products

- Developers
- User stories
- Blog
- Pricing

A realtime charity thermometer for GiveCamp UK
In this tutorial, we will build a realtime charity thermometer widget using Pusher, which could be used on any charity event website.
Introduction
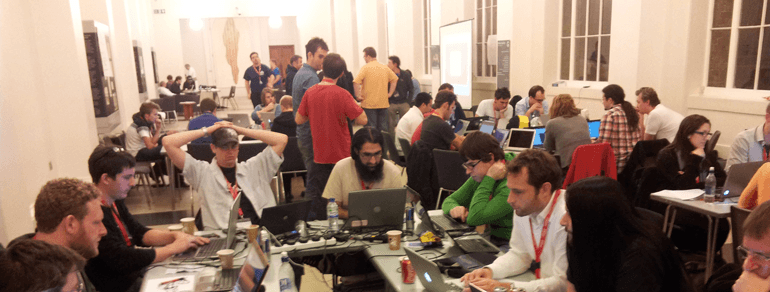
I’m excited about attending GiveCamp UK this weekend. As well as contributing by giving all attendees 3 months free access to our Startup plan I hope to help out with development where I can. I also hope that a few of the teams will decide to add some cool realtime user engaging functionality to the apps they’re building. This got me thinking about how charities might benefit from this type of functionality so I thought I’d build a demo of the most obvious use. Donation Thermometers are used at a lot of charity events. We’ve seen them during Comic Relief and Children in Need so let’s see how we could build a realtime charity thermometer widget which could be used on any charity event website.
Just want to see the demo? View the demo here, and download the code here
Accessibility is always important but potentially more so for charities so it’s important our widget at least displays something even if JavaScript isn’t enabled so we’ll progressively enhance a widget. To do this we:
- Generate the widget HTML on the server
- Stylise it using CSS
- Tweak the UI using JavaScript
- Finally we’ll use Pusher to make the widget update in realtime as new donations come in
A Cause = Beer!
For this demo we’ll need a cause to donate to. What better cause for GiveCamp UK than to buy the organisers of the event, Rachel Hawley and Paul Stack, beer to show them how much we appreciate the work that’s gone into organising the event.
Note: We obviously won’t be using real money in the demo but it’ll show them how much we would buy them ;)
Building the realtime charity thermometer HTML
For accessibility it’s good to have some textual values so for the HTML we’ll focus on that whilst adding some elements for the visual display.
If you can't see the HTML code here you can view the source of the widget below.
This creates a really simple display like this:
1<div class="thermometer-widget" data-code-target="html_code_example"> 2 3 <div class="title">GiveCamp UK</div> 4 <div class="cause">Buy Paul & Rachel beer!</div> 5 6 <div class="figures"> 7 <div class="goal"> 8 <span class="label">Our Goal</span> 9 <span class="value">£5,000</span> 10 </div> 11 <div class="current_total"> 12 <span class="label">Raised so far</span> 13 <span class="value">£3,000</span> 14 </div> 15 </div> 16 17</div> 18<br />
This isn’t very exciting but it displays the simple values.
Add a thermometer to widget using CSS
Since we are now allowed to use CSS I’m going to add a few more elements to the HTML. This doesn’t affect the look of the widget if CSS isn’t available, it just lets us add our thermometer visualisation to the display.
If you can't see the HTML code here you can view the source of the widget below.
It’s worth providing a bit of information of the structure of the HTML:
- .figures – we’ve already seen this previously. It contains the key values for the widget.
- .display – the visual thermometer display
- .display .thermometer
- .base – this is the round bulb at the bottom of the thermometer.
- .base .value – this can be used to show the textual value of the funds raised
- .middle – the outer part of the thermometer neck
- .middle .value – will fill depending on the amount raised. For the moment it has no height.
- .top – Just a curved top for the thermometer
There’s quite a lot of CSS for this so I’m not going to include it in the post. You can of course view the raw CSS file.
Note: I’m not a web designer so I’m not going to claim this looks super-awesome. I hope you agree that it does serve it’s purpose.
With the additional HTML elements and the CSS applied the widget now looks as follows:
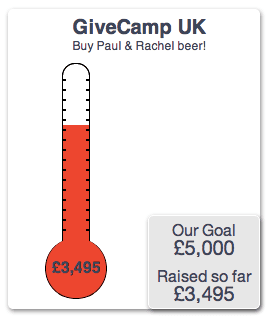
GiveCamp UK
Buy Paul & Rachel beer!
Our Goal
£5,000
Raised so far
£3,000
£3,000
You’ll see from the notes on the HTML structure above that no height has been applied to the thermometer visualisation’s .middle .value so it doesn’t correctly communicate the amount raised. Since we’re not allowed to use JavaScript yet we need to generate the height value on the server and apply and apply the height to the element. To do this we need to work out the percentage of the goal that has been raised and then work out the height in pixels to apply to the value. Here’s the PHP for this:
1$goal = 5000; 2$current_total = 3000; 3$current_percent_fraction = $current_total/$goal; // 0.6 = 60% full 4$middle_height = 165; 5$middle_height_value = $middle_height * $current_percent_fraction; // 99px
When we generate the HTML we can then put an inline style on the element:
1<div class="middle"> 2 <div class="value" style="height: 99px"></div> 3</div>
This results in the thermometer visualisation actually indicating a value:
GiveCamp UK
Buy Paul & Rachel beer!
Our Goal
£5,000
Raised so far
£3,000
£3,000
Tweaking the UI with JavaScript
JavaScript was invented and added to browsers so we could build DHTML menus. No, No, No! that’s not right. JavaScript was made available in web browsers so that we can enrich a web page or application. So, let’s enrich this widget!
Measurement Markers
We can use JavaScript to improve the widget in a few ways. The first is to improve the general look of the thermometer by adding measurement markers to the .middle of the thermometer. If we were to do this using HTML the markup would get very ugly very quickly.
In the following code we reference the .middle and .middle .value and get their height. We access the charity goal amount and current total from the UI and parse the values out using the getNumericVal function. Then using all this information we know how many marks we are going to draw on the .middle element. Then we add the elements that represent the marks.
There is a bit of setup here to access the elements, values and work out how many marks we need to draw. Because of this, and because we want to reuse this in the following examples I’ve wrapped this up in a setUp function. Now we can concentrate on just improving the UI.
1<script data-code-target="script_code_example_setup"> 2 function getNumericVal(el, selector) { 3 var el = el.find(selector); 4 var val = el.text(); 5 val = parseInt(val.replace(/D/g, ''), 10); // remove £ and commas + parse 6 return val; 7 }; 8 9 function setUp(thermometerSelector) { 10 var config = {}; 11 config.el = jQuery(thermometerSelector); 12 config.middleEl = config.el.find('.display .middle'); 13 config.middleValueEl = config.middleEl.find('.value'); 14 config.currentTotalEl = config.el.find('.current_total .value'); 15 config.numberOfMarks = parseInt(config.middleEl.height()/10, 10); 16 config.goalValue = getNumericVal(config.el, '.figures .goal .value'); 17 config.currentTotalValue = getNumericVal(config.el, '.figures .current_total .value'); 18 config.pixelsPerValue = config.middleValueEl.height()/config.currentTotalValue; 19 config.valuePerMark = config.goalValue/config.numberOfMarks; 20 21 return config; 22 } 23 24</script>
Now that we have all the elements referenced and values set up we can add the markers to the thermometer.
1<script data-code-target="script_code_example1"> 2 function addThermometerMarks(middleEl, numberOfMarks, valuePerMark) { 3 for(var i = 1; i <= numberOfMarks; ++i) { 4 var amount = parseInt(valuePerMark * i); 5 var markEl = jQuery('<div class="mark"></div>'); 6 markEl.css({'position': 'absolute', 'bottom': (i*10) + "px"}); 7 markEl.attr('title', '£' + amount); 8 var tooltip = jQuery('<div class="tooltip">£' + amount + '</div>'); 9 markEl.append(tooltip); 10 middleEl.append(markEl); 11 } 12 }; 13 14 jQuery(function() { 15 var config = setUp('.thermometer-widget.styled.js-enriched.ex1'); 16 addThermometerMarks(config.middleEl, config.numberOfMarks, config.valuePerMark); 17 }); 18</script>
Note: It would be nicer if the markers were at more rounded values but I’m not trying to build a real product, just show what’s possible
This results in the thermometer display looking like this:
GiveCamp UK
Buy Paul & Rachel beer!
Our Goal
£5,000
Raised so far
£3,000
£3,000
Marker values, hover highlights and tooltips
The thermometer markings aren’t much use if we don’t know what values they represent so let’s display the values when the user hovers over the marker elements by displaying the tooltip. We’ll also add small highlight effect. You’ll see from the previous piece of code that we’ve already got tooltip elements so now just need to show them on hover. We do this by adding a class to the marker which changes the display:none style to display:block when the user hovers over the element with their mouse. Again, check out the raw CSS for full details.
1<script data-code-target="script_code_example2"> 2 function addMarkHighlights(middleEl) { 3 middleEl.find('.mark').hover(function() { 4 var el = jQuery(this); 5 el.addClass('mark-selected'); 6 }, 7 function() { 8 var el = jQuery(this); 9 el.removeClass('mark-selected'); 10 }); 11 }; 12 13 jQuery(function() { 14 var config = setUp('.thermometer-widget.styled.js-enriched.ex2'); 15 addThermometerMarks(config.middleEl, config.numberOfMarks, config.valuePerMark); 16 addMarkHighlights(config.middleEl); 17 }); 18</script>
GiveCamp UK
Buy Paul & Rachel beer!
Our Goal
£5,000
Raised so far
£3,000
£3,000
Animate the values
The final effects that we can add is to animate the thermometer .middle .value height and the textual values by increasing from 0 to the current total.
Let’s get a utility function out of the way. It adds commas to values.
1<script data-code-target="script_code_example3"> 2 function addCommas(number) { 3 var number = number+''; var l = number.length; var out = ''; 4 var n = 0; 5 for (var i=(l-1);i>=0;i--) { 6 out = '<span class="l">'+number.charAt(i)+'</span>'+out; 7 if ((l-i)%3 == 0 ) { 8 if( i != 0) { 9 out = '<span class="lcom">,</span>'+out; 10 } 11 } 12 n++; 13 } 14 return out; 15 } 16</script>
Next, let’s animate the text. This is really just a visual thing. It doesn’t need to be too clever so we’ll just increment the value every 50ms by a calculated amount. We’re also going to return the setInterval identifier so that it can be cleared elsewhere if required.
1<script data-code-target="script_code_example_animateText"> 2 function animateText(el, fromValue, toValue) { 3 var total = fromValue; 4 var interval = setInterval(function() { 5 if(total < toValue) { 6 // 2000ms for the animation, we update every 50ms 7 total += parseInt((toValue-fromValue) / (2000/50)); 8 total = Math.min(total, toValue); 9 el.html('£' + addCommas(total)); 10 } 11 else { 12 clearInterval(interval); 13 } 14 }, 50); 15 return interval; 16 }; 17</script>
Now let’s animate the thermometer visualisation. This is really easy thanks to the jQuery.animate function.
1<script data-code-target="script_code_example_animateThermometer"> 2 function animateThermometer(valueEl, fromHeight, toHeight, totalEl, totalValue, callback) { 3 // animate down really quickly. If a users sees it then it won't look too bad. 4 valueEl.animate({'height': fromHeight + 'px'}, 'fast', function() { 5 // animate back up slowly. Cool! 6 valueEl.animate({'height': toHeight}, '2000', function() { 7 totalEl.html('£' + addCommas(totalValue)); 8 callback(); 9 }); 10 }); 11 } 12</script>
Finally, let’s link all these functions up and fully stylise and animate the thermometer. We’ll also shift some of the comment setup calls into an addBehaviours function.
1<script data-code-target="script_code_example_animateValues"> 2 function animateValues(valueEl, totalEl, fromValue, toValue, goalValue, pixelsPerValue) { 3 var fromHeight = pixelsPerValue*fromValue; 4 var toHeight = Math.min(pixelsPerValue*toValue, pixelsPerValue*goalValue); 5 var interval = animateText(totalEl, fromValue, toValue); 6 animateThermometer(valueEl, fromHeight, toHeight, totalEl, toValue, 7 function() { 8 clearInterval(interval); 9 }); 10 return interval; 11 }; 12 13 function addBehaviours(config, setInitialValues) { 14 setInitialValues = (typeof setInitialValues === 'undefined'? true: setInitialValues); 15 addThermometerMarks(config.middleEl, config.numberOfMarks, config.valuePerMark); 16 addMarkHighlights(config.middleEl); 17 if(setInitialValues) { 18 animateValues(config.middleValueEl, config.currentTotalEl, 0, 19 config.currentTotalValue, config.goalValue, config.pixelsPerValue); 20 } 21 } 22 23 jQuery(function() { 24 var config = setUp('.thermometer-widget.styled.js-enriched.ex3'); 25 addBehaviours(config); 26 }); 27 28</script>
1<script> 2function replayAnimation() { 3 var config = setUp('.thermometer-widget.styled.js-enriched.ex3'); 4 animateValues(config.middleValueEl, config.currentTotalEl, 5 0, config.currentTotalValue, config.goalValue, config.pixelsPerValue); 6 return false; 7}; 8jQuery(function() { 9 jQuery('#replay_animation').click(replayAnimation).css({'cursor': 'pointer', 'text-decoration': 'underline', 'font-weight': 'bold'}); 10}) 11</script>
To replay the animation just click here.
GiveCamp UK
Buy Paul & Rachel beer!
Our Goal
£5,000
Raised so far
£3,000
£3,000
Add realtime updates
It feels like we’ve had to work quite hard to get this far. But the awesome news is that adding realtime updates to the charity thermometer widget is super-easy.
First, let’s add the Pusher JavaScript library to the page:
1<script src="http://js.pusher.com/1.12/pusher.min.js"></script>
1<script src="http://js.pusher.com/1.12/pusher.min.js"></script>
And connect to Pusher by creating a new Pusher instance. We’ll also subscribe to a public givecampuk-channel on which a new_donation event will be bound to. This event will be triggered any time a new donation is made to the GiveCamp UK cause. The event itself will tell us who has donated, how much and what the new total is. The JSON for this will look as follows:
1{ 2 "who": "Phil Leggetter", 3 "howMuch": "20", 4 "newTotal": "3020" 5 }
Now we know this we can also create a function called animateDonation which calls our animateValues function with the updated values to display our realtime update. The code for all of the above is as follows:
1<script data-code-target="script_code_example4"> 2 function animateDonation(middleValueEl, currentTotalEl, currentTotal, newTotal, 3 pixelsPerValue, goalValue) { 4 var newHeightPixels = parseInt(pixelsPerValue * newTotal, 10); 5 return animateValues(middleValueEl, currentTotalEl, currentTotal, newTotal, 6 goalValue, pixelsPerValue); 7 }; 8 9 jQuery(function() { 10 var config = setUp('.thermometer-widget.styled.js-enriched.ex4'); 11 addBehaviours(config, false); 12 13 var pusher = new Pusher("006c79b1fe1700c6c10d"); 14 var channel = pusher.subscribe('givecampuk-channel'); 15 var animateInterval = null; 16 channel.bind('new_donation', function(data) { 17 if(animateInterval) { 18 clearInterval(animateInterval); 19 } 20 var newTotal = data.newTotal; 21 var currentTotalValue = getNumericVal(config.el, '.figures .current_total .value'); 22 animateInterval = animateDonation(config.middleValueEl, config.currentTotalEl, currentTotalValue, 23 newTotal, config.pixelsPerValue, config.goalValue); 24 }); 25 }); 26</script>
The animateDonation function returns the animation interval which gives us the opportunity to cancel an ongoing animation if a new update comes in. This stops two animations running at the same time where we can see some really crazy things.
We’re now ready to create the code that triggers the update. I’m going to use PHP, and the Pusher PHP library by Squeeks, for this but it’s really simple to achieve the same thing in other languages using one of the Pusher Server libraries. I’m going to create a web service that allows donations to be made. It’ll just who and a how_much parameters. We’ll store this data in a database and update the running total. Here’s the code for that before we add the Pusher code.
1require('config.php'); 2 3 $con = mysql_connect("localhost", $db_username, $db_password); 4 if (!$con) 5 { 6 die('Could not connect: ' . mysql_error()); 7 } 8 mysql_select_db($db_name, $con); 9 10 $who = mysql_real_escape_string($_GET['who']); 11 $how_much = mysql_real_escape_string($_GET['how_much']); 12 13 if( !$who || !how_much || !is_numeric($how_much) ) { 14 die('unsupported who and how_much values'); 15 } 16 17 $running_total = 0; 18 $last_update = "SELECT * FROM $db_tablename ORDER BY id DESC LIMIT 1"; 19 $result = mysql_query($last_update); 20 if($result) { 21 $row = mysql_fetch_array($result); 22 $running_total = $row['running_total']; 23 } 24 25 $running_total = $running_total + $how_much; 26 27 $insert_query = "INSERT INTO givecampuk (who, how_much, running_total) "; 28 $insert_query .= "VALUES('$who', $how_much, $running_total)"; 29 30 $insert_result = mysql_query($insert_query); 31 if(!$insert_result) { 32 die('insert query failed' . mysql_error()); 33 } 34 35 mysql_close($con);
Note: The config.php include contains the database details
Now let’s add the realtime magic. All we have to do is create a Pusher instance, put the data we want to send into an array and trigger the event by calling $pusher->trigger().
1$pusher = new Pusher($key, $secret, $app_id); 2 $channel_name = 'givecampuk-channel'; 3 4 $values = array('who' => $who, 'howMuch' => $how_much, 'newTotal' => $running_total); 5 $pusher->trigger($channel_name, 'new_donation', $values);
That’s it. It’s really that easy to trigger a realtime event. And since we’ve done all the hard work on the client the realtime charity thermometer updates in realtime. Here’s the working widget and a form that lets you do your own donation and also reset the running total. When you submit the form a JavaScript event handler will capture the event and call our web service..
GiveCamp UK
Buy Paul & Rachel beer!
Our Goal
£5,000
Raised so far
£3,000
£3,000
Who
How Much
Reset?
Why not share this link around and get others to donate so you can see the updates in realtime without triggering them yourself?
Summary
So, what have we achieved?
- Progressively enhanced a widget which starts it’s life as static boring HTML.
- Added CSS and a few extra HTML elements to turn the widget into something more more visually appealing
- Used JavaScript to update the UI further by adding markers which would turn the HTML into a mess and added animations
- Used Pusher to add realtime updates to the widget so whenever a new donation comes in the values update
The really interesting thing is that adding the realtime components to the widget took a fraction of the time in comparison to everything else. So, if you’ve already got a dynamic application it’s really simple to add a sprinkling of realtime magic to enhance that application even further and make it much more engaging.
If you have any thoughts or questions about this please leave a comment or [send me an email](mailto:phil@pusher.com?subject=GiveCampUK Charity Thermometer Widget).
Where next?
I really like this little widget. I’d love to see it become a real widget so I’ll try and take out all the code from this post, including the back-end components, and put it all up in github.
Note: Tested in IE9 on Windows 7, Chrome 14 on Mac OS X 10.6.8 and Firefox 7.0.1 on Mac OS X 10.6.8


© 2024 Pusher Ltd. All rights reserved.
Pusher Limited is a company registered in England and Wales (No. 07489873) whose registered office is at MessageBird UK Limited, 3 More London Riverside, 4th Floor, London, United Kingdom, SE1 2AQ.